실전 HTML5 & CSS동영상강좌_09강_CSS 기본-IV
↓제대로 출력안되니까 다시 확인 first.html파일임
<!DOCTYPE html>
<html>
<head>
<meta charset="EUC-KR">
<title></title>
<style>
#wrap {
width: 800px;
margin: 0 auto;
}
#header {
border-bottom: 1px solid #cccccc;
}
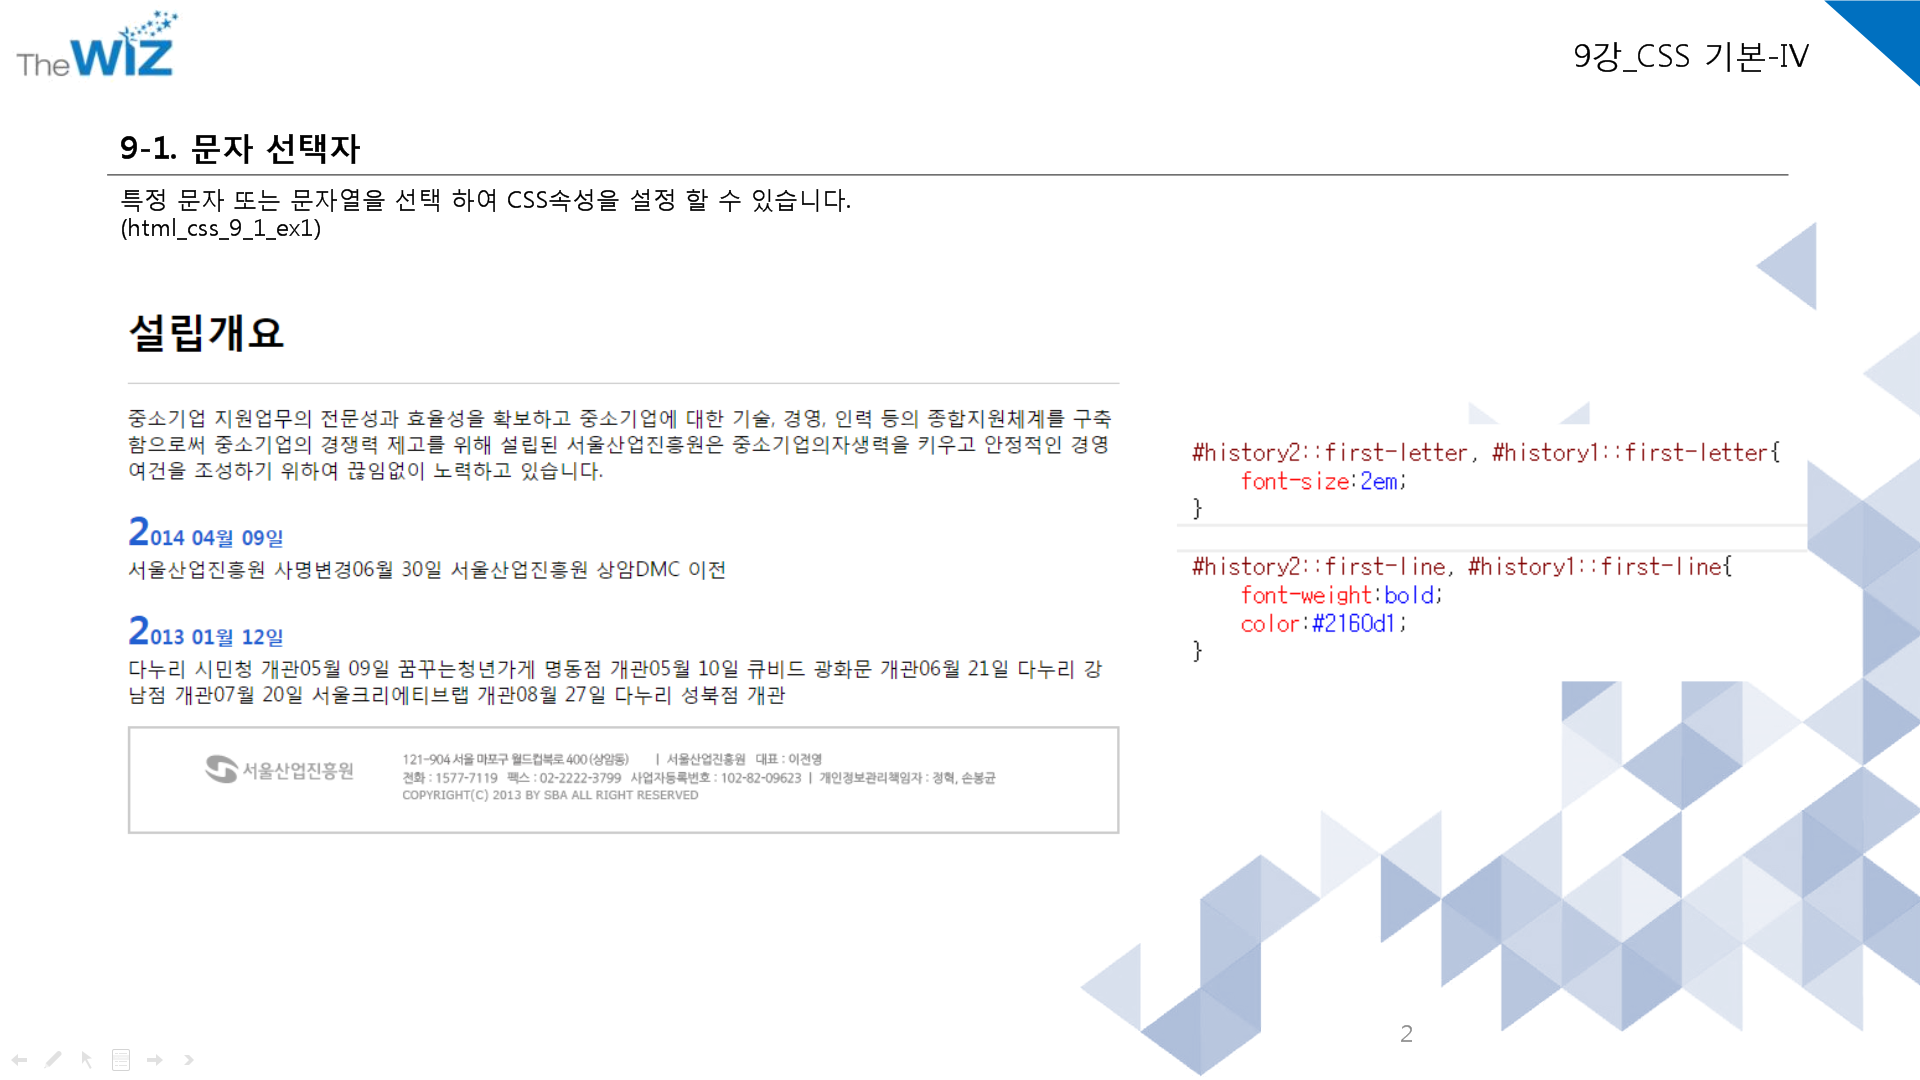
#content p:first-child::selection { /* 이부분이 드래그하면 다른색*/
background-color: blue;
color: yellow
}
#history2:first-letter, #history1:first-letter {
font-size: 2em;
}
#histroy2:first-line, #history1:first-line {
font-weight: bold;
color: #2160d1;
}
#footer ul {
overflow: hidden;
border: 2px solid #cccccc;
}
#footer ul li {
list-style: none;
float: left;
padding: 20px;
}
</style>
</head>
<body>
<div id="wrap">
<div id="header">
<h1>설립개요</h1>
</div>
<div id="content">
<p>중소기업 지원업무의 전문성과 효율성을 확보하고 중소기업에 대한 기술, 경영, 인력 등의 종합지원체계를
구축함으로써 중소기업의 경쟁력 제고를 위해 설립된 서울산업진흥원은 중소기업의자생력을 키우고 안정적인 경영여건을 조성하기
위하여 끊임없이 노력하고 있습니다.</p>
<p id="history2">
2014 04월 09일<br />서울산업진흥원 사명변경06월 30일 서울산업진흥원 상암DMC 이전
</p>
<p id="history1">
2013 01월 12일<br />다누리 시민청 개관05월 09일 꿈꾸는청년가게 명동점 개관05월 10일 큐비드 광화문
개관06월 21일 다누리 강남점 개관07월 20일 서울크리에티브랩 개관08월 27일 다누리 성북점 개관
</p>
</div>
<div id="footer">
<ul>
<li><img
src="http://www.sba.seoul.kr/kr/images/footer/f_logo.png"></li>
<li><img
src="http://www.sba.seoul.kr/kr/images/footer/copyright.png"></li>
</ul>
</div>
</div>
</body>
</html>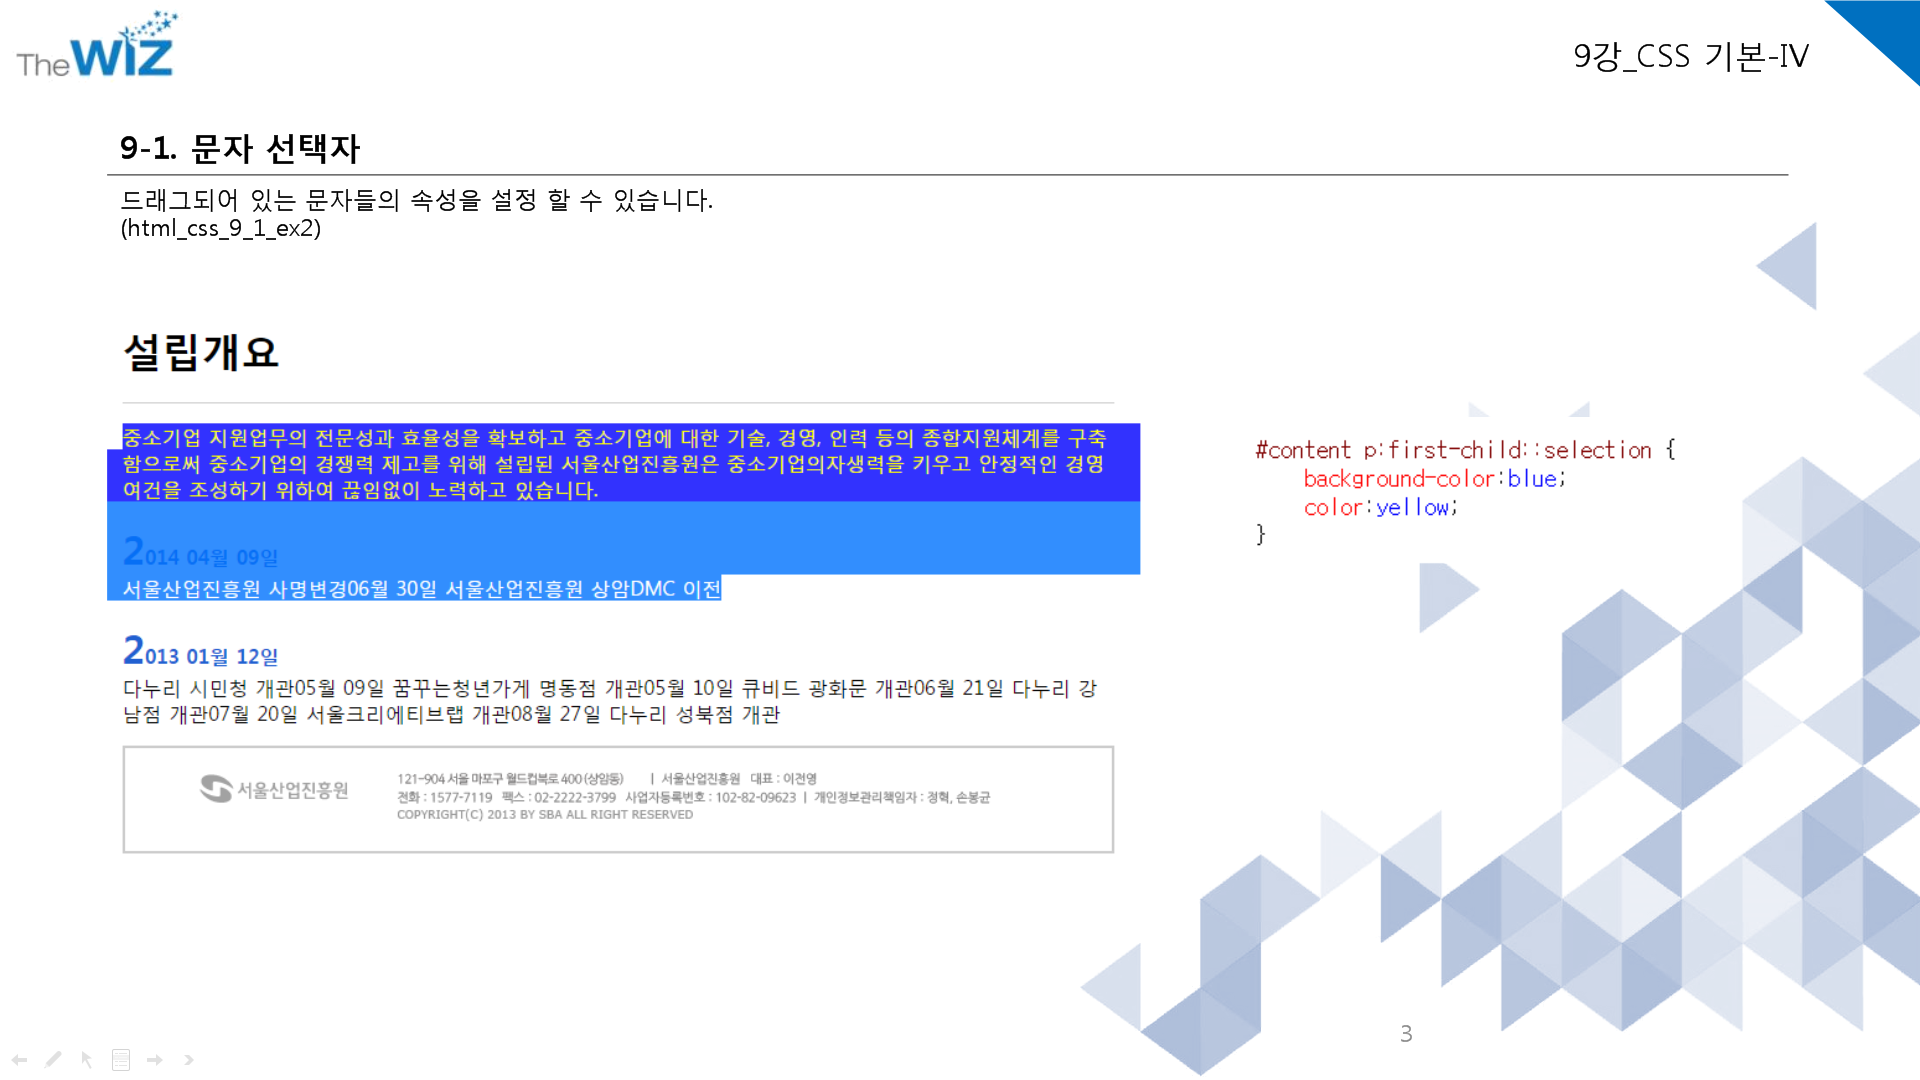
<!DOCTYPE html>
<html lang="en" xmlns="http://www.w3.org/1999/xhtml">
<head>
<meta charset="utf-8" />
<title></title>
<style>
#wrap {
width:800px;
margin:0 auto;
}
#header {
border-bottom:1px solid #cccccc;
}
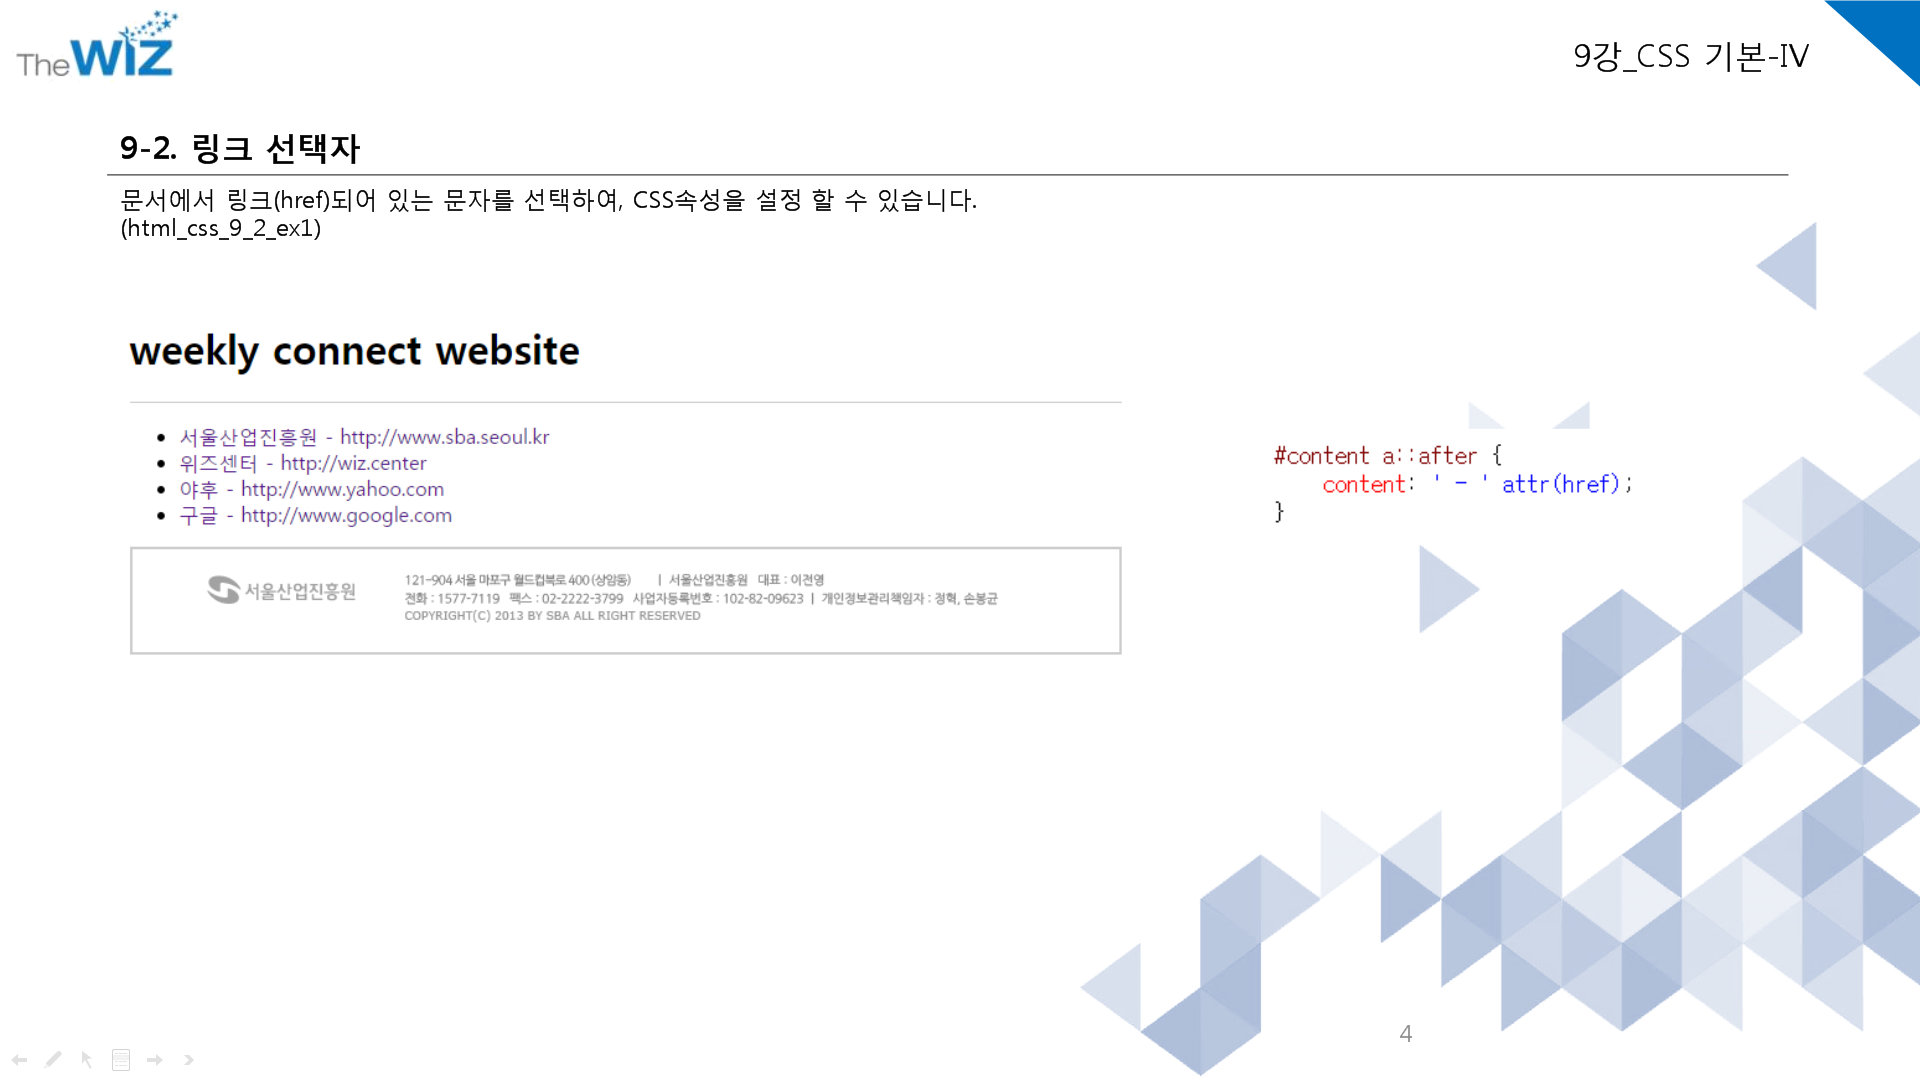
#content a {
text-decoration:none;
}
#content a::after {
content: ' - ' attr(href);
}
#footer ul {
overflow:hidden;
border:2px solid #cccccc;
}
#footer ul li {
list-style:none;
float:left; padding:20px;
}
</style>
</head>
<body>
<div id="wrap">
<div id="header">
<h1>weekly connect website</h1>
</div>
<div id="content">
<ul>
<li><a href="http://www.sba.seoul.kr" target="_blank">서울산업진흥원</a></li>
<li><a href="http://wiz.center" target="_blank">위즈센터</a></li>
<li><a href="http://www.yahoo.com" target="_blank">야후</a></li>
<li><a href="http://www.google.com" target="_blank">구글</a></li>
</ul>
</div>
<div id="footer">
<ul>
<li><img src="http://www.sba.seoul.kr/kr/images/footer/f_logo.png"></li>
<li><img src="http://www.sba.seoul.kr/kr/images/footer/copyright.png"></li>
</ul>
</div>
</div>
</body>
</html> #content a::after {
content: ' - ' attr(href);
}// 여기서 #content랑 밑에 content는 다르다!
뒤에 targer="_bland"의미
_blank
새 윈도우 창을 열어서, 웹페이지를 엶.
_self
현재 윈도우창에서 링크된 웹페이지 엶.
_parent // 아직 안배움
현재 프레임의 부모 프레임에서 새웹페이지가 열립니다.
만약 어떤 창 A에서 창 B를 새로 열었습니다. 그런데 창 B에서 _parent로 창을 열면 창 A에서 열리게 되는 것이죠.
_top //아직 안배움
최상위 프레임에서 열립니다. _parent와 비슷한데요. _parent는 바로 이전창(부모창)에서 열리는 반면
_top은 최상위( 가장 최고 부모)창에서 열립니다.
<!DOCTYPE html>
<html lang="en" xmlns="http://www.w3.org/1999/xhtml">
<head>
<meta charset="utf-8" />
<title></title>
<style>
#wrap {
width: 800px;
margin: 0 auto;
}
#header {
border-bottom: 1px solid #cccccc;
}
#content a {
text-decoration: none;
}
#content a::after {
content: ' - ' attr(href);
}
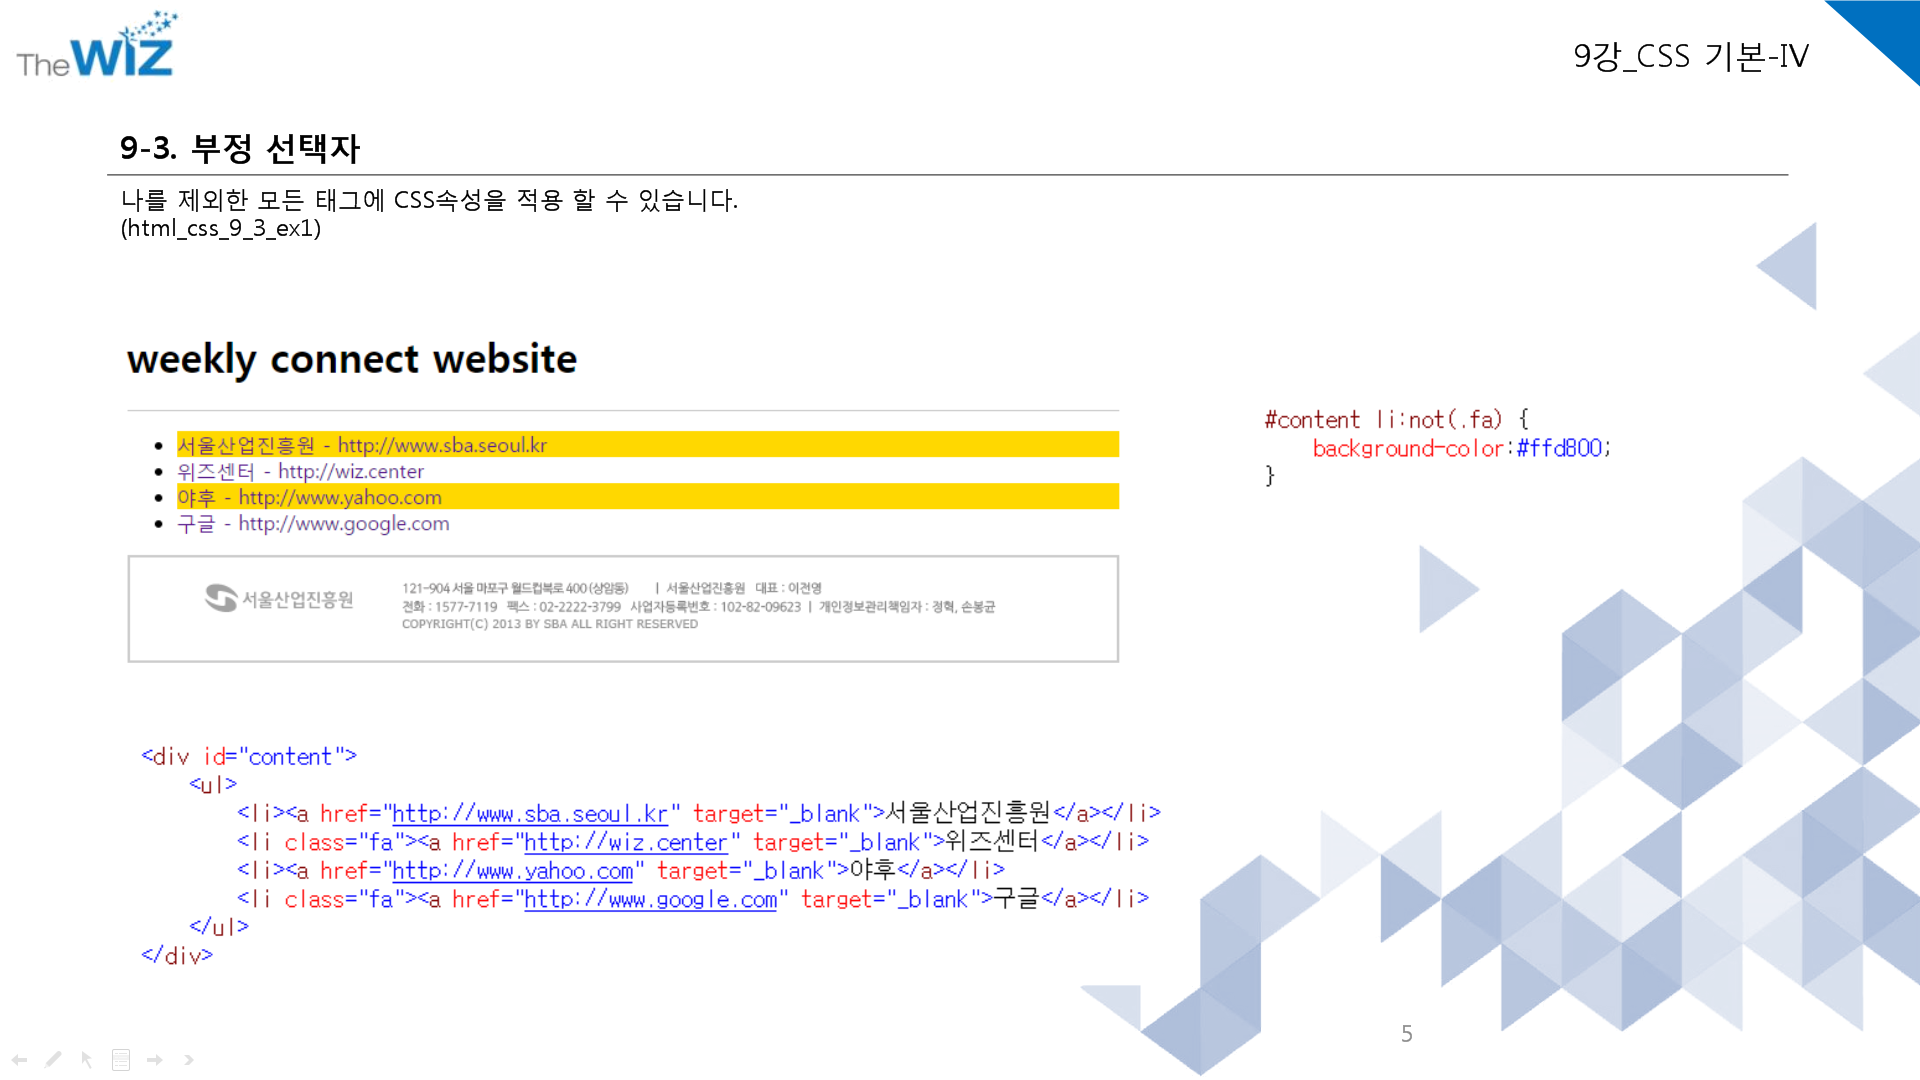
#content li:not(.fa) {
background-color: #ffd800;
}
#footer ul {
overflow: hidden;
border: 2px solid #cccccc;
}
#footer ul li {
list-style: none;
float: left;
padding: 20px;
}
</style>
</head>
<body>
<div id="wrap">
<div id="header">
<h1>weekly connect website</h1>
</div>
<div id="content">
<ul>
<li><a href="http://www.sba.seoul.kr" target="_blank">서울산업진흥원</a></li>
<li class = "fa"><a href="http://wiz.center" target="_blank">위즈센터</a></li>
<li><a href="http://www.yahoo.com" target="_blank">야후</a></li>
<li class = "fa"><a href="http://www.google.com" target="_blank">구글</a></li>
</ul>
</div>
<div id="footer">
<ul>
<li><img
src="http://www.sba.seoul.kr/kr/images/footer/f_logo.png"></li>
<li><img
src="http://www.sba.seoul.kr/kr/images/footer/copyright.png"></li>
</ul>
</div>
</div>
</body>
</html>#content li:not(.fa) {
background-color: #ffd800;
}
<li class = "fa"><a href="주소값">
<li><a href="주소값">
실전 HTML5 & CSS동영상강좌_10강_CSS 속성-I

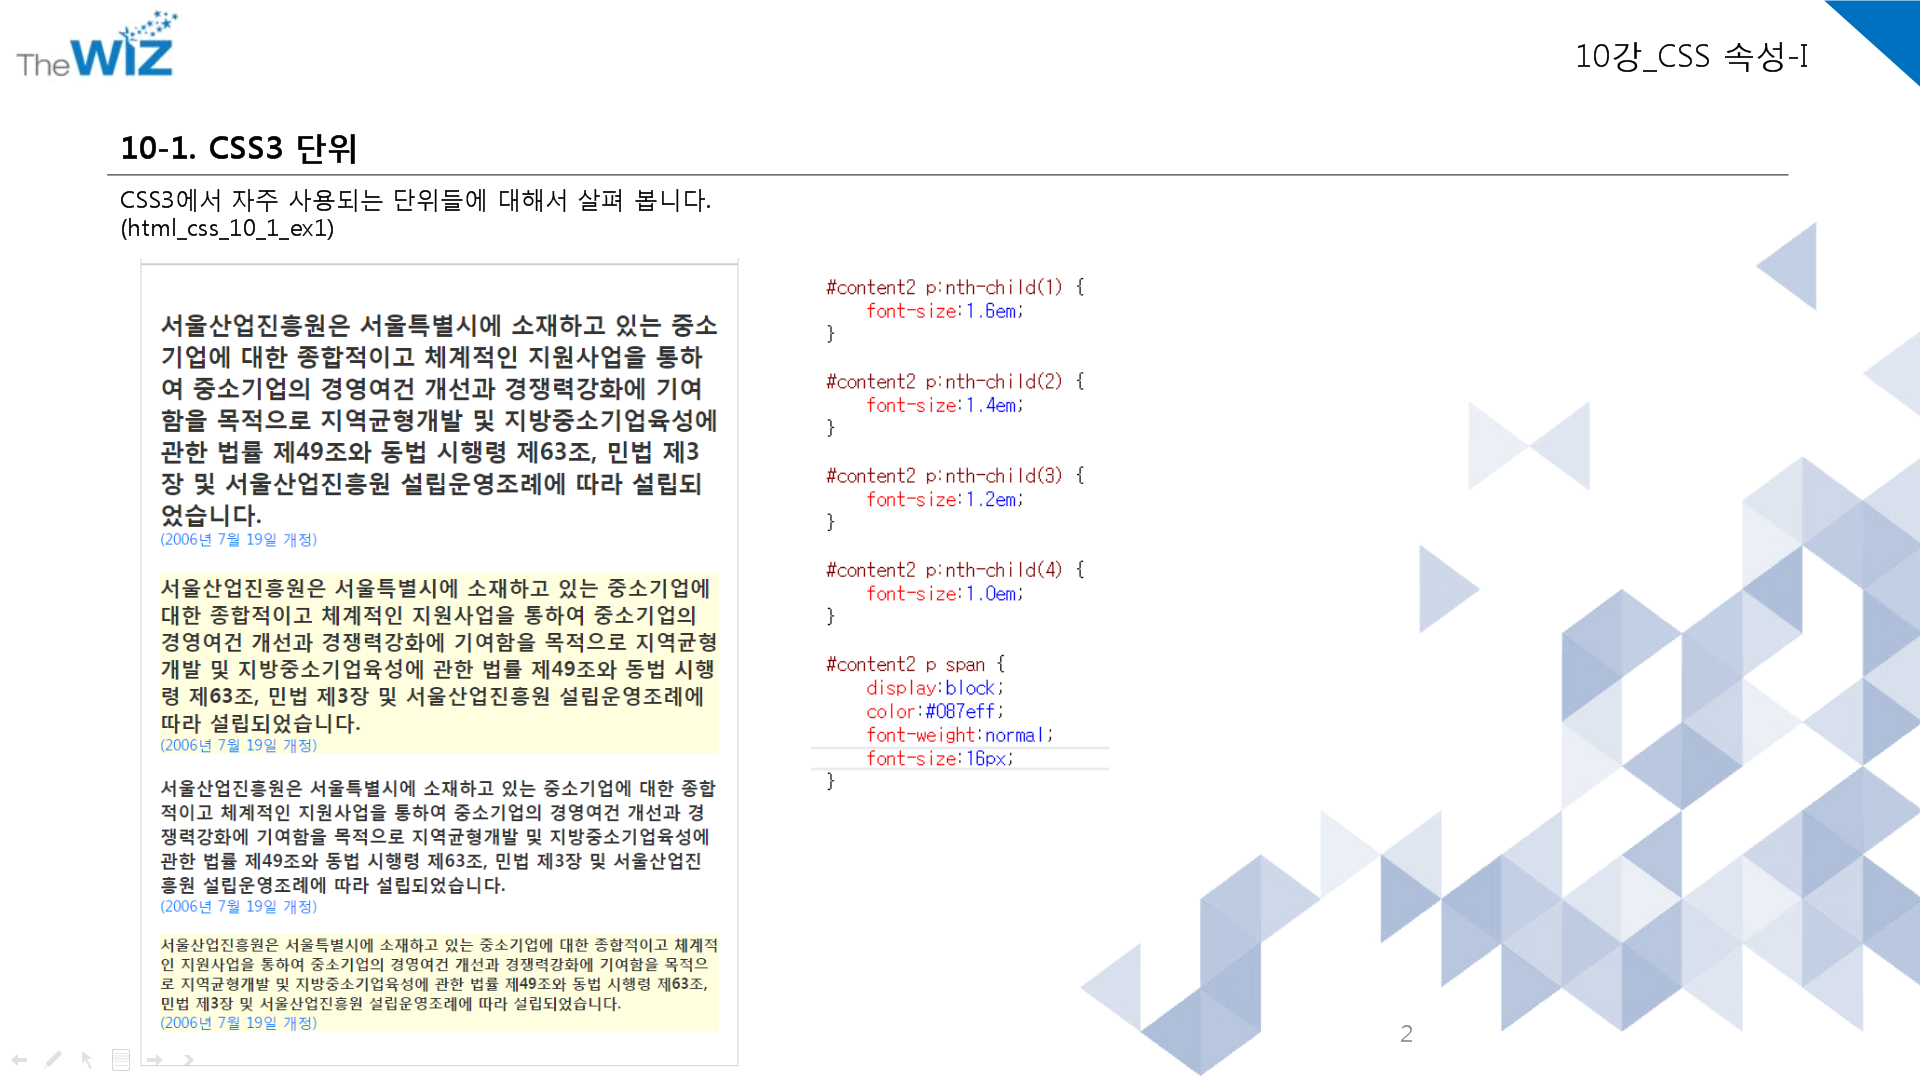
em : 16px을 기준으로함.
8px은 0.5em
#content가있다는것 →해당 아이디가있다.
margin:0 auto; 뜻: 센터에 온다.
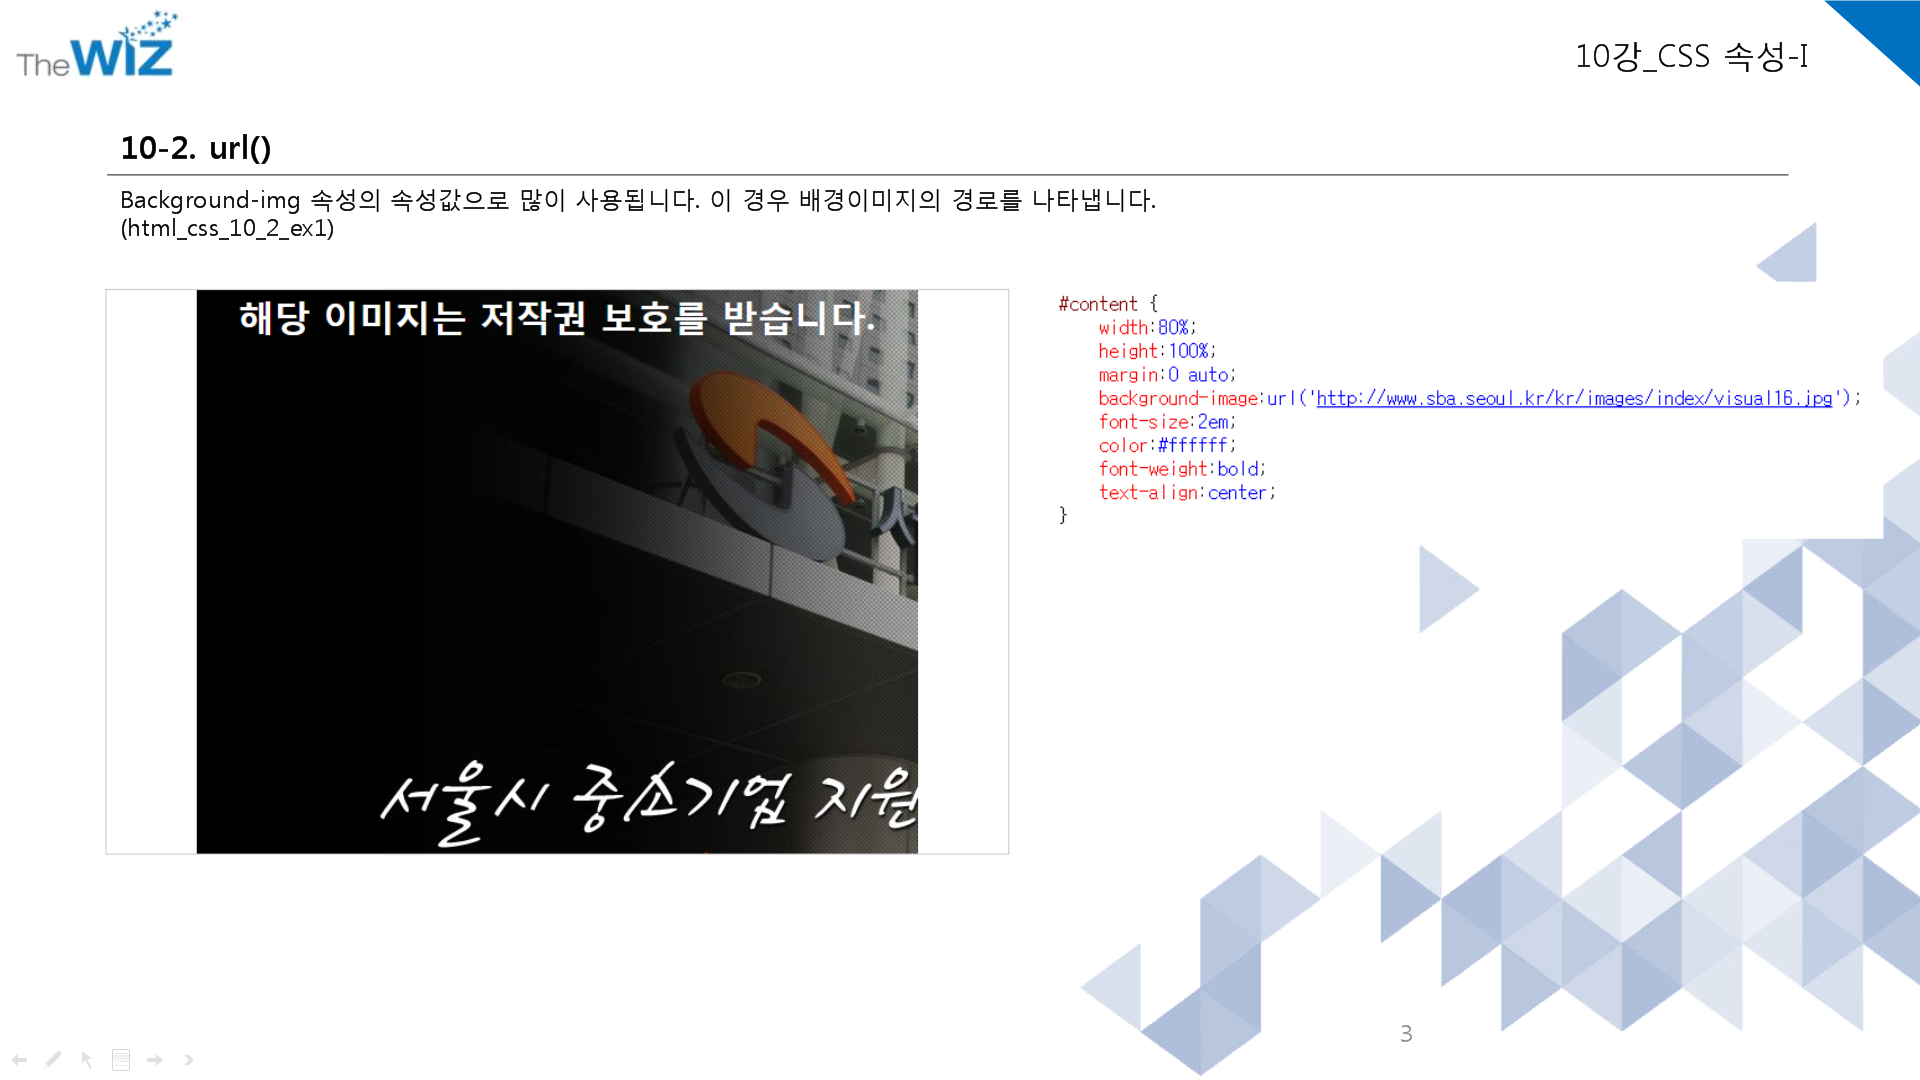
width:80% 는 전체화면에서 80%채우겠다.
100%는 100%로 채우겠다.
background-image : url('http://~~~'); -이렇게 이미지 바로 백그라운드에 넣을 수 있다.
div -block
il(인라인) - nonblock
<!DOCTYPE html>

<html lang="en" xmlns="http://www.w3.org/1999/xhtml">
<head>
    <meta charset="utf-8" />
    <title></title>

    <style>

        body div:nth-child(1) {
            width:100px;
            height:100px;
            background-color:#ff0000;
            color:#ffffff;
            font-weight:bold;
            text-align:center;
        }

        body div:nth-child(2) {
            width:100px;
            height:100px;
            background-color:#00ff00;
            color:#ffffff;
            font-weight:bold;
            text-align:center;
        }

        body div:nth-child(3) {
            width:100px;
            height:100px;
            background-color:#0000ff;
            color:#ffffff;
            font-weight:bold;
            text-align:center;
        }

        body div:nth-child(4) {
            width:100px;
            height:100px;
            background-color:#ff0000;
            color:#ffffff;
            font-weight:bold;
            text-align:center;
        }

        body div:nth-child(5) {
            width:100px;
            height:100px;
            background-color:#00ff00;
            color:#ffffff;
            font-weight:bold;
            text-align:center;
            display:inline;
            margin:10px 10px 10px 10px;
        }

        body div:nth-child(6) {
            width:100px;
            height:100px;
            background-color:#0000ff;
            color:#ffffff;
            font-weight:bold;
            text-align:center;
            display:inline;
        }
        body div:nth-child(7) {
            width:100px;
            height:100px;
            background-color:#ff0000;
            color:#ffffff;
            font-weight:bold;
            text-align:center;
            display:none;
        }
        body div:nth-child(8) {
            width:100px;
            height:100px;
            background-color:#00ff00;
            color:#ffffff;
            font-weight:bold;
            text-align:center;
            display:inline;
        }
        body div:nth-child(9) {
            width:100px;
            height:100px;
            background-color:#0000ff;
            color:#ffffff;
            font-weight:bold;
            text-align:center;
            display:inline-block;
        }

    </style>

</head>
<body>

    <div>
        content1
    </div>
    <div>
        content2
    </div>
    <div>
        content3
    </div>

    <div>
        content4
    </div>
    <div>
        content5
    </div>
    <div>
        content6
    </div>
    <div>
        content7
    </div>
    <div>
        content8
    </div>
    <div>
        content9
    </div>

</body>
</html>
↑inline-block의 속성은?
       body div:nth-child(9) {
            width:100px;
            height:100px;
            background-color:#0000ff;
            color:#ffffff;
            font-weight:bold;
            text-align:center;
            display:inline-block;
        }
margin : 외부에 공백 주는것. 10이면 10씩 겉에 공백주는것.
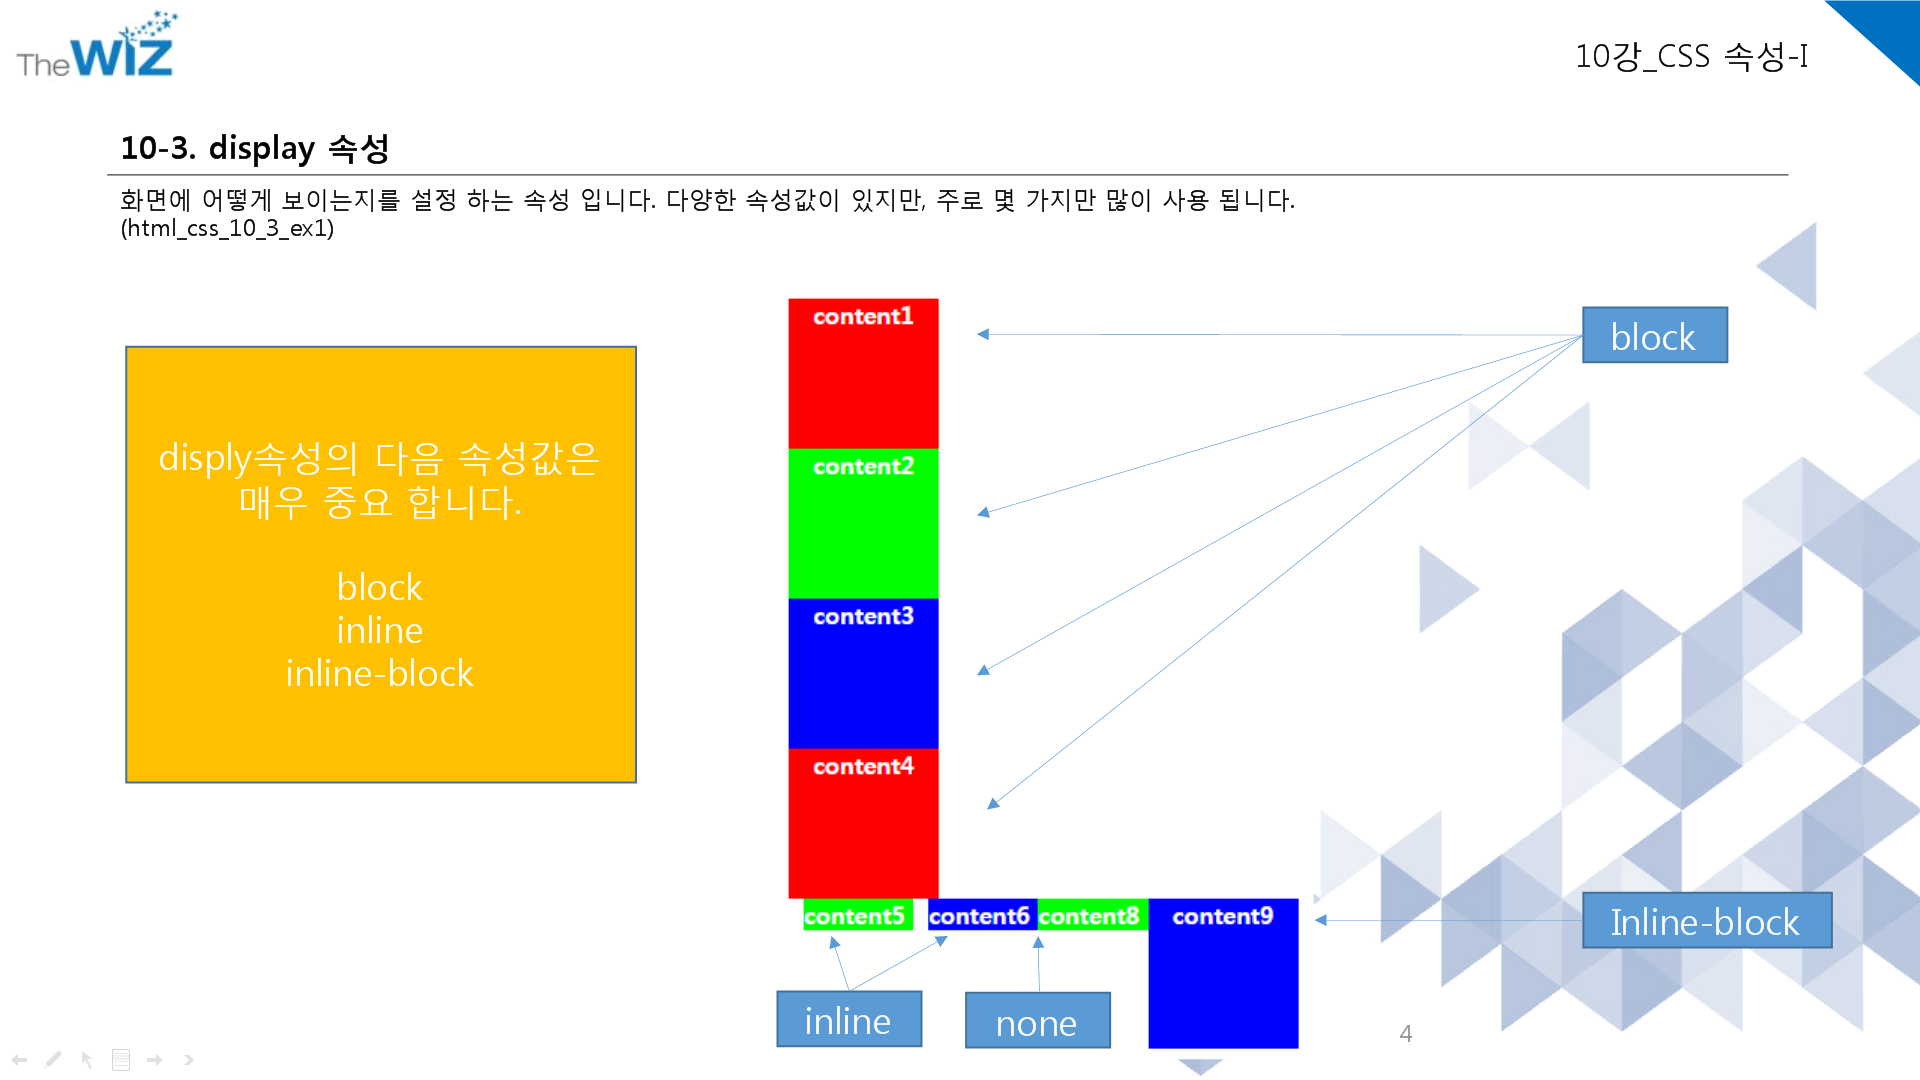
display속성은 이거 3개 중 하나가 쓰인다. 특징 차이점 꼭 알기
block, inline, inline-block
block - 개행
inline - 개행X
inline에서는 width와 height가 먹히지 않는다.
block은 그 모양만주고 개행되는 것이아니라 줄의 옆 공백까지 전부 차지. 그래서 공백이 있어도 다른값이 넣어지지않는다. -그래서 width, height 이런거 적용 안된다.(inline도) padding,margin만 적용됨. --밑에 궁금증 이어짐
F12 - Elements에 들어가면 해당 그림이 가진 태그들 알수있음
여기서 content9에 마우스갖다대면 content9값만 가짐(다른위에 content1,2,3,4는 줄 전부 차지). 그래서 다음 그림이 와도 바로 옆에 붙을 수 있다.
content9(inline-block)은 왜 자기 값만 가지는지? 그게 inline-block의 특징이다.
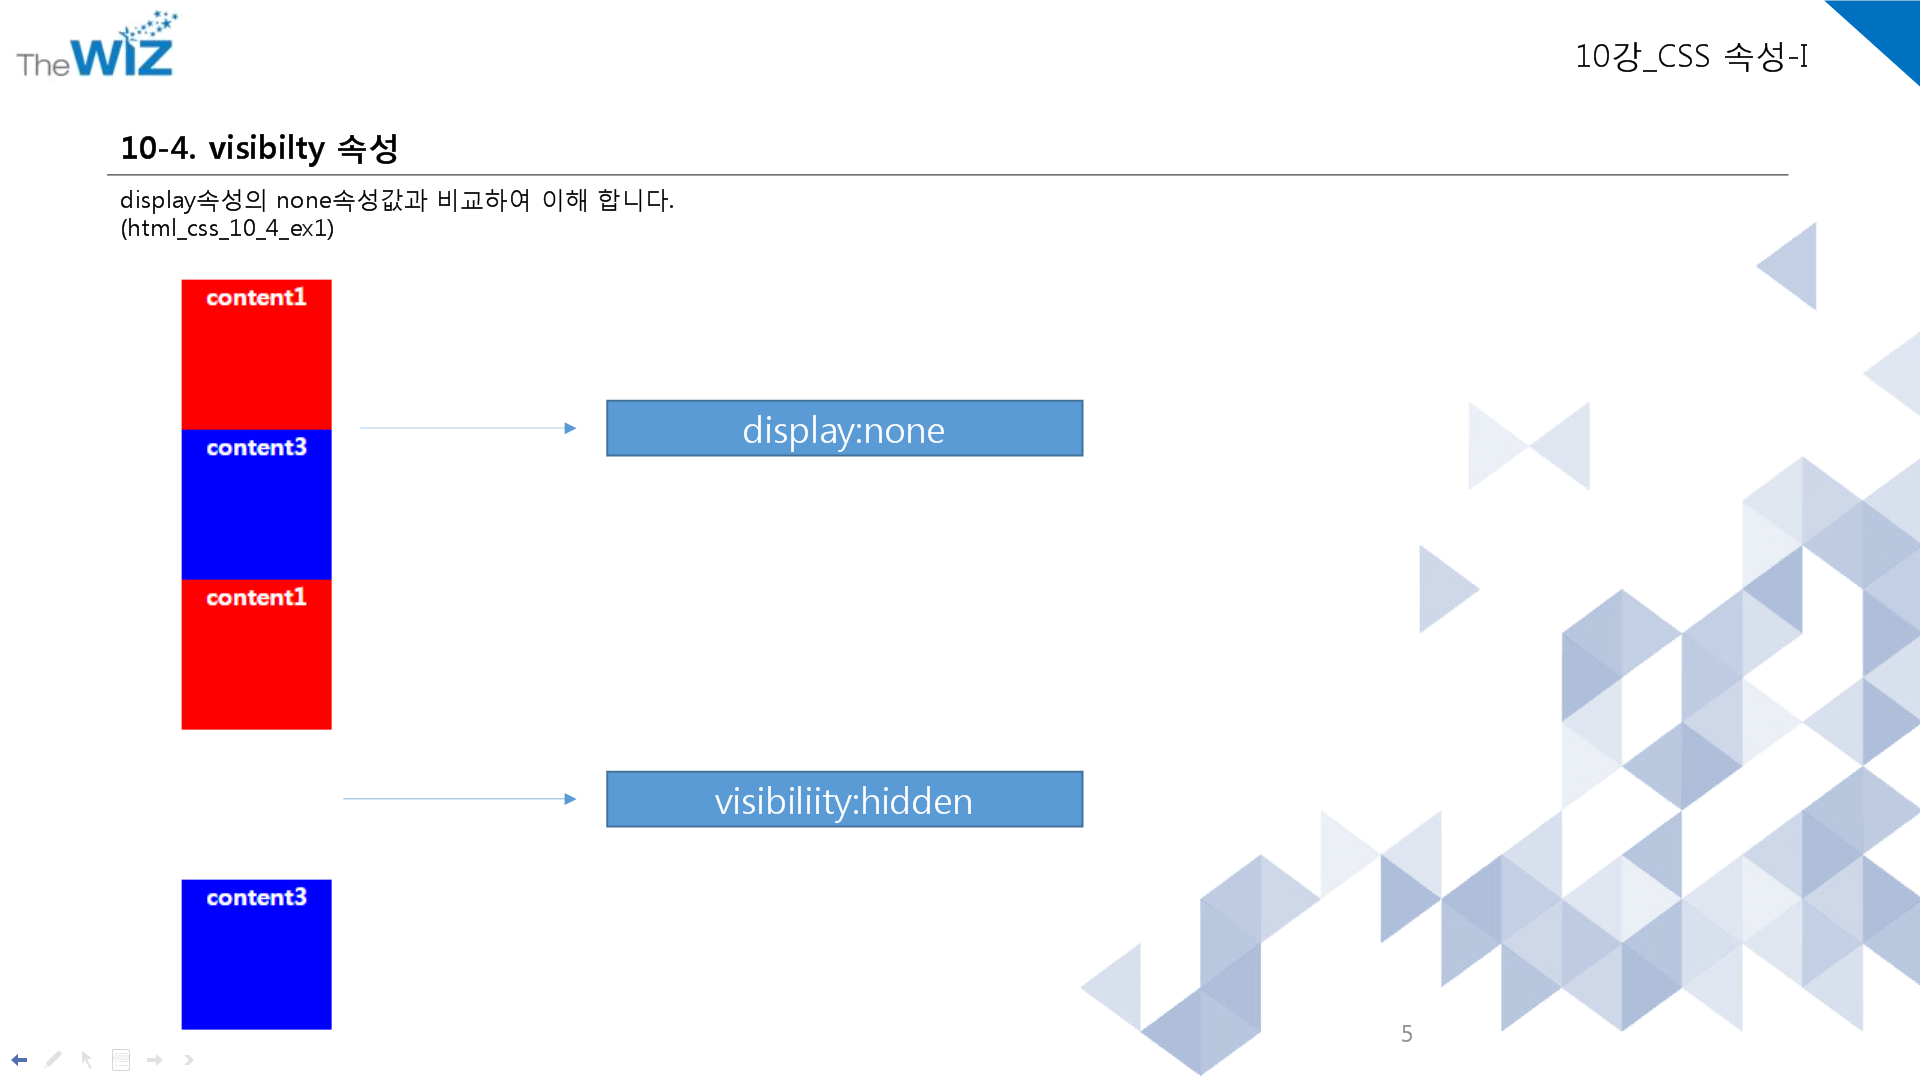
display:none; - 숨기는것. 공간 차지x
visibility:hidden; - 숨기는것. 공간은 차지함
<!DOCTYPE html>

<html lang="en" xmlns="http://www.w3.org/1999/xhtml">
<head>
    <meta charset="utf-8" />
    <title></title>

    <style>

        #display_none div:nth-child(1) {
            width:100px;
            height:100px;
            background-color:#ff0000;
            color:#ffffff;
            font-weight:bold;
            text-align:center;
        }

        #display_none div:nth-child(2) {
            width:100px;
            height:100px;
            background-color:#00ff00;
            color:#ffffff;
            font-weight:bold;
            text-align:center;
            display:none;
        }

        #display_none div:nth-child(3) {
            width:100px;
            height:100px;
            background-color:#0000ff;
            color:#ffffff;
            font-weight:bold;
            text-align:center;
        }


        #visibility_hidden div:nth-child(1) {
            width:100px;
            height:100px;
            background-color:#ff0000;
            color:#ffffff;
            font-weight:bold;
            text-align:center;
        }

        #visibility_hidden div:nth-child(2) {
            width:100px;
            height:100px;
            background-color:#00ff00;
            color:#ffffff;
            font-weight:bold;
            text-align:center;
            visibility:hidden;
        }

        #visibility_hidden div:nth-child(3) {
            width:100px;
            height:100px;
            background-color:#0000ff;
            color:#ffffff;
            font-weight:bold;
            text-align:center;
        }

    </style>

</head>
<body>
    <div id="display_none">
        <div>
            content1
        </div>
        <div>
            content2
        </div>
        <div>
            content3
        </div>
    </div>

    <div id="visibility_hidden">
        <div>
            content1
        </div>
        <div>
            content2
        </div>
        <div>
            content3
        </div>
    </div>

</body>
</html>

↑display속성을 inline-block으로 줘서 width, height값 적용되게 함
opacity CSS 속성은 요소의 불투명도를 설정
***헷갈리는 거 다시 복습
width와 height 속성은 각각 가로 길이, 세로 길이를 의미합니다.
값을 정의 할때는 “100px” 처럼 숫자 뒤에 단위를 표시하여 적습니다.
(px는 픽셀 이라는 의미의며 ‘50%’ 처럼 ‘%’ 단위를 사용 할 수도 있음)
<span> 태그등 inline 요소는 적용 되지 않는데, 이는 display 속성에서 다시한번 다룹니다.
block
div 태그, p 태그, h 태그#, li 태그 등이 이에 해당됩니다.
기본적으로 가로 영역을 모두 채우며, block 요소 다음에 등장하는 태그는 줄바꿈이 된 것처럼 보입니다. 이는 word 같은 문서에서 문단을 표시할 때, 한 문단이 끝난 뒤에 나타나는 요소는 항상 다음 줄에 표시되던 것과 비슷한 맥락입니다.
width(가로), height(세로) 속성을 지정 할 수 있으며, block 요소 뒤에 등장하는 태그가 그 이전 block 요소에 오른쪽에 배치될 수 있어도 항상 다음 줄에 렌더링됩니다.
inline
span 태그, b 태그, i 태그, a 태그 등이 이에 해당됩니다.
block 과 달리 줄 바꿈이 되지 않고, width와 height를 지정 할 수 없습니다. word 같은 문서에서 볼드, 이탤릭, 색상, 밑줄 등 글자나 문장에 효과를 주기 위해 존재하는 단위라고 할 수 있습니다. 문서에서 특정 부분에 색상을 입힌다고 다음에 나오는 글이 줄바꿈 되지 않듯이 inline 요소 뒤에 나오는 태그 또한 줄바꿈 되지 않고 바로 오른쪽에 표시됩니다.
inline-block
block과 inline의 중간 형태라고 볼 수 있는데, 줄 바꿈이 되지 않지만 크기를 지정 할 수 있습니다.
Internet Explorer 7 이하에서는 사용할 수 없습니다.
jdk
저번시간까진 servlet
오늘부터 jsp
jsp_lecture_09

jsp는 servlet이다.

동적문서, 정적문서 차이 -특히 동적문서는 반드시 이해
Servlet은 Javav언어를 이용하여 문서를 작성하고, 출력객체를 이용하여 HTML코드를 삽입하였습니다.
JSP는 Servlet과 반대로 HTML코드에 JAVA언어를 삽입하여 동적 문서를 만들 수 있습니다.
HTML코드안에 JAVA코드를 삽입하기 위해서는 태그를 이용해야 하며, 이러한 태그를 공부해야 합니다.
시계를 예로 들면
그냥 <p>현재시간 : 2020-12-31-04:55:56<p> 으로 넣으면 언제들어가도 저 상태이다. = 정적페이지
계속 시간이 바뀌는 동적페이지로 만드려면? →프로그래밍을 해주면된다.(전에 했던 캘린더 코드 처럼)
html은 정적페이지. jsp는 동적페이지(java를 통해서 날짜를 집어넣을 수 있다.)
페이지를 동적으로 만드는 것들 종류:
jsp, asp(c#)-거의사용x, php //이렇게 3가지 + java script(얘는 클라이언트도 사용가능)
<% %> jsp태그라고 생각하기
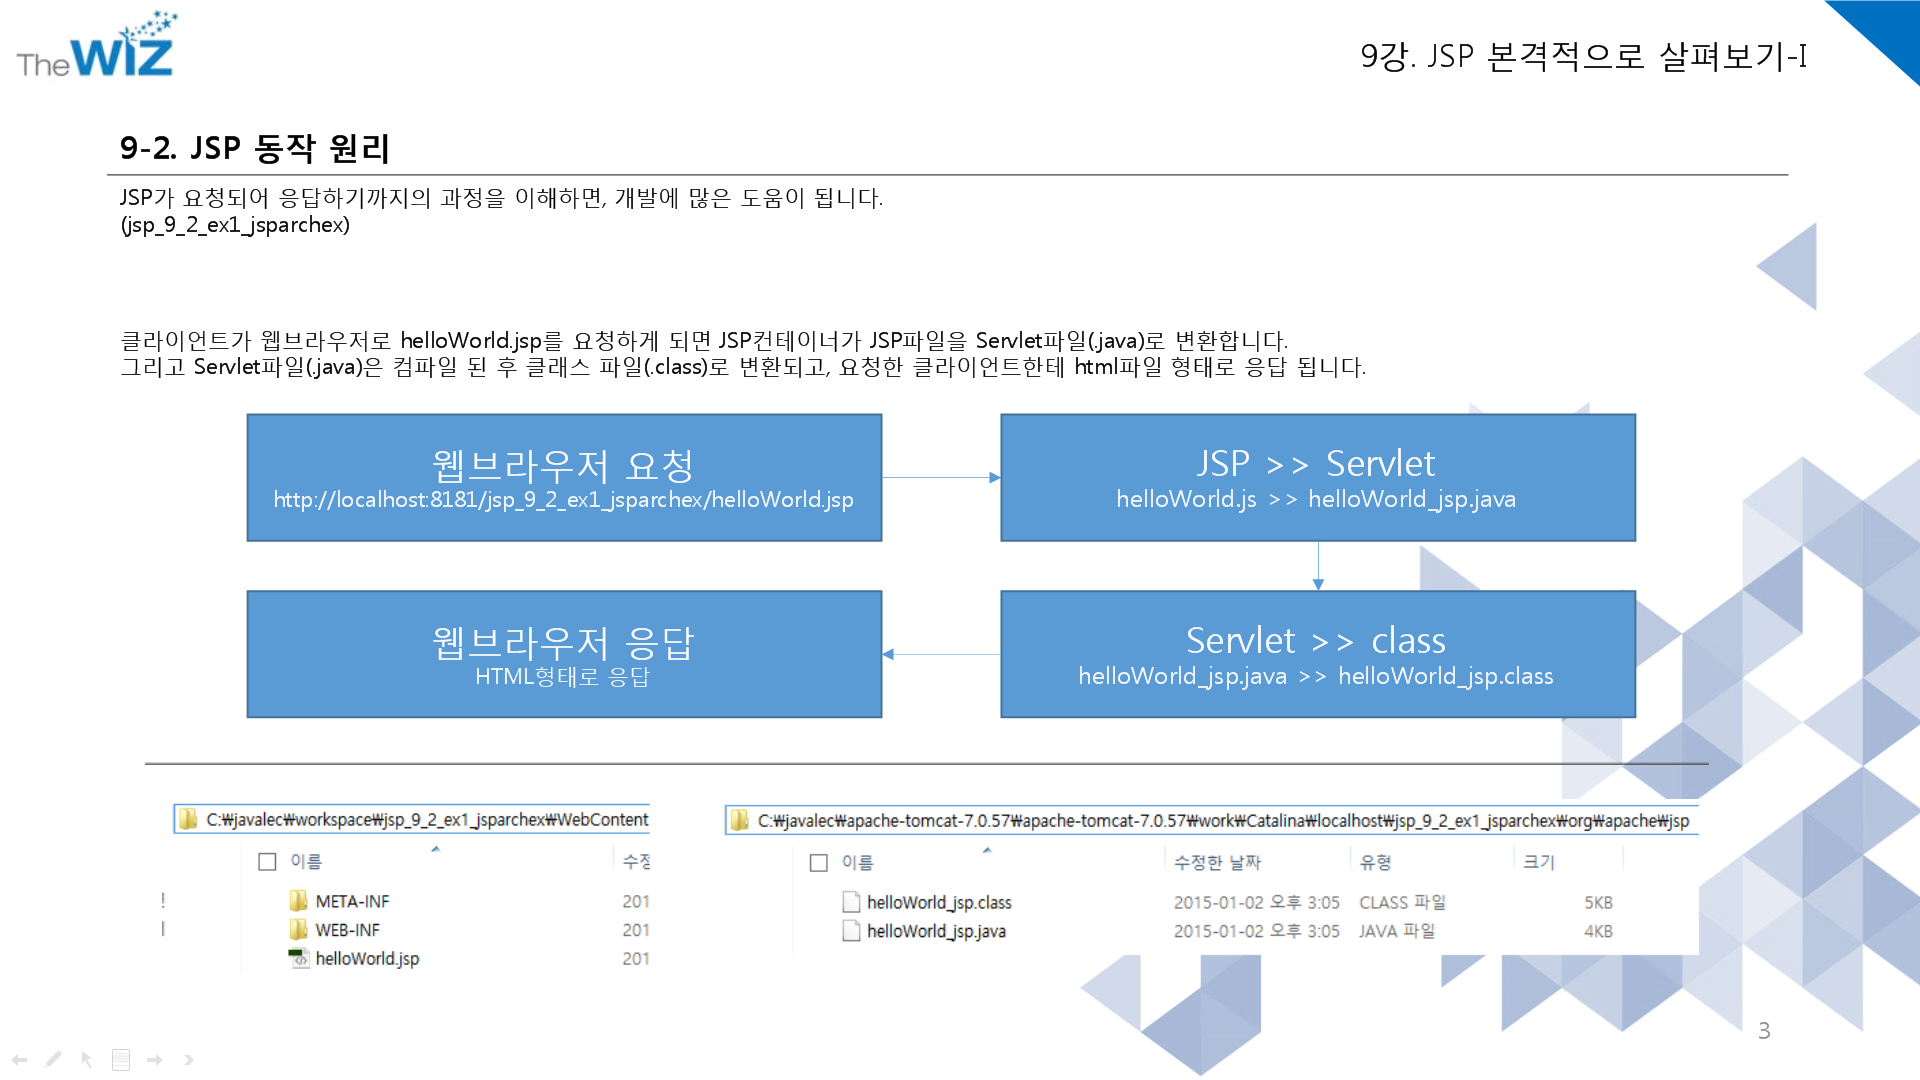
원리는 servlet이랑 똑같다. 위의 그림은 무조건 외울것.

jsp_lecture_10


파일 만드는 방법
webcontent 에 jsp파일 만들기
<%@ page language="java" contentType="text/html; charset=EUC-KR"
	pageEncoding="EUC-KR"%>
<!DOCTYPE html>
<html>
<head>
<meta charset="EUC-KR">
<title>Insert title here</title>
</head>
<body>

	<%
		int i = 0;
	while (true) {
		i++;
		out.println("2 * " + i + " = " + (2 * i) + "<br />");
	%>

	==========
	<br />
	<%
	if (i >= 9) break; }
	%>
</body>
</html>

//출력창
2 * 1 = 2
==========
2 * 2 = 4
==========
2 * 3 = 6
==========
2 * 4 = 8
==========
2 * 5 = 10
==========
2 * 6 = 12
==========
2 * 7 = 14
==========
2 * 8 = 16
==========
2 * 9 = 18
==========
<%
%>
여기는 println안씀 바로 위의 조건식에 같이 붙어서 돌아감.
<%
%>
↓잘 사용안함
<%@ page language="java" contentType="text/html; charset=EUC-KR"
pageEncoding="EUC-KR"%>
<!DOCTYPE html>
<html>
<head>
<meta charset="EUC-KR">
<title>Insert title here</title>
</head>
<body>
<%
int i = 10;
String str = "ABCDE";
%>
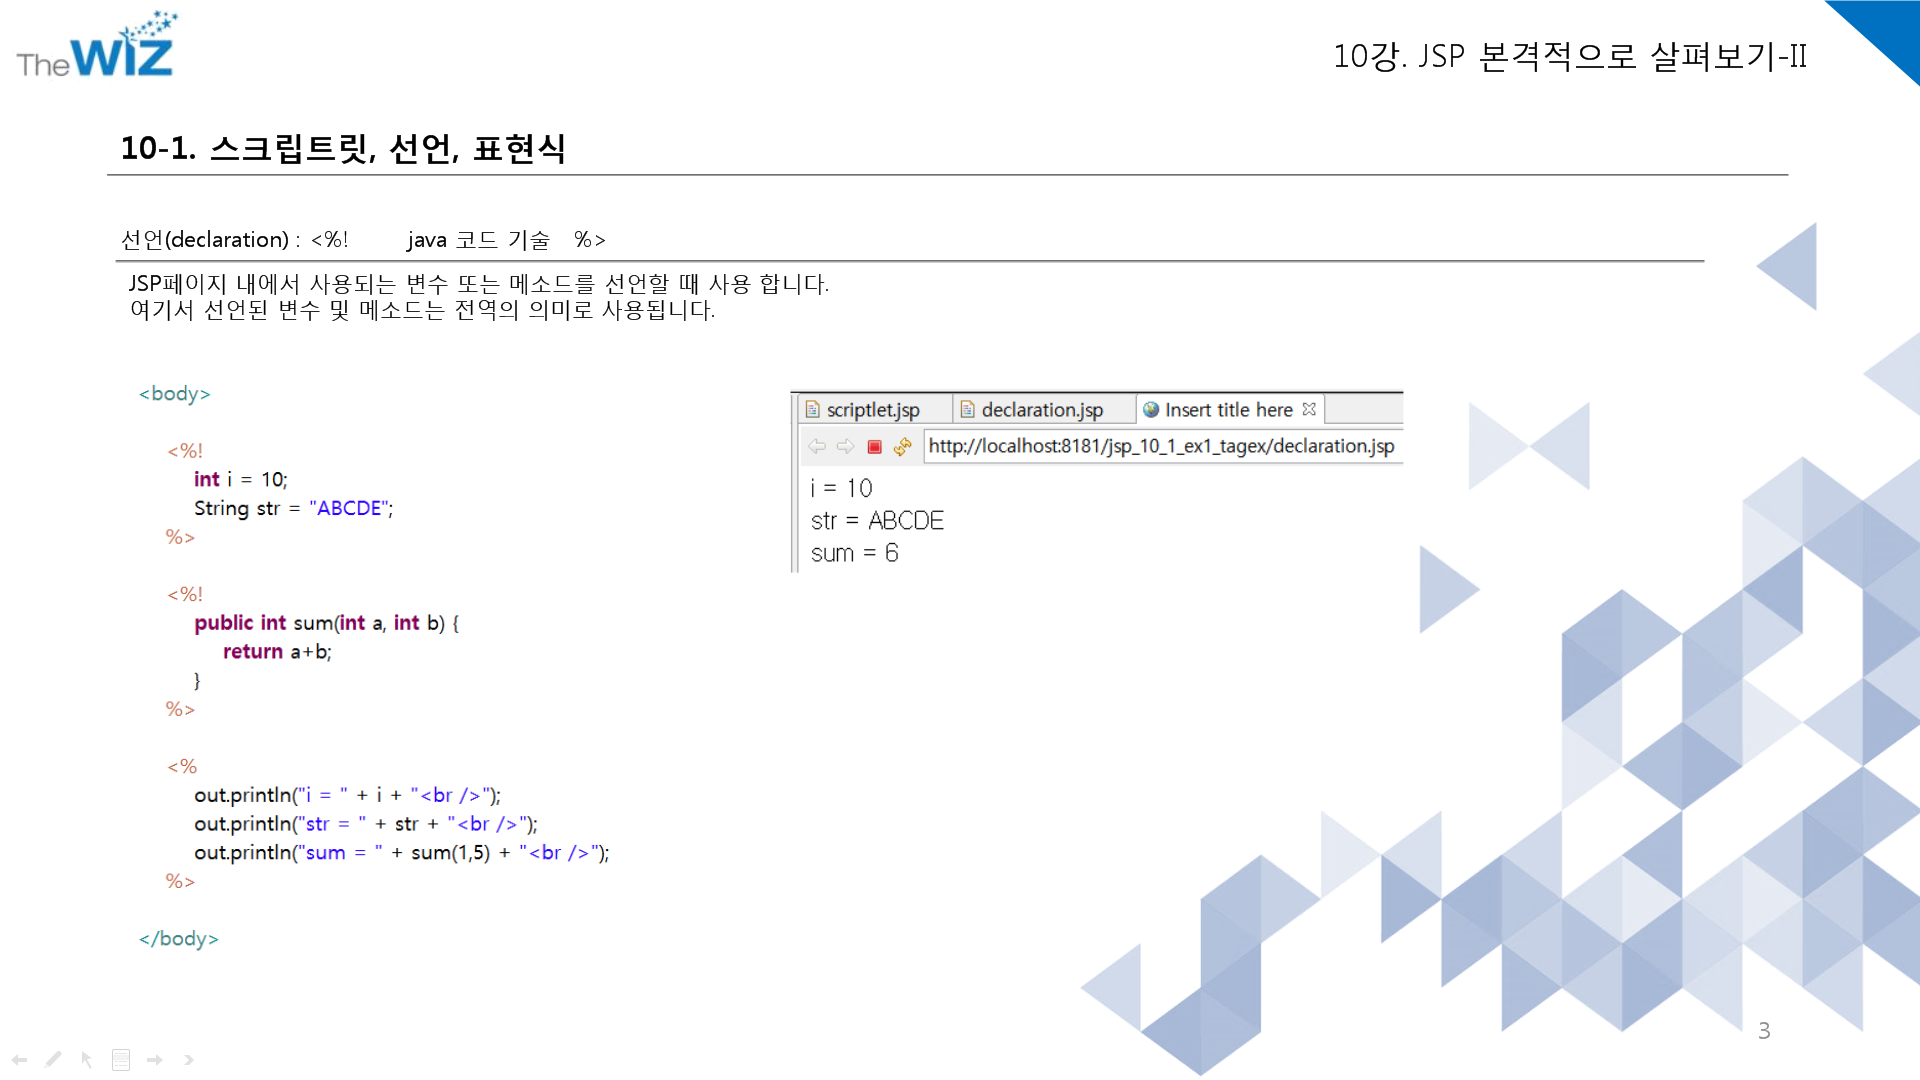
<%!
public int sum(int a, int b) {
return a + b;
}%>
<%
out.println("i = " + i +"<br />");
out.println("str = "+str + "<br />");
out.println("sum = " +sum(1,5)+"<br />");
%>
</body>
</html>
//출력창
i = 10
str = ABCDE
sum = 6
<%= %> 자주씀

<%= %> 이 안에 넣어주면 ;안들어가고 그냥 변수 넣은거에 출력. 근데 String타입으로 출력.
<%@ page language="java" contentType="text/html; charset=EUC-KR"
	pageEncoding="EUC-KR"%>
<!DOCTYPE html>
<html>
<head>
<meta charset="EUC-KR">
<title>Insert title here</title>
</head>
<body>

	<%!
	int i = 10;
	String str = "ABCDE";

	public int sum(int a, int b) {
		return a + b;
	}%>

	<%=i%><br />
	<%=str%><br />
	<%=sum(1, 5)%>
</body>
</html>


//출력화면
10
ABCDE
6
안에
public int sum() 이런 함수선언 무조건 있어야한다!
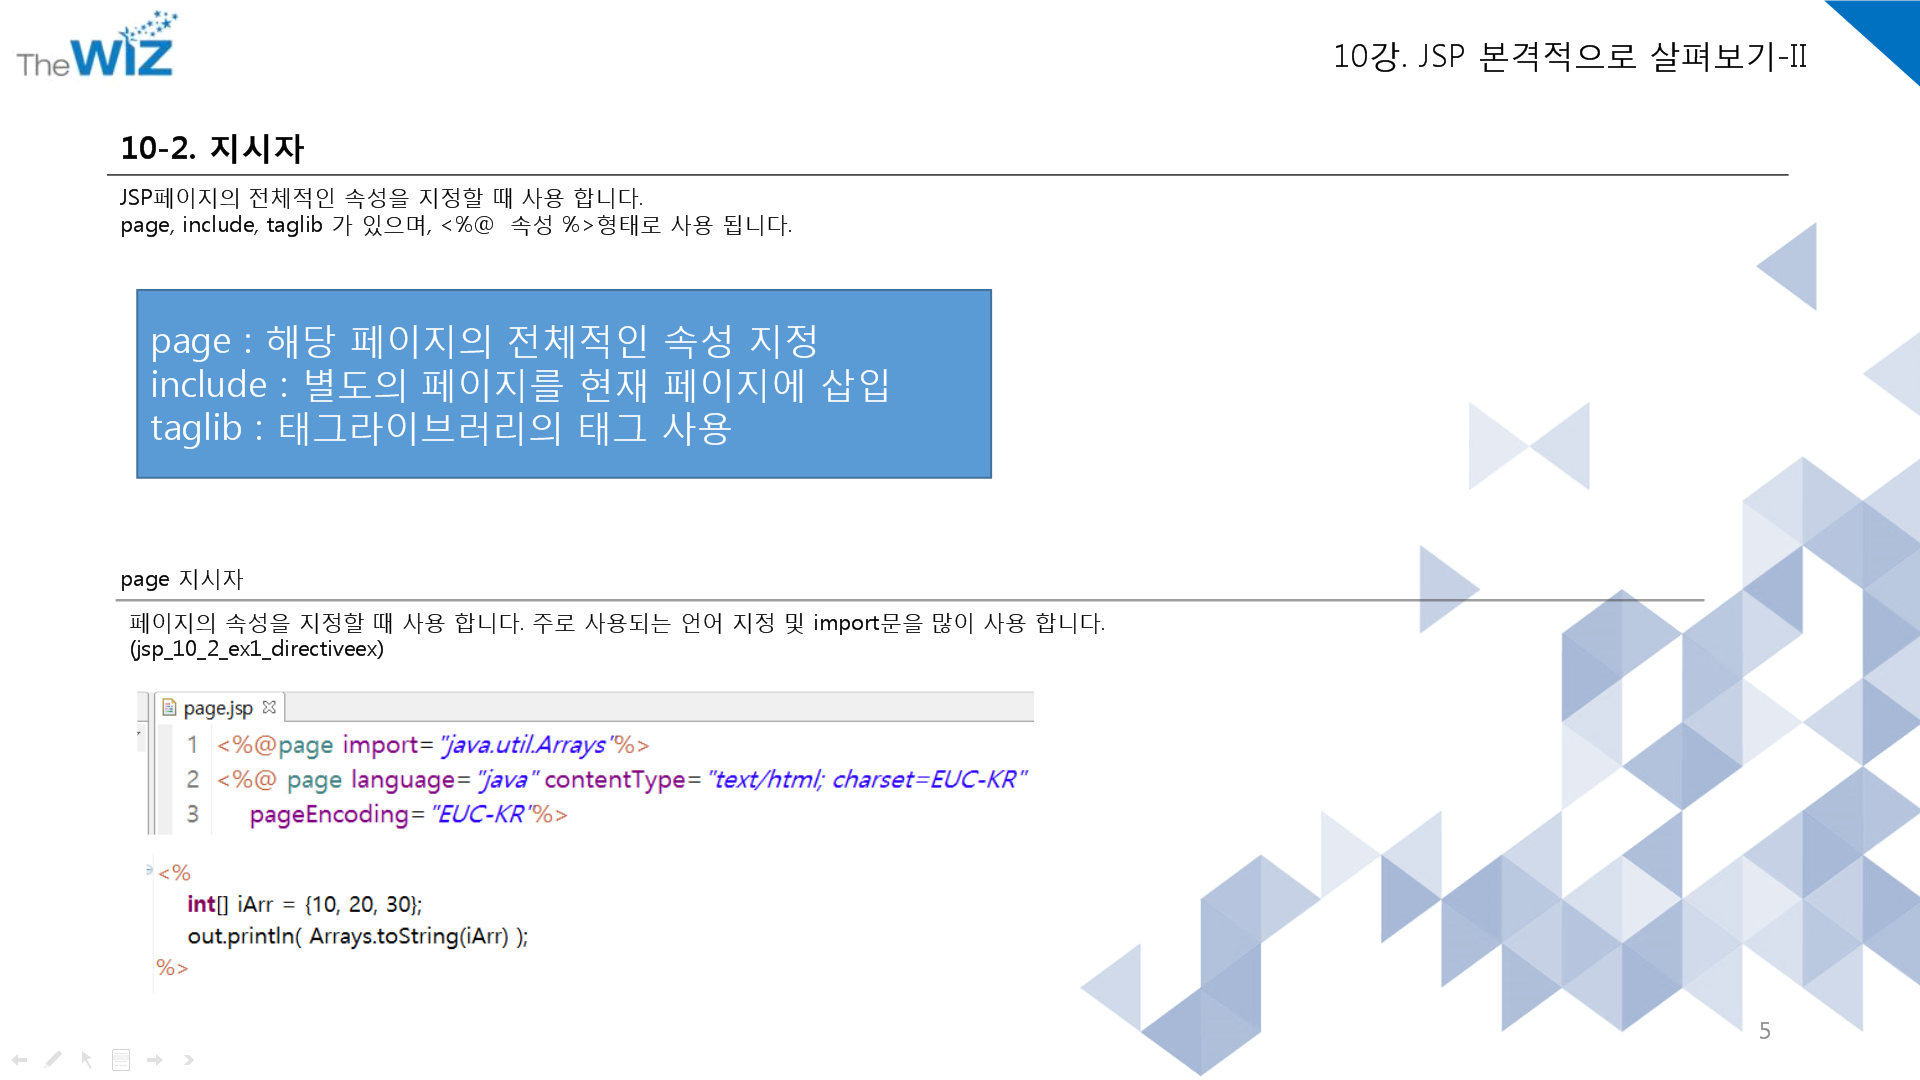
지시자 - <%@ %> 이런 형태임. page, include,, taglib 이 있다.(외울필욘없음 page가 제일 많이 쓰임)
<%@ 다음엔 페이지 속성이 나옴
<%@page import="java.util.Arrays"%>
<%@ page language="java" contentType="text/html; charset=EUC-KR"
    pageEncoding="EUC-KR"%>
<!DOCTYPE html PUBLIC "-//W3C//DTD HTML 4.01 Transitional//EN" "http://www.w3.org/TR/html4/loose.dtd">
<html>
<head>
<meta http-equiv="Content-Type" content="text/html; charset=EUC-KR">
<title>Insert title here</title>
</head>
<body>

<%
	int[] iArr = {10, 20, 30};
	out.println( Arrays.toString(iArr) );
%>

</body>
</html>

파일자체를 그냥 갖다 넣음.

jsp주석은 <%-- --%> 랑 자바 주석 //랑 /* */둘다 가능하다.
html주석은 <!-- -->
서버 기본 구성
1] 실행 환경
1. 웹 서버 - 클라이언트에게 요청을 받고, 코드 실행한 결과를 (WAS에게 받아) 요청자에게 전달하는 주체(실체)
2. WAS - 코드를 실행하고, 실행된 결과를 보여주는 서비스 환경. 웹어플리케이션
2] 실행 대상
1. Server App - WAS에서 실행되는 것으로, "동적인 방식으로" 문서를 만들기 위한 코드
2. Servlet
-
Server + -let을 합친 말로
Server Application let(작은 조각, 파편)의 줄임말로 추측,
내용은 Server App 각각의 코드를 의미
뉴렉 42강
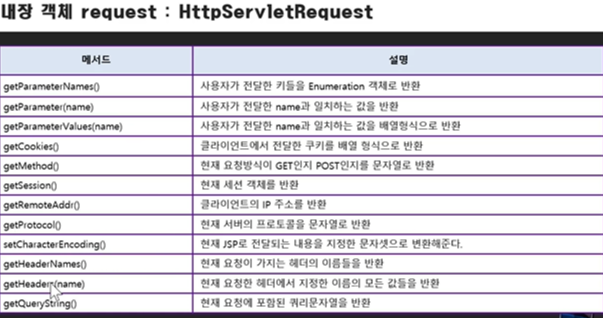
request - 내장객체
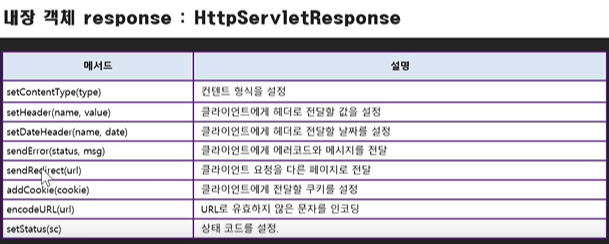
response
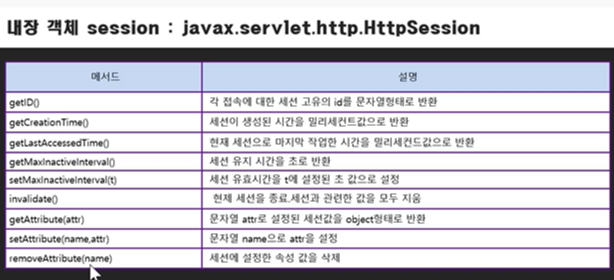
session
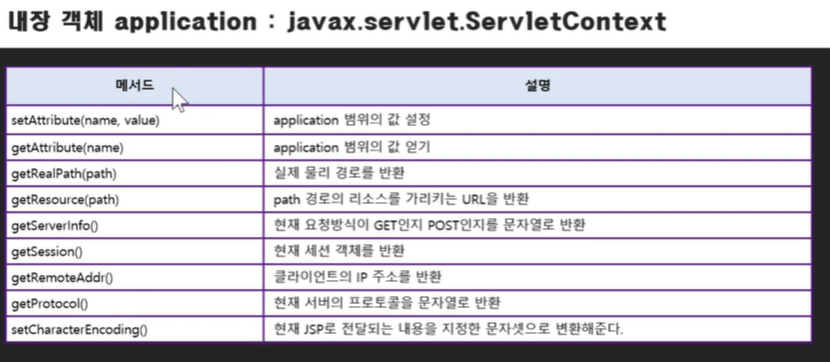
application
뉴렉 43강 연습문제

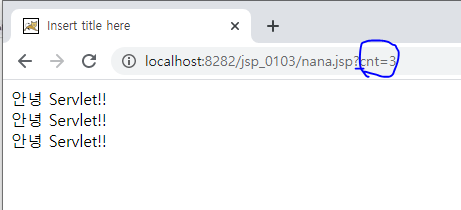
[nana.jsp] - WebContent에 만들어줌

<%@ page language="java" contentType="text/html; charset=UTF-8"
	pageEncoding="UTF-8"%>
<%
	String cnt_ = request.getParameter("cnt");
int cnt = 100;
if (cnt_ != null && !cnt_.equals(""))
	cnt = Integer.parseInt(cnt_);
%>

<!DOCTYPE html>
<html>
<head>
<meta charset="UTF-8">
<title>Insert title here</title>
</head>
<body>
	<%
		for (int i = 0; i < cnt; i++) {
	%>
	안녕 Servlet!!
	<br>
	<%
		}
	%>
</body>
</html>
출력화면
뉴렉 44강 연습문제
[spagetti.jsp] - WebContent에 만들어줌
<%@ page language="java" contentType="text/html; charset=UTF-8"
	pageEncoding="UTF-8"%>
<%
int num = 0;
String num_ = request.getParameter("n");
if(num_ != null && num_.equals(""))
	num = Integer.parseInt(num_);
%>

<!DOCTYPE html>
<html>
<head>
<meta charset="UTF-8">
<title>Insert title here</title>
</head>
<body>
	<%if(num%2 != 0){ %>
	홀수입니다.
	<% }else{%>
	짝수입니다.
	<%} %>
</body>
</html>
뉴렉 45강
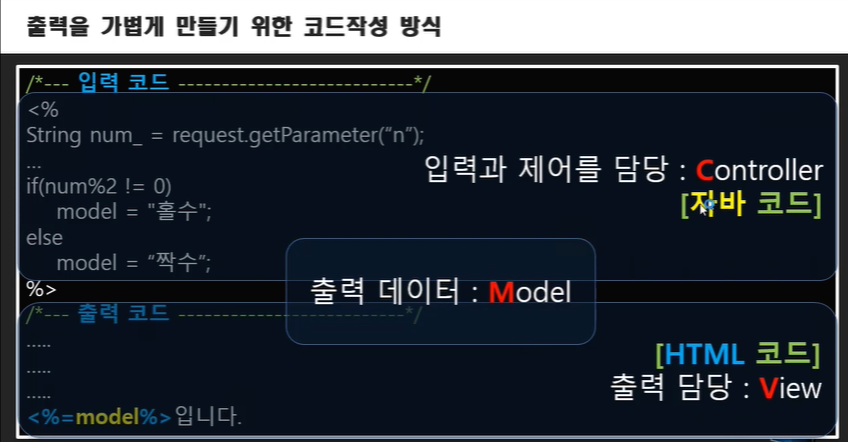
MVC에 대해서 - model1
[spagetti.jsp] - WebContent에 만들어줌
<%@ page language="java" contentType="text/html; charset=UTF-8"
	pageEncoding="UTF-8"%>
<%
	int num = 0;
String num_ = request.getParameter("n");
if (num_ != null && num_.equals(""))
	num = Integer.parseInt(num_);

String model;
if (num % 2 != 0)
	model = "홀수";
else
	model = "짝수";
%>

<!DOCTYPE html>
<html>
<head>
<meta charset="UTF-8">
<title>Insert title here</title>
</head>
<body>
	<%=model%>입니다.
</body>
</html>
뉴렉 46강 - model2 →controller단이 물리적으로 분리되었나!?

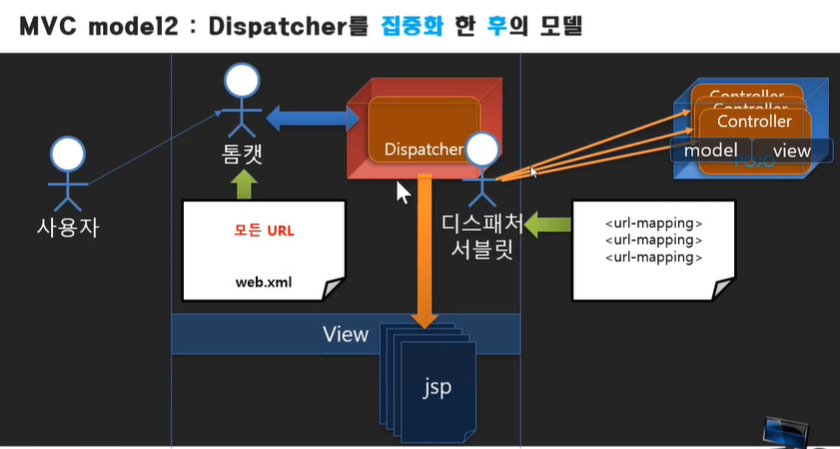
분리되었으면 서로 연결해주는게 필요 = 그게 forwarding (2가지)
//redirect:현재작업한거 상관없이 새로운거 요청
//forward:현재작업한 것을 이어나가게 하는것
[Spag.servlet(=Spag.java)] Java Resources에 패키지 만들어서 만듦 - 여기서실행

package jsp_0103;

import java.io.IOException;

import javax.servlet.RequestDispatcher;
import javax.servlet.ServletException;
import javax.servlet.annotation.WebServlet;
import javax.servlet.http.HttpServlet;
import javax.servlet.http.HttpServletRequest;
import javax.servlet.http.HttpServletResponse;

/**
 * Servlet implementation class Spag
 */
@WebServlet("/spag")
public class spag extends HttpServlet {
	private static final long serialVersionUID = 1L;

	/**
	 * @see HttpServlet#HttpServlet()
	 */
	public spag() {
		super();
		// TODO Auto-generated constructor stub
	}

	/**
	 * @see HttpServlet#doGet(HttpServletRequest request, HttpServletResponse
	 *      response)
	 */
	protected void doGet(HttpServletRequest request, HttpServletResponse response)
			throws ServletException, IOException {
		int num = 0;
		String num_ = request.getParameter("n");
		if (num_ != null && num_.equals(""))
			num = Integer.parseInt(num_);

		String result;
		if (num % 2 != 0)
			result = "홀수";
		else
			result = "짝수";

		request.setAttribute("result", result);

		RequestDispatcher dispatcher=
		request.getRequestDispatcher("spagetti.jsp");

		dispatcher.forward(request, response);

	}

	/**
	 * @see HttpServlet#doPost(HttpServletRequest request, HttpServletResponse
	 *      response)
	 */
	protected void doPost(HttpServletRequest request, HttpServletResponse response)
			throws ServletException, IOException {
		// TODO Auto-generated method stub
		doGet(request, response);
	}

}
[spagetti.jsp] - WebContent에 만들어줌
<%@ page language="java" contentType="text/html; charset=UTF-8"
pageEncoding="UTF-8"%>
<!DOCTYPE html>
<html>
<head>
<meta charset="UTF-8">
<title>Insert title here</title>
</head>
<body>
<%=request.getAttribute("result")%>입니다.
</body>
</html>
오늘의 문제
1.css 에서의 display 종류와 속성에 대하여 설명하시오.
display속성 3가지
block, inline, inline-block
block - 개행 (block은 그 모양만주고 개행되는 것이아니라 줄의 옆 공백까지 전부 차지. 그래서 공백이 있어도 다른값이 넣어지지않는다. -그래서 width, height 이런거 적용 안된다.(inline도) padding,margin만 적용됨)
inline - 개행X (inline에서는 width와 height가 먹히지 않는다.)
inline-block = block+inline (개행X, width height적용 가능, inline처럼 자기값만 가진다.) ex.<bottom><select>
2.px 과 em 의 차이는?
em : 16px을 기준으로함.
ex) 8px은 0.5em
3.inline-block 태그의 종류는?
-inline 요소-
<a>, <i>, <span>, <abbr>, <img>, <strong>, <b>, <input>, <sub>, <br>, <code>, <em>, <small>, <tt>, <map>, <textarea>, <label>, <sup>, <q>, <button>, <cite>
4.opacity 속성의 사용법은?
opacity CSS 속성은 요소의 불투명도를 설정
0은 투명, 1은 불투명
5.display:none 과 visibility:hidden 의 차이는?
display:none; - 숨기는것. 공간 차지x
visibility:hidden; - 숨기는것. 공간은 차지함
6.아래의 동영상 사이트를 시청하시오.
www.youtube.com/watch?v=O-n1EjDEuIc
7.동적문서와 정적문서의 차이는?
ex) <p>현재시간 : 2020-12-31-04:55:56<p> 으로 넣으면 언제들어가도 저 상태이다. = 정적페이지
계속 시간이 바뀌는 동적페이지로 만드려면? →프로그래밍을 해주면된다.(전에 했던 캘린더 코드 처럼)
html은 정적페이지. jsp는 동적페이지(java를 통해서 날짜를 집어넣을 수 있다.)
8.아래를(JSP 태그) 설명하시오.
지시자 : <%@ %> : 페이지 속성
주석 : <%-- --%> / html은 <!-- -->
선언 : <%! %> : 변수, 메소드 선언
표현식 : <%= %> : 결과값 출력
스크립트릿 : <% %> : JAVA 코드 → 자바 문법 들어감!
액션태그 : <jsp:action> </jsp:action> : 자바빈 연결
-지시자 : <%@ %> 이런 형태임. page, include,, taglib 이 있다.
-주석 : jsp주석은 <%-- --%> 랑 자바 주석 //랑 /* */둘다 가능하다.
-선언 : public int sum() 이런 함수선언 무조건 있어야한다
-표현식
-스크립트릿
-액션태그 : 페이지와 페이지 사이를 연결해주는 역할이다. ex) <jsp:forward>페이지 사이의 제어를 이동시킬 때 사용
<jsp:include>다른 페이지의 실행 결과를 현재의 페이지에 포함시킬때 사용

1.위 구구단을 servlet으로 작성하시오. //가로세로 바꾸고 싶으면 i,j만 바꾸면됨
<!DOCTYPE html>
<html>
<head>
<meta charset="UTF-8">
<title>gugudan</title>
</head>
<body>
	<form action="../gugudan" method="post">
		구구단을 출력하시겠습니까? <input type="submit" value="yes">
	</form>

</body>
</html>

package Servlet_20_12_31_hw;

import java.io.IOException;
import java.io.PrintWriter;

import javax.servlet.ServletException;
import javax.servlet.annotation.WebServlet;
import javax.servlet.http.HttpServlet;
import javax.servlet.http.HttpServletRequest;
import javax.servlet.http.HttpServletResponse;

/**
 * Servlet implementation class gugudan
 */
@WebServlet("/gugudan")
public class gugudan extends HttpServlet {
	private static final long serialVersionUID = 1L;

	/**
	 * @see HttpServlet#HttpServlet()
	 */
	public gugudan() {
		super();
		// TODO Auto-generated constructor stub
	}

	/**
	 * @see HttpServlet#doGet(HttpServletRequest request, HttpServletResponse
	 *      response)
	 */
	protected void doGet(HttpServletRequest request, HttpServletResponse response)
			throws ServletException, IOException {
		// TODO Auto-generated method stub
		response.getWriter().append("Served at: ").append(request.getContextPath());
	}

	/**
	 * @see HttpServlet#doPost(HttpServletRequest request, HttpServletResponse
	 *      response)
	 */
	protected void doPost(HttpServletRequest request, HttpServletResponse response)
			throws ServletException, IOException {

		response.setContentType("text/html; charset=UTF-8");
		PrintWriter writer = response.getWriter();

		writer.println("<html><head></head><body>");

		writer.println("<table border=\"1\">");

		for (int i = 1; i <= 9; i++) {
			writer.println("<tr>");
			for (int j = 2; j <= 9; j++) {

				writer.println("<td>" + j + "*" + i + "=" + j * i + "</td>");

			}
			writer.println("</tr>");
			writer.println("<br/>");
		}
		writer.println("</table>");

		writer.println("</body></html>");

		writer.close();

	}

}
2. 위 구구단을 jsp로 작성하시오.
<%@ page language="java" contentType="text/html; charset=EUC-KR"
	pageEncoding="EUC-KR"%>
<!DOCTYPE html>
<html>
<head>
<meta charset="EUC-KR">
<title>Insert title here</title>
</head>
<body>
	구구단
	<table border="1">
		<%
			for (int i = 1; i < 10; i++) {
			out.println("<tr>");
			for (int j = 2; j < 10; j++) {
				out.println("<td>");
				out.println(i + "*" + j + "=" + i * j);
				out.println("</td>");
			}
			out.println("</tr>");
		}
		%>
	</table>
</body>
</html>
3. 아래를 jsp로 작성하시오.
1) include.jsp파일을 생성합니다.
-<h4>태그에 '구구단 출력하기'를 작성합니다.
-include 액션 태그로 구구단을 출력하는 include_data.jsp 파일로 이동하도록 작성합니다
-param 액션 태그로 숫자 5를 출력하는 include_data.jsp파일에 전달하도록 작성합니다.
2) include_data.jsp파일을 생성합니다.
-전달받은 숫자 5의 구구단을 출력하도록 작성합니다.
3) 웹 브라우저에 http://localhost:8080/Exercise/ch04/include.jsp를 입력하여 실행 결과를 확인합니다.
<%@ page language="java" contentType="text/html; charset=UTF-8"
    pageEncoding="UTF-8"%>
<!DOCTYPE html>
<html>
<head>
<meta charset="UTF-8">
<title>gugudanPrint</title>
</head>
<body>
	<%
		String dan = request.getParameter("dan");
		int danPrint = Integer.parseInt(dan);

		for(int i =1; i<=9;i++){
			out.println(danPrint + "*" + i + "=" + (danPrint*i));
			out.println("<br/>");
		}
	%>

</body>
</html>
<%@ page language="java" contentType="text/html; charset=UTF-8"
pageEncoding="UTF-8"%>
<!DOCTYPE html>
<html>
<head>
<meta charset="UTF-8">
<title>gugudanPrint</title>
</head>
<body>
<%
String dan = request.getParameter("dan");
int danPrint = Integer.parseInt(dan);
for(int i =1; i<=9;i++){
out.println(danPrint + "*" + i + "=" + (danPrint*i));
out.println("<br/>");
}
%>
</body>
</html>
4. 아래를 jsp로 작성하시오
<%@ page language="java" contentType="text/html; charset=UTF-8"
pageEncoding="UTF-8"%>
<!DOCTYPE html>
<html>
<head>
<meta charset="UTF-8">
<title>address</title>
</head>
<body>
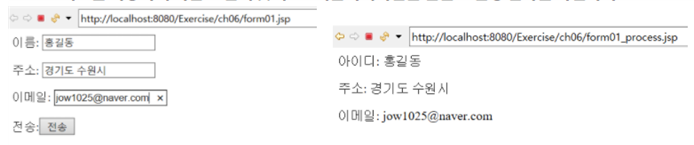
<form action="address_process.jsp">
이름 : <input type="text" name="uname"><br>
주소 : <input type="text" name="uaddress"><br>
이메일 : <input type="text" name="uemail"><br>
전송<input type="submit" value="전송">
</form>
</body>
</html><%@ page language="java" contentType="text/html; charset=UTF-8"
pageEncoding="UTF-8"%>
<!DOCTYPE html>
<html>
<head>
<meta charset="UTF-8">
<title>print</title>
</head>
<body>
<%
String name = request.getParameter("uname");
String address= request.getParameter("uaddress");
String email= request.getParameter("uemail");
out.println("아이디 : " + name + "<br>");
out.println("주소 : " + address+ "<br>");
out.println("이메일 : " + email+ "<br>");
%>
</body>
</html>
5. 아래를 jsp로 작성하시오

<%@ page language="java" contentType="text/html; charset=UTF-8"
    pageEncoding="UTF-8"%>
<!DOCTYPE html>
<html>
<head>
<meta charset="UTF-8">
<title>fruit</title>
</head>
<body>
	<form action="fruit_print.jsp">
		오렌지<input type="checkbox" name = "fruit" value="오렌지">
		사과 <input type="checkbox" name = "fruit" value="사과">
		바나나<input type="checkbox" name = "fruit" value="바나나">
		<input type="submit" value="전송">

	</form>

</body>
</html>
<%@page import="java.util.Arrays"%>
<%@ page language="java" contentType="text/html; charset=UTF-8"
pageEncoding="UTF-8"%>
<!DOCTYPE html>
<html>
<head>
<meta charset="UTF-8">
<title>fruit_print</title>
</head>
<body>
<%
String[] fruit =request.getParameterValues("fruit");
out.println("<h3>선택한과일</h3>");
for(int i = 0;i<fruit.length;i++){
out.println(fruit[i]);
}
%>
</body>
</html>
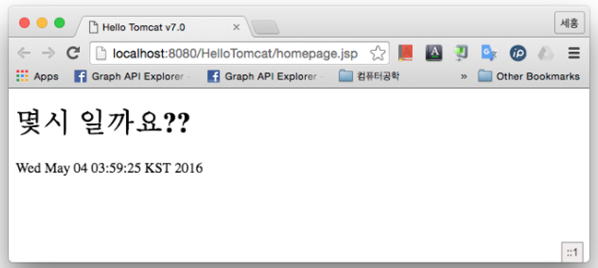
6. 아래를 jsp로 작성하시오
<%@page import="java.text.SimpleDateFormat"%>
<%@page import="java.util.Date"%>
<%@ page language="java" contentType="text/html; charset=UTF-8"
    pageEncoding="UTF-8"%>
<!DOCTYPE html>
<html>
<head>
<meta charset="UTF-8">
<title>calendar</title>
</head>
<body>
	<h1>몇시 일까요?</h1>
	<%
		Date date = new Date();
		SimpleDateFormat sd = new SimpleDateFormat("yy년mm월dd일 a hh:mm:ss");
	%>
	현재 날짜와 시간은 <%=date %> 입니다.


</body>
</html>'코딩 > 수업 정리' 카테고리의 다른 글
| 21.01.05 Tue [030] (0) | 2021.01.05 |
|---|---|
| 21.01.04 Mon [029] (0) | 2021.01.04 |
| 20.12.30 Wed [027] (0) | 2020.12.30 |
| 20.12.29 Tue [026] (0) | 2020.12.29 |
| 20.12.28 Mon [025] (0) | 2020.12.28 |


댓글