HTML
실전 HTML5 & CSS동영상강좌_04강_HTML 기본-III

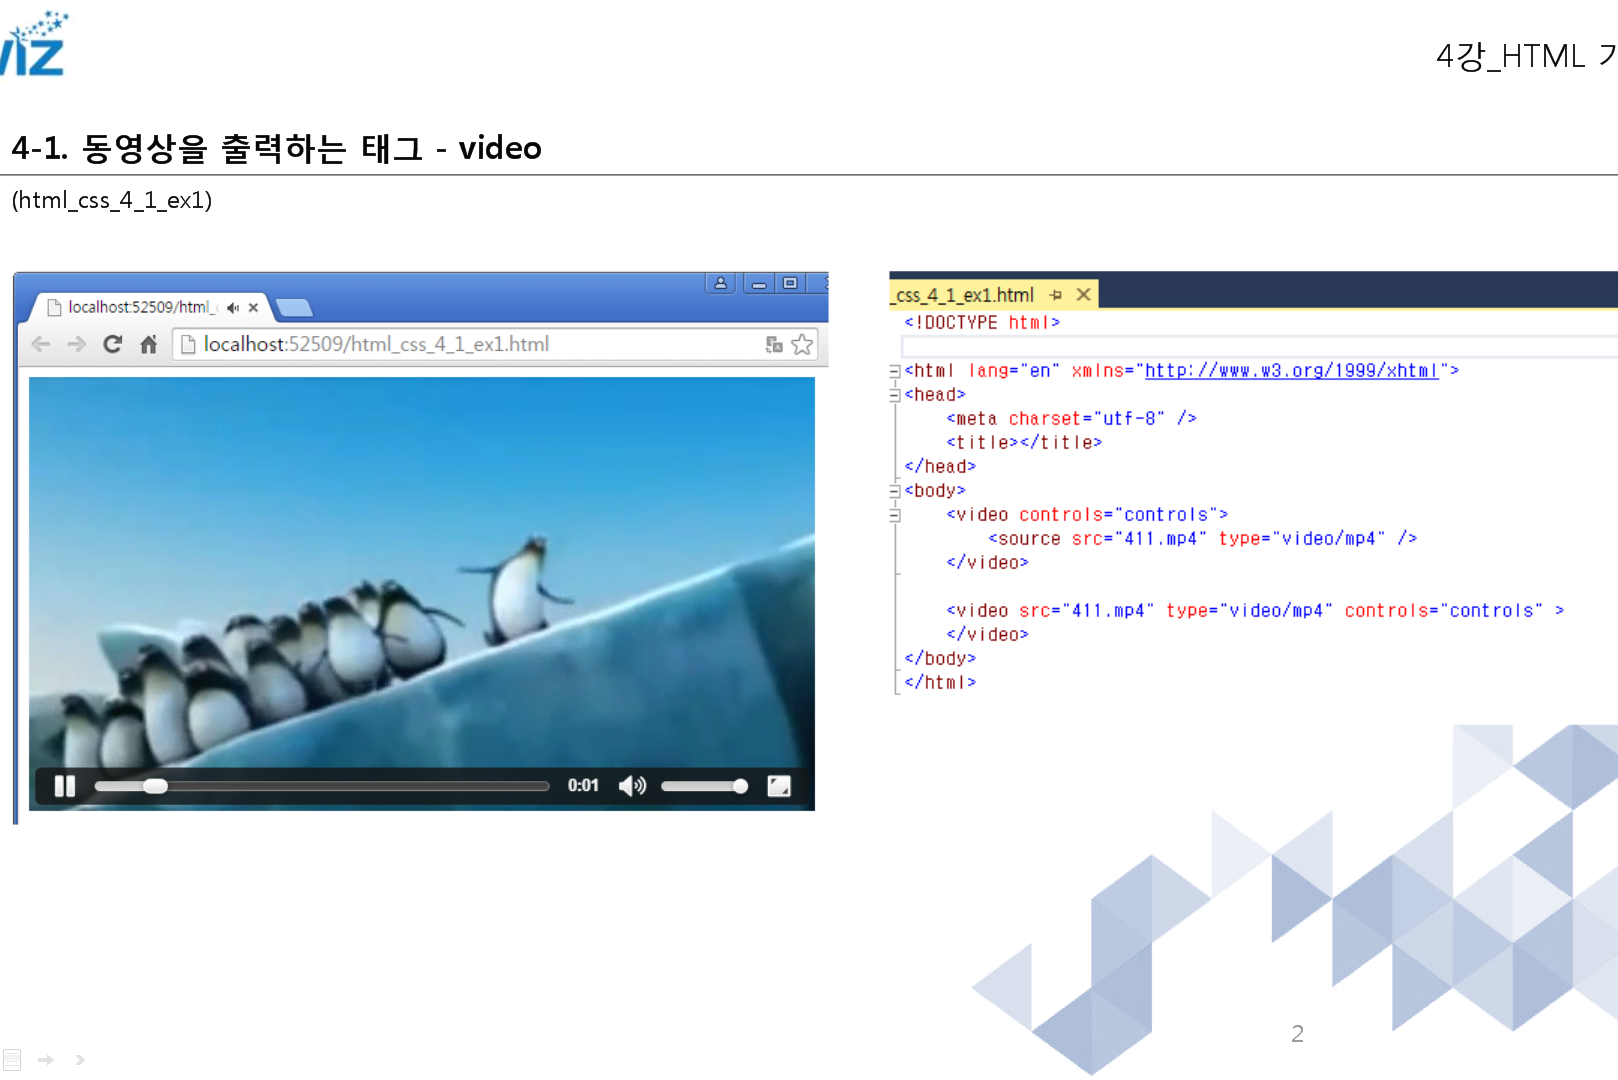
비디오도 html파일로 가능.
//비디오 예제 태그
<!DOCTYPE html>
<html lang="en" wmlns="http://www.w3.org/1999/whtml">
<head>
<meta charset="utf-8">
<title></title>
</head>
<body>
	<video src="411.mp4" type="video/mp4" controls="controls"></video>

	<video controls="controls">
		<source src="411.mp4" type="video/mp4" />
	</video>

</body>
</html>
//똑같은 비디오가 두개 뜬다.
폼태그 이건 무조건 외워야함★ - 이런거외워야 회원가입창 만듦.
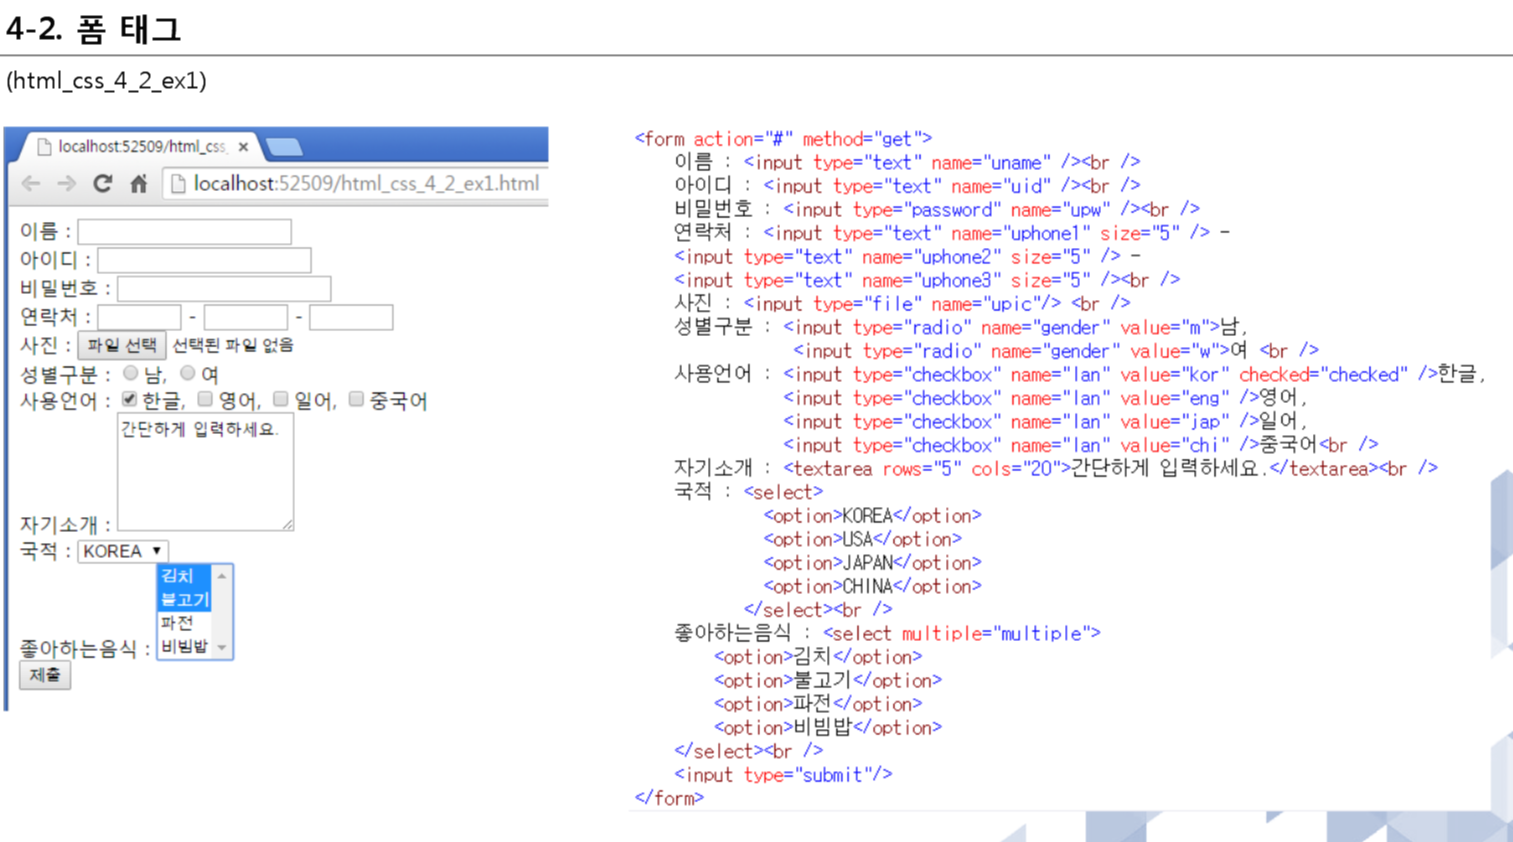
radio 는 둘중 하나만 선택가능
checkbox는 여러개 선택가능
<!DOCTYPE html>

<html lang="en" xmlns="http://www.w3.org/1999/xhtml">
<head>
    <meta charset="utf-8" />
    <title></title>
</head>
<body>
    <form action="#" method="get">
        이름 : <input type="text" name="uname" /><br />
        아이디 : <input type="text" name="uid" /><br />
        비밀번호 : <input type="password" name="upw" /><br />
        연락처 : <input type="text" name="uphone1" size="5" /> -
        <input type="text" name="uphone2" size="5" /> -
        <input type="text" name="uphone3" size="5" /><br />
        사진 : <input type="file" name="upic"/> <br />
        성별구분 : <input type="radio" name="gender" value="m">남,
                    <input type="radio" name="gender" value="w">여 <br />
        사용언어 : <input type="checkbox" name="lan" value="kor" checked="checked" />한글,
                   <input type="checkbox" name="lan" value="eng" />영어,
                   <input type="checkbox" name="lan" value="jap" />일어,
                   <input type="checkbox" name="lan" value="chi" />중국어<br />
        자기소개 : <textarea rows="5" cols="20">간단하게 입력하세요.</textarea><br />
        국적 : <select>
                 <option>KOREA</option>
                 <option>USA</option>
                 <option>JAPAN</option>
                 <option>CHINA</option>
               </select><br />
        좋아하는음식 : <select multiple="multiple">
            <option>김치</option>
            <option>불고기</option>
            <option>파전</option>
            <option>비빔밥</option>
        </select><br />
        <input type="submit"/>
    </form>
</body>
</html>
type="text" name="uname" 이런식으로 쓰는거 꼭 외우기
한글앞에있는 checked = "checked"는 처음에 뿌렸을때 초기값
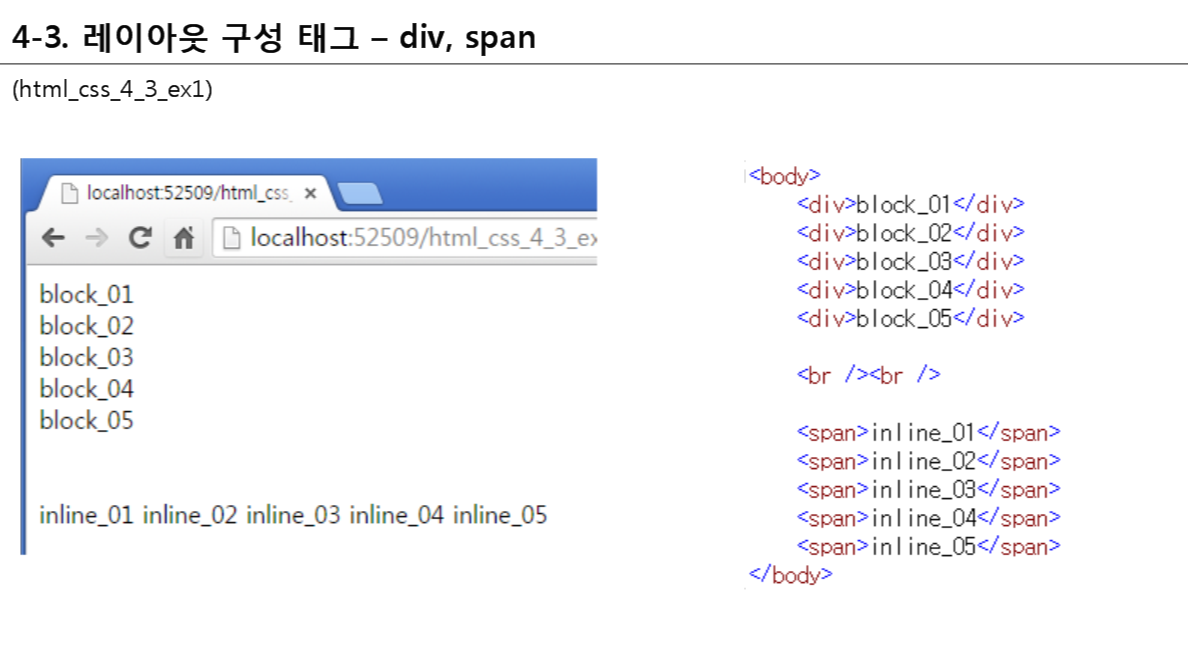
block태그 inline(nonblock)태그에 대한 구분 잘하기!
<div>는 개행이있고, = block
<span>은 개행이 없다. = inline(nonblock)
-block 요소-(block형식이란 차곡차곡 쌓아 올려지는 형식)
<address>, <article>, <aside>, <blockgquote>, <canvas>, <dd>, <div>, <dl>, <hr>, <header>, <form>,<h1>, <h2>, <h3>, <h4>, <h5>, <h6>, <table>, <pre>, <ul>, <p>, <ol>, <video>
-inline 요소-
<a>, <i>, <span>, <abbr>, <img>, <strong>, <b>, <input>, <sub>, <br>, <code>, <em>, <small>, <tt>, <map>, <textarea>, <label>, <sup>, <q>, <button>, <cite>
span은 인라인으로 줄 문장에 단어를 꾸며주고 싶을때 쓴다.
ex. <span><h3><b>야외 텐트를 닮은 건축물</b> <mark>"테쉬폰"</mark></h3></span>
실전 HTML5 & CSS동영상강좌_05강_HTML 기본-IV

<!DOCTYPE html>
<html lang="en" xmlns="http://www.w3.org/1999/xhtml">
<head>
<meta charset="EUC-KR">
<title></title>
</head>
<body>
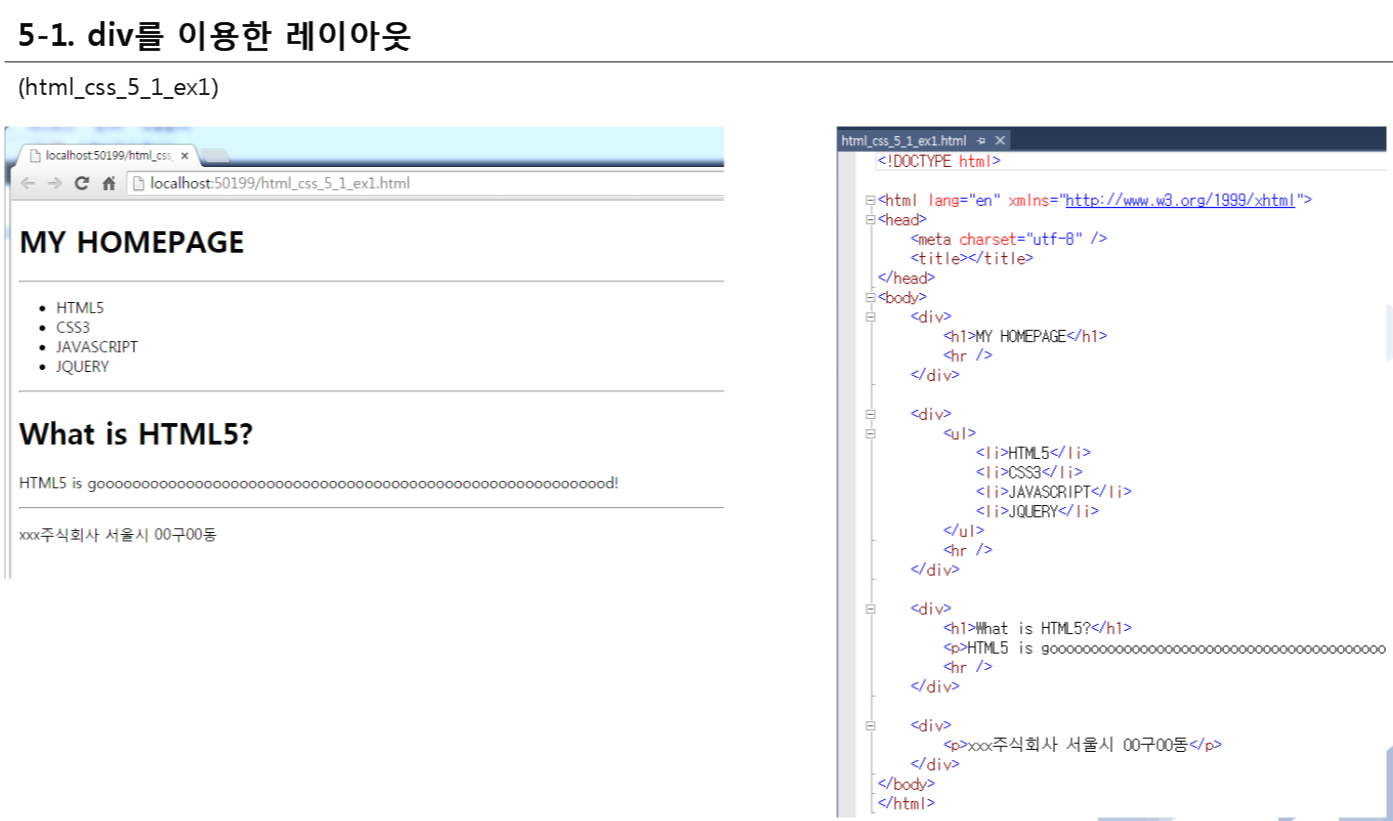
<div>
<h1>My Homepage</h1>
<hr /> //
</div>
<div>
<ul>
<li>HTML5</li>
<li>CSS3</li>
<li>JAVASCRIPT</li>
<li>JQUERY</li>
</ul>
<hr />
</div>
<div>
<h1>What is HTML5?</h1>
<p>HTML5 is gooood
<hr />
</div>
<div>
<p>xxx주식회사 서울시 00구 00동</p>
</div>
</body>
</html><hr>은 수평선을 뜻하는 A horizontal rule의 약자
<hr style="width:50%;height:10px;border:none;background-color:blue;"> 이런식으로 꾸밀수도있다.

<!DOCTYPE html>
<html lang="en" xmlns="http://www.w3.org/1999/xhtml">
<head>
<meta charset="EUC-KR">
<title></title>
</head>
<body>
	<header>
		<h1>My Homepage</h1>
		<hr />
	</header>

	<div>
		<ul>
			<li>HTML5</li>
			<li>CSS3</li>
			<li>JAVASCRIPT</li>
			<li>JQUERY</li>
		</ul>
		<hr />
	</nav>

	<section>
		<h1>What is HTML5?</h1>
		<p>HTML5 is gooood
		<hr />
	</section>

	<footer>
		<p>xxx주식회사 서울시 00구 00동</p>
	</footer>
</body>
</html>
시멘틱(semantic) = div+플러스 의미
<nav> = navi = 메뉴
<section> = 여러 중심 내용을 감싸는 공간
<footer> = 꼬리말
<aside>=옆에 오는 글

시멘틱을 사용하는 이유? (블로그출처) 태그구조를 쉽게 파악할 수 있으며 나중에 CSS를 적용하는데 있어서도 시멘틱태그가 전체적으로 도움이 됩니다. 가장중요한것은 지금 자신이 만들고 있는 웹페이지가 어떻게 구성되어있는지 파악할 수가 있다는 것입니다.
실전 HTML5 & CSS동영상강좌_06강_CSS 기본-I

선택자

style이라는것은 css를 말함
css는 html을 꾸미는것(백그라운드 폰트 등등,,,)
style에서 문법이 달라짐
<div>는 요소.
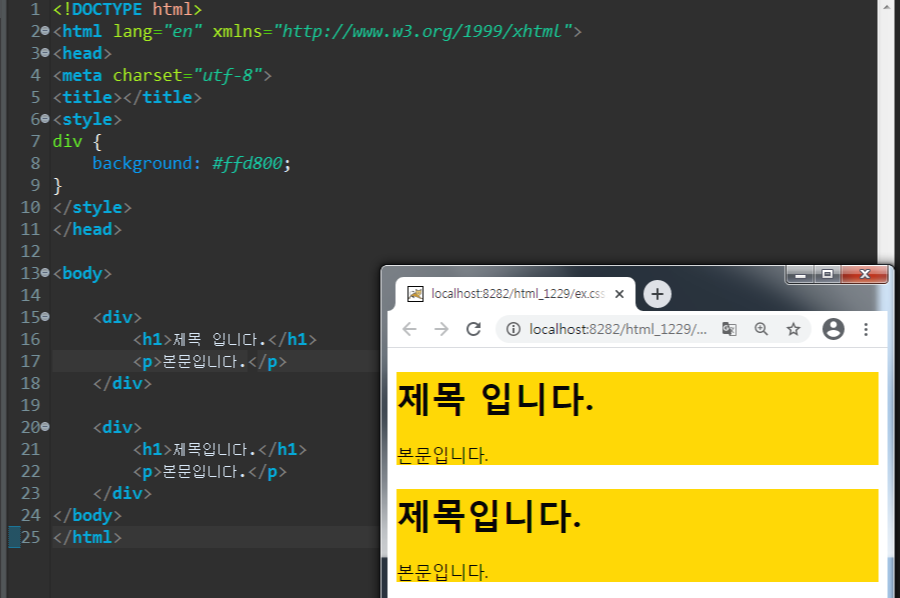
<!DOCTYPE html>
<html lang="en" xmlns="http://www.w3.org/1999/xhtml">
<head>
<meta charset="utf-8">
<title></title>
<style>
div {
	background: #ffd800;
}
</style>
</head>

<body>

	<h1>제목 입니다.</h1>
	<p>본문입니다.</p>

	<div>
		<h1>제목입니다.</h1>
		<p>본문입니다.</p>
	</div>
</body>
</html>
div{ }는 <div>태그에 영향줌!
(style안에 있는 div{ } ---<태그>아닌 { }. 문법요소가 달라짐)


<!DOCTYPE html>

<html lang="en" xmlns="http://www.w3.org/1999/xhtml">
<head>
    <meta charset="utf-8" />
    <title></title>
    <style>
        li {
            color: #ffd800;
        }

        p {
            background-color:#ff0000;
        }
    </style>
</head>
<body>
    <header>
        <h1>oo 주식회사</h1>
    </header>

    <nav>
        <ul>
            <li>회사소개</li>
            <li>제품소개</li>
            <li>고객센터</li>
            <li>공지사항</li>
        </ul>
    </nav>

    <section>
        <p>
            우리 회사는 50년 전통의 역사와 뛰어난 기술을 바탕으로 좋은 회사 입니다.
        </p>
    </section>

    <footer>
        <p>
            서울시 oo구 oo동 oo빌딩
        </p>
    </footer>
</body>
</html>

* - all을 뜻함 (*.txt검색하는것을 생각)
<!DOCTYPE html>

<html lang="en" xmlns="http://www.w3.org/1999/xhtml">
<head>
    <meta charset="utf-8" />
    <title></title>
    <style>
        li,p,h1 {
            color: #ffd800;
        }

        h1 {
            color:#2909f8;
        }

        p {
            font-weight:bold;
        }
    </style>
</head>
<body>
    <header>
        <h1>oo 주식회사</h1>
    </header>

    <nav>
        <ul>
            <li>회사소개</li>
            <li>제품소개</li>
            <li>고객센터</li>
            <li>공지사항</li>
        </ul>
    </nav>

    <section>
        <p>
            우리 회사는 50년 전통의 역사와 뛰어난 기술을 바탕으로 좋은 회사 입니다.
        </p>
    </section>

    <footer>
        <p>
            서울시 oo구 oo동 oo빌딩
        </p>
    </footer>
</body>
</html>

*{에서 전체글자를 녹색으로 줘도}
p{에서 글자를 검은색으로 줬기때문에 } - p에서는 검은색 글자가 나타남
실전 HTML5 & CSS동영상강좌_07강_CSS 기본-II

id(#) 많이씀
↓이 화면 구성정도는 무조건 외우기
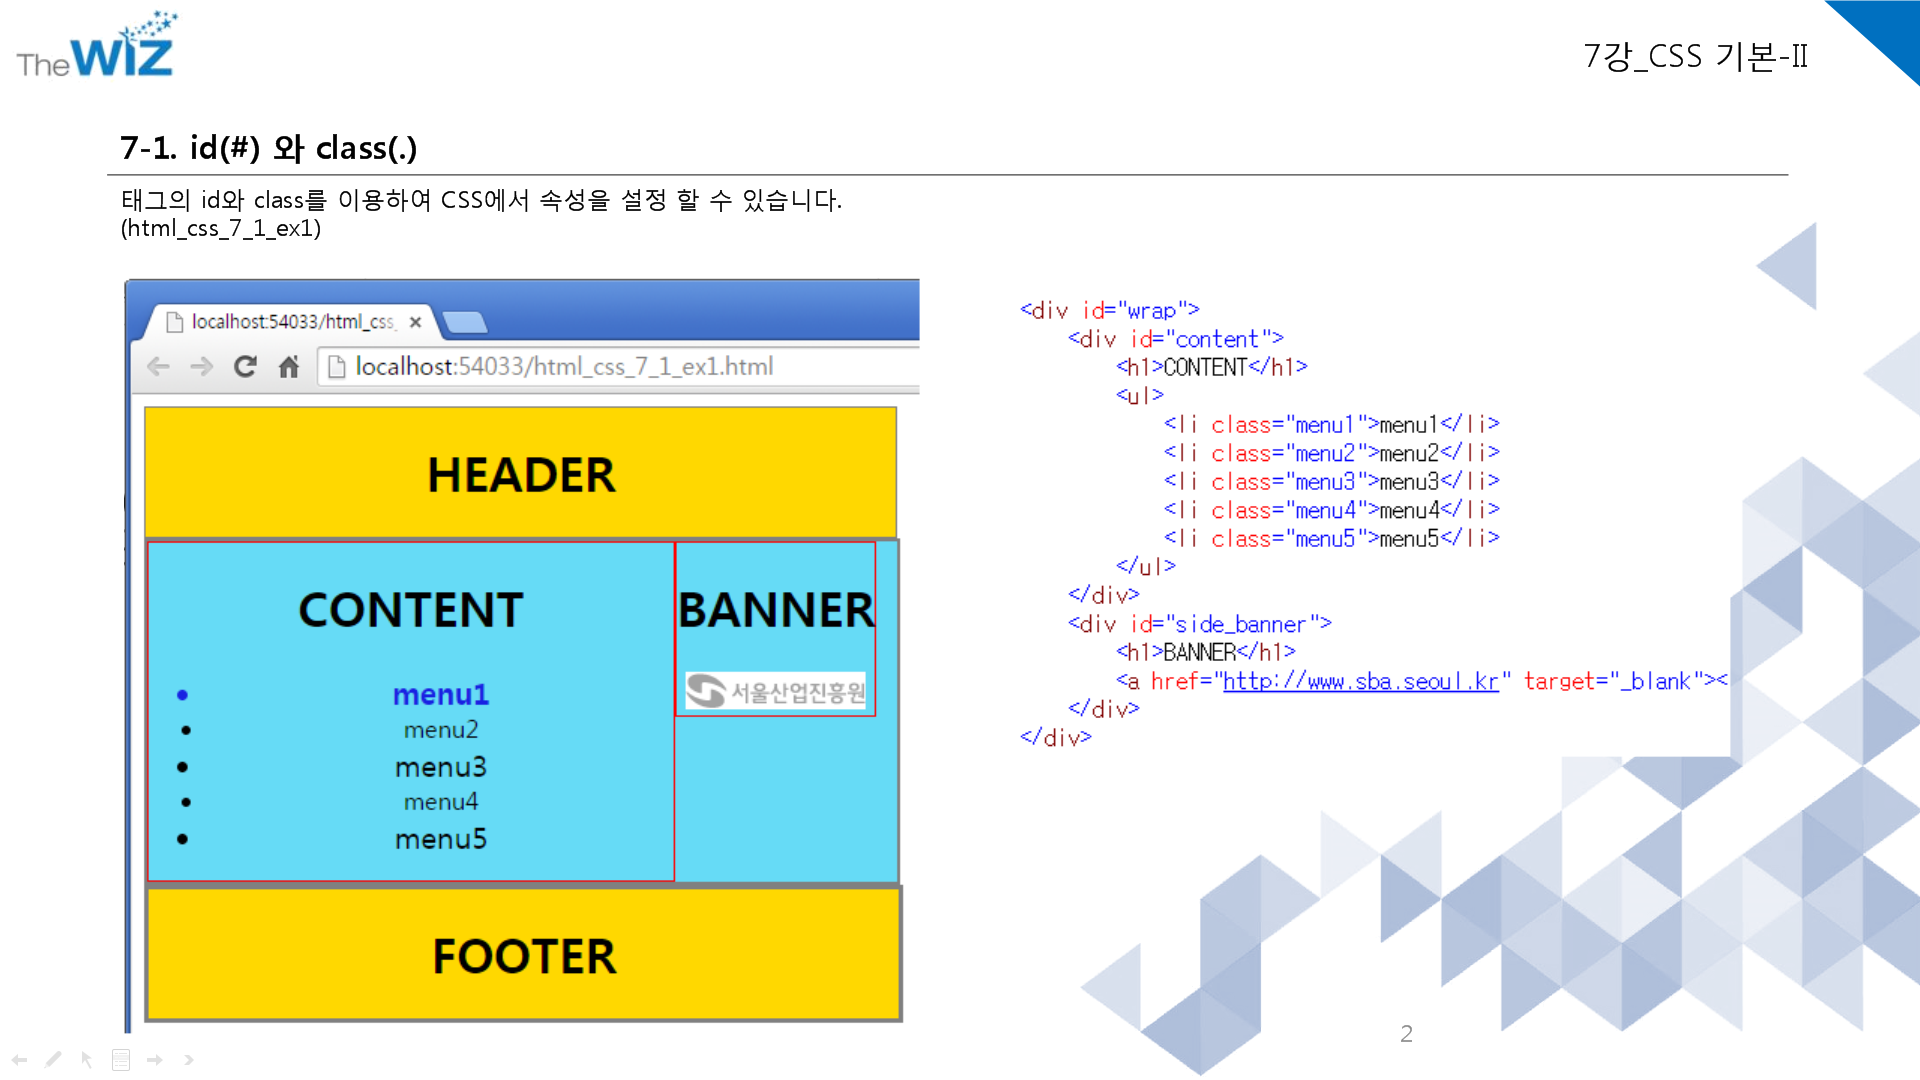
#id.class (id는 내가 임의로 지정하는 이름)
ex. #header , #content, #wrap 이런식으로 sytle에 넣으면 id= 관련된거 전부 영향줌
<!DOCTYPE html>
<html>
<head>
<meta charset="EUC-KR">
<title>Insert title here</title>
</head>
<body>
	<div id=header">
		<h1>HEADER</h1>
	</div>

	<div id="wrap">
		<div id="content">
			<h1>CONTENT</h1>
			<ul>
				<li class="manu1">menu1</li>
				<li class="manu2">menu2</li>
				<li class="manu3">menu3</li>
				<li class="manu4">menu4</li>
				<li class="manu5">menu5</li>
			</ul>
		</div>
		<div id="side_banner">

			<h1>BANNER</h1>

			<a href="http://www.sba.seoul.kr" target="_blank"><img
				src="http://www.sba.seoul.kr/kr/images/footer/f_logo.png"></a>

		</div>

	</div>


	<div id="footer">
		<h1>FOOTER</h1>
	</div>
</body>
</html>
overflow - CSS에서 가장 어려운것
overflow
float:left; = 왼쪽으로 붙여라.
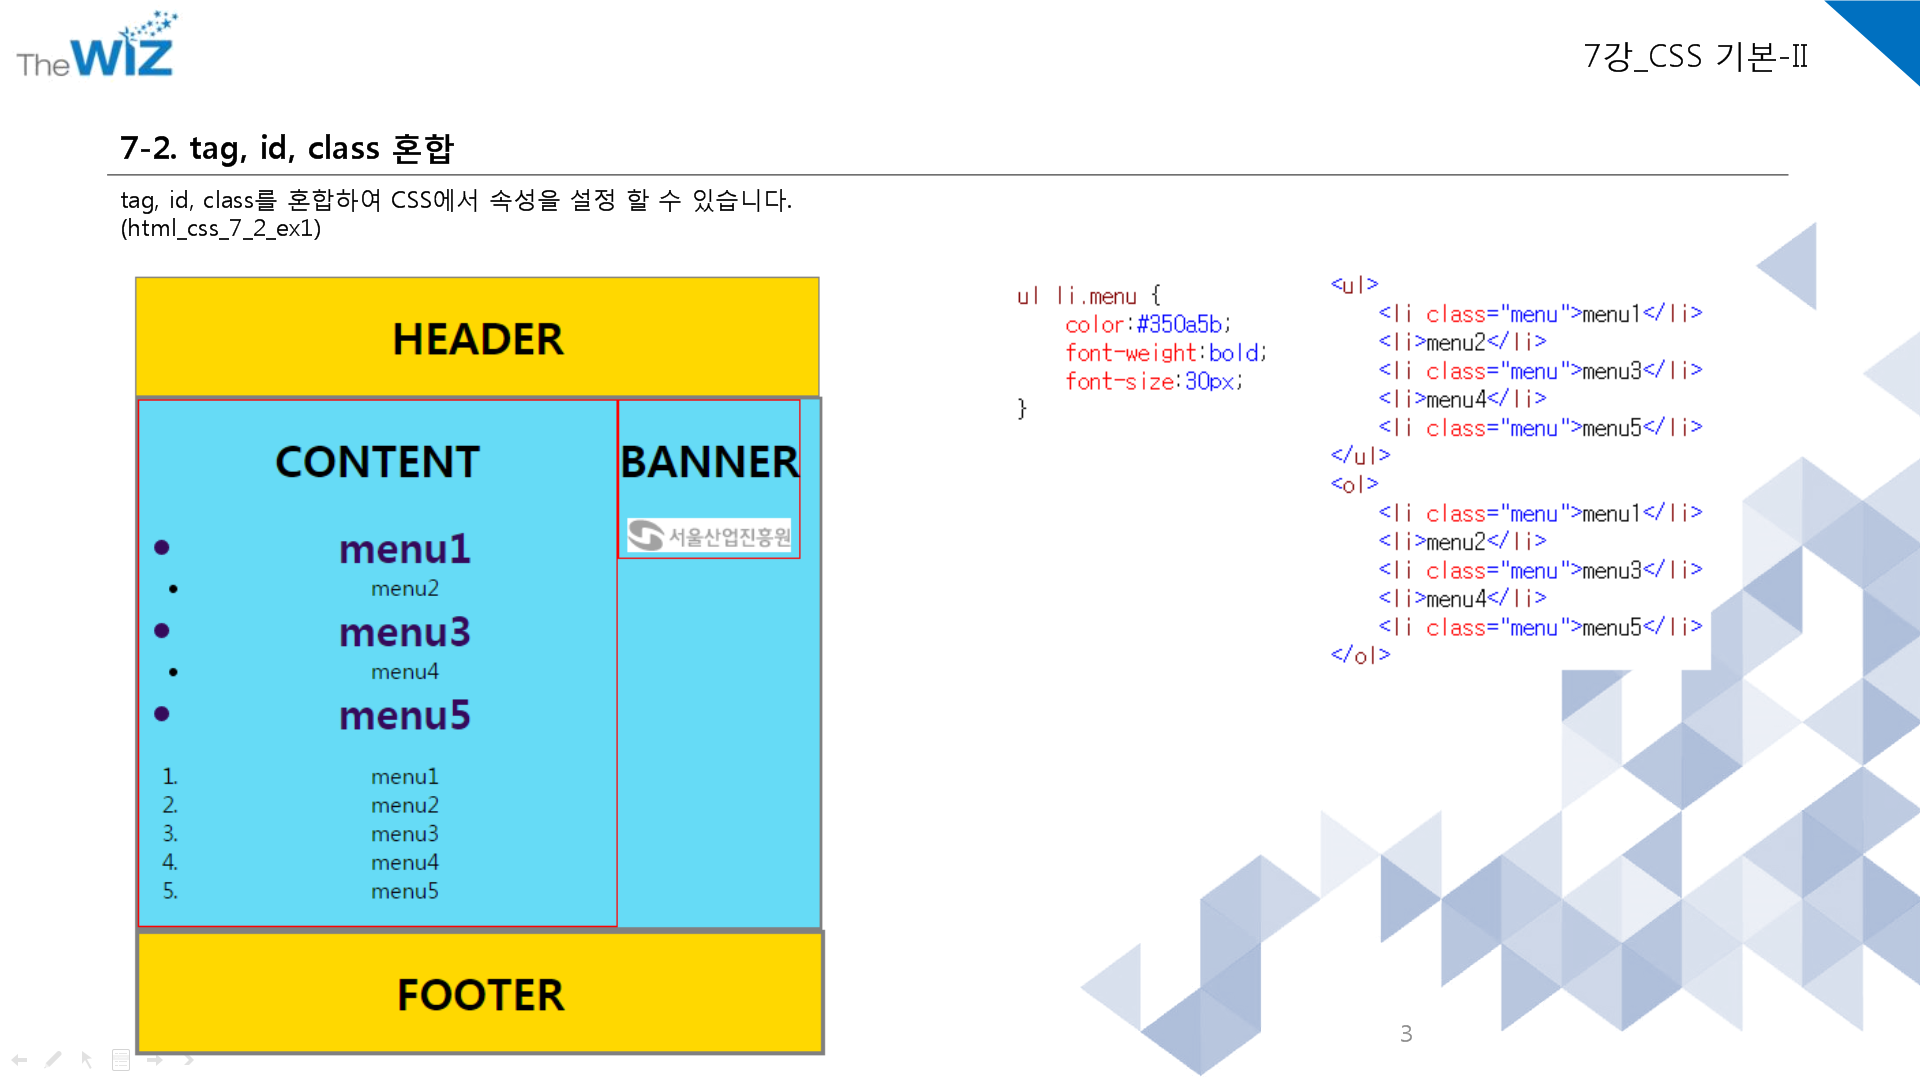
지정자에는 앞에 .을 붙인다. ex) .menu1 { }
JSP
jsp_lecture_06

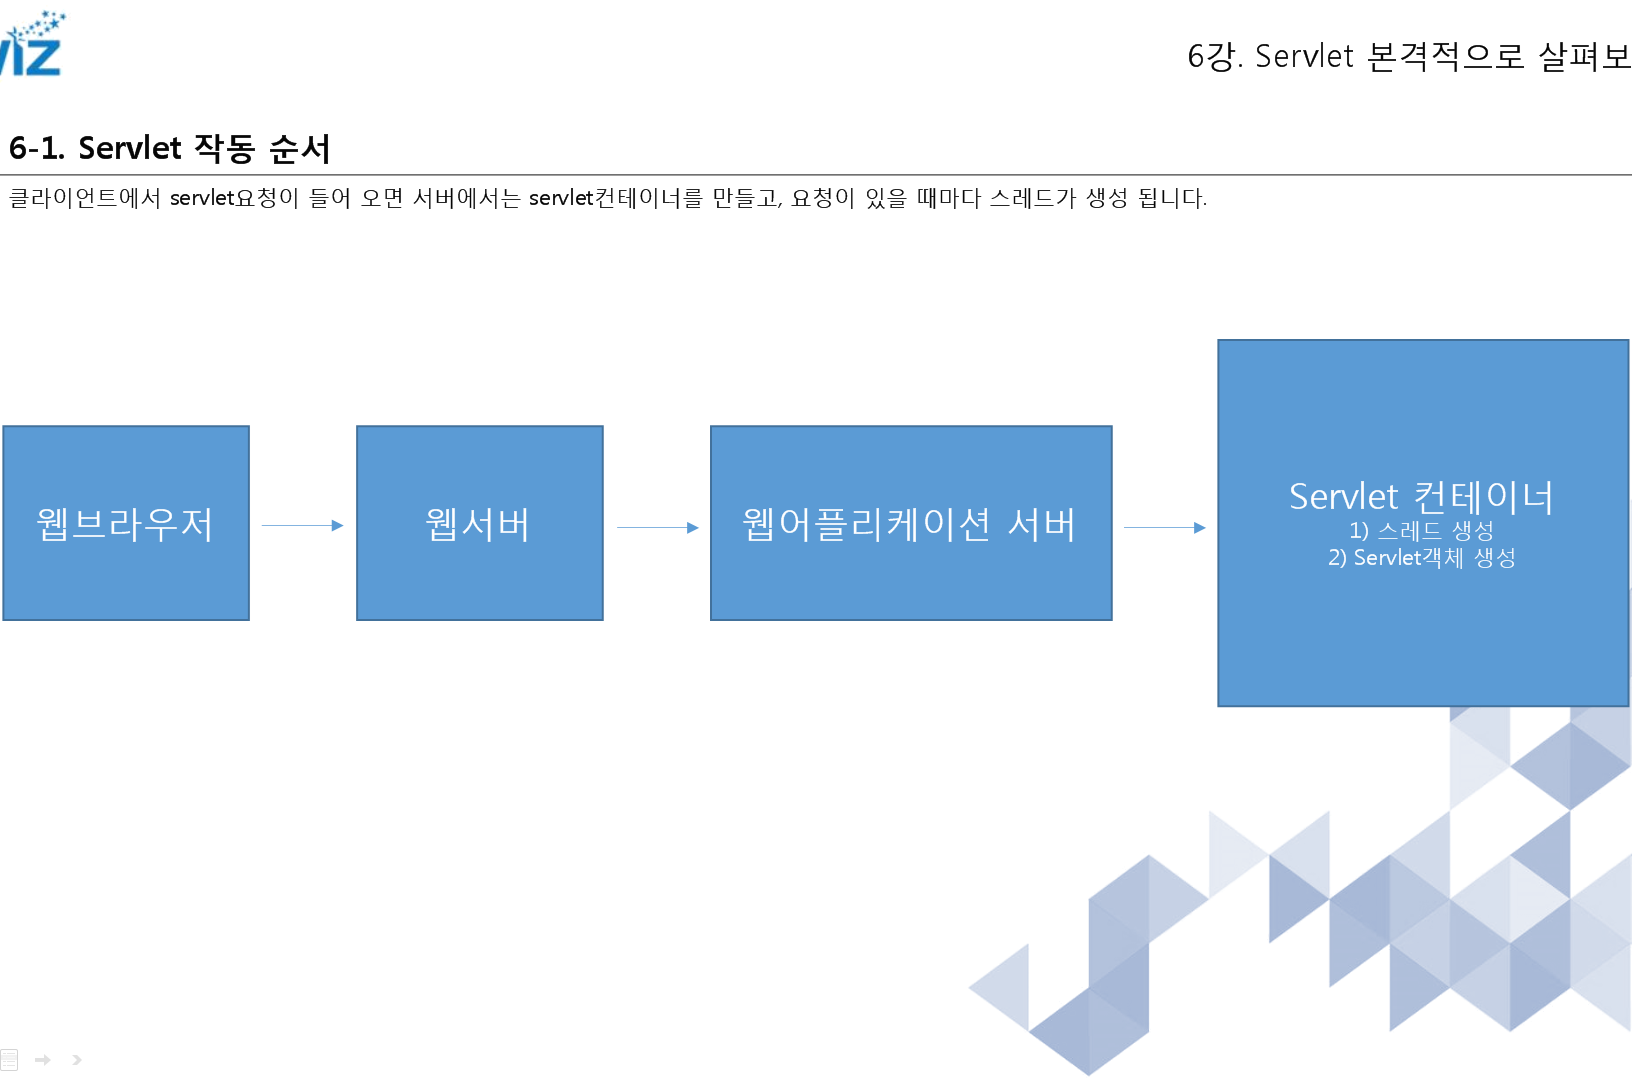
클라이언트에서 servlet요청이 들어오면 서버에서는 servlet컨테이너를 만들고, 요청이 있을 때마다 스레드가 생성된다.
웹어플리케이션 서버 = WAS
jsp servlet이 다른 cgi언어(?)에 비해서 장점들이 있는데 바로 위의 그림임


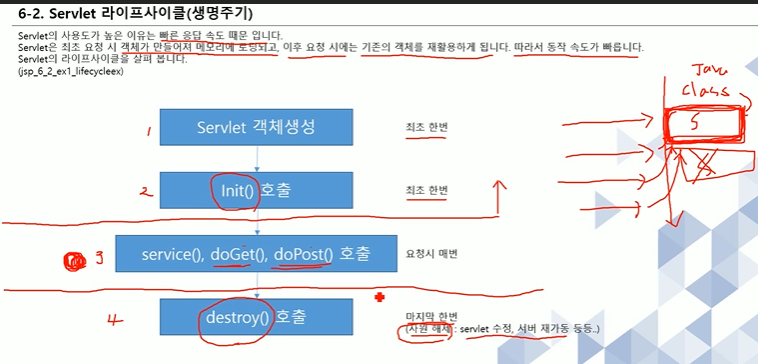
<Servlet의 생성주기>
사용도가 높은 이유는 빠른 응답 속도 때문
최초 요청시 객체가 만들어져 메모리에 로딩(최초 생성)
그 이후 요청시엔 기존 객체 재활용.
따라서 동작 속도가 빠르다.
doGet(get방식으로 했을때, 웹브라우저를 통해 직접 접근할때 실행),doPost(post방식으로 했을 때 실행)는 요청시 매번 호출 된다.
package com.javalec.ex;

import java.io.IOException;

import javax.annotation.PostConstruct;
import javax.annotation.PreDestroy;
import javax.servlet.ServletException;
import javax.servlet.ServletRequest;
import javax.servlet.ServletResponse;
import javax.servlet.annotation.WebServlet;
import javax.servlet.http.HttpServlet;
import javax.servlet.http.HttpServletRequest;
import javax.servlet.http.HttpServletResponse;

/**
 * Servlet implementation class LifeCycleEx
 */
@WebServlet("/LifeCycleEx")
public class LifeCycleEx extends HttpServlet {
	private static final long serialVersionUID = 1L;

    /**
     * @see HttpServlet#HttpServlet()
     */
    public LifeCycleEx() {
        super();
        // TODO Auto-generated constructor stub
    }

//	@Override
//	public void service(ServletRequest arg0, ServletResponse arg1)
//			throws ServletException, IOException {
//		// TODO Auto-generated method stub
//		System.out.println("service");
//	}

    @Override
    public void init() throws ServletException {
    	// TODO Auto-generated method stub
    	System.out.println("init");
    }

	@Override
	public void destroy() {
		// TODO Auto-generated method stub
		System.out.println("destroy");
	}


	/**
	 * @see HttpServlet#doGet(HttpServletRequest request, HttpServletResponse response)
	 */
	protected void doGet(HttpServletRequest request, HttpServletResponse response) throws ServletException, IOException {
		// TODO Auto-generated method stub
		System.out.println("doGet");
	}

	/**
	 * @see HttpServlet#doPost(HttpServletRequest request, HttpServletResponse response)
	 */
	protected void doPost(HttpServletRequest request, HttpServletResponse response) throws ServletException, IOException {
		// TODO Auto-generated method stub
		System.out.println("doPost");
	}


	@PostConstruct
	private void initPostConstruct() {
		// TODO Auto-generated method stub
		System.out.println("initPostConstruct");
	}

	@PreDestroy
	private void destoryPreDestory() {
		// TODO Auto-generated method stub
		System.out.println("destoryPreDestory");
	}

}

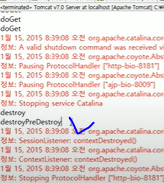
↑출력화면 보면 init은 한번만 호출하고 F5를 누르면 doGet만 호출된다. why? init()은 이미 메모리에 올라가서 올라갈 더이상 호출할 필요가 없기때문 //근데 저기에 initPostConstruct는 왜뜬지 모름;;- 아.. 밑에 예제임
그리고 중단버튼 누르면 destroy 출력된다.
initPostConstruct()는 LifeCycleEx가 시작되기 제일처음에 뜬다.
default로 doGet방식이어서 get방식으로 뜸.
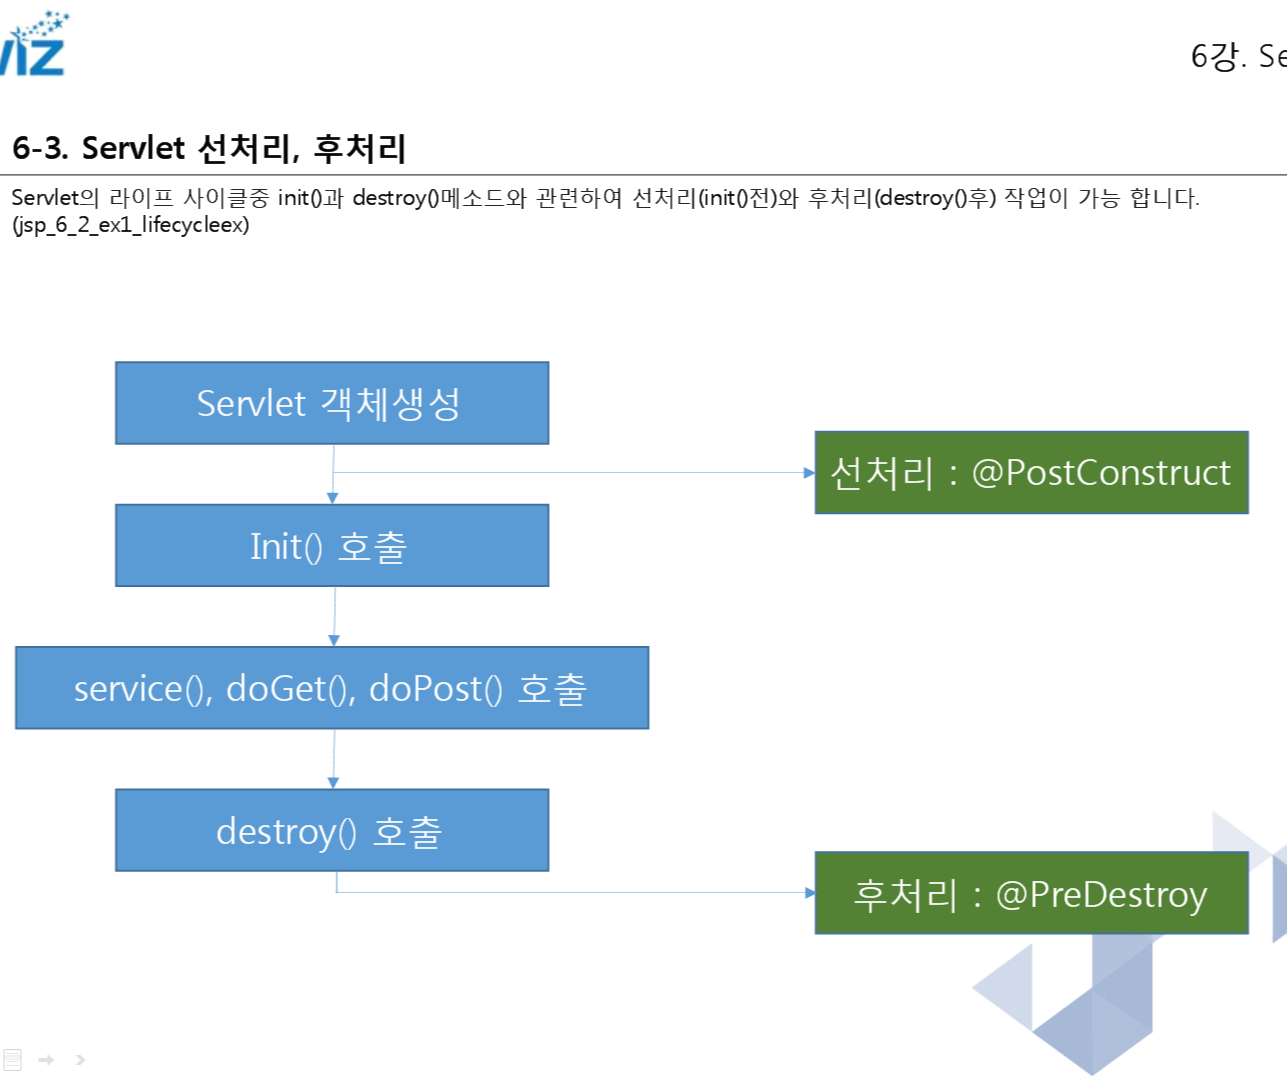


마무리짓고 사라져야하는건 destroy에 넣어야하고 꼭 필요하고 없어지면 안되는것은 init()에 넣는다.
init은 객체올라갈때 한번만 실행되는것. doGet은 객체 올라올때마다 계속 실행되는것.
@PostConstruct는 가끔쓰인다.
jsp_lecture_07 - 한글처리 중요


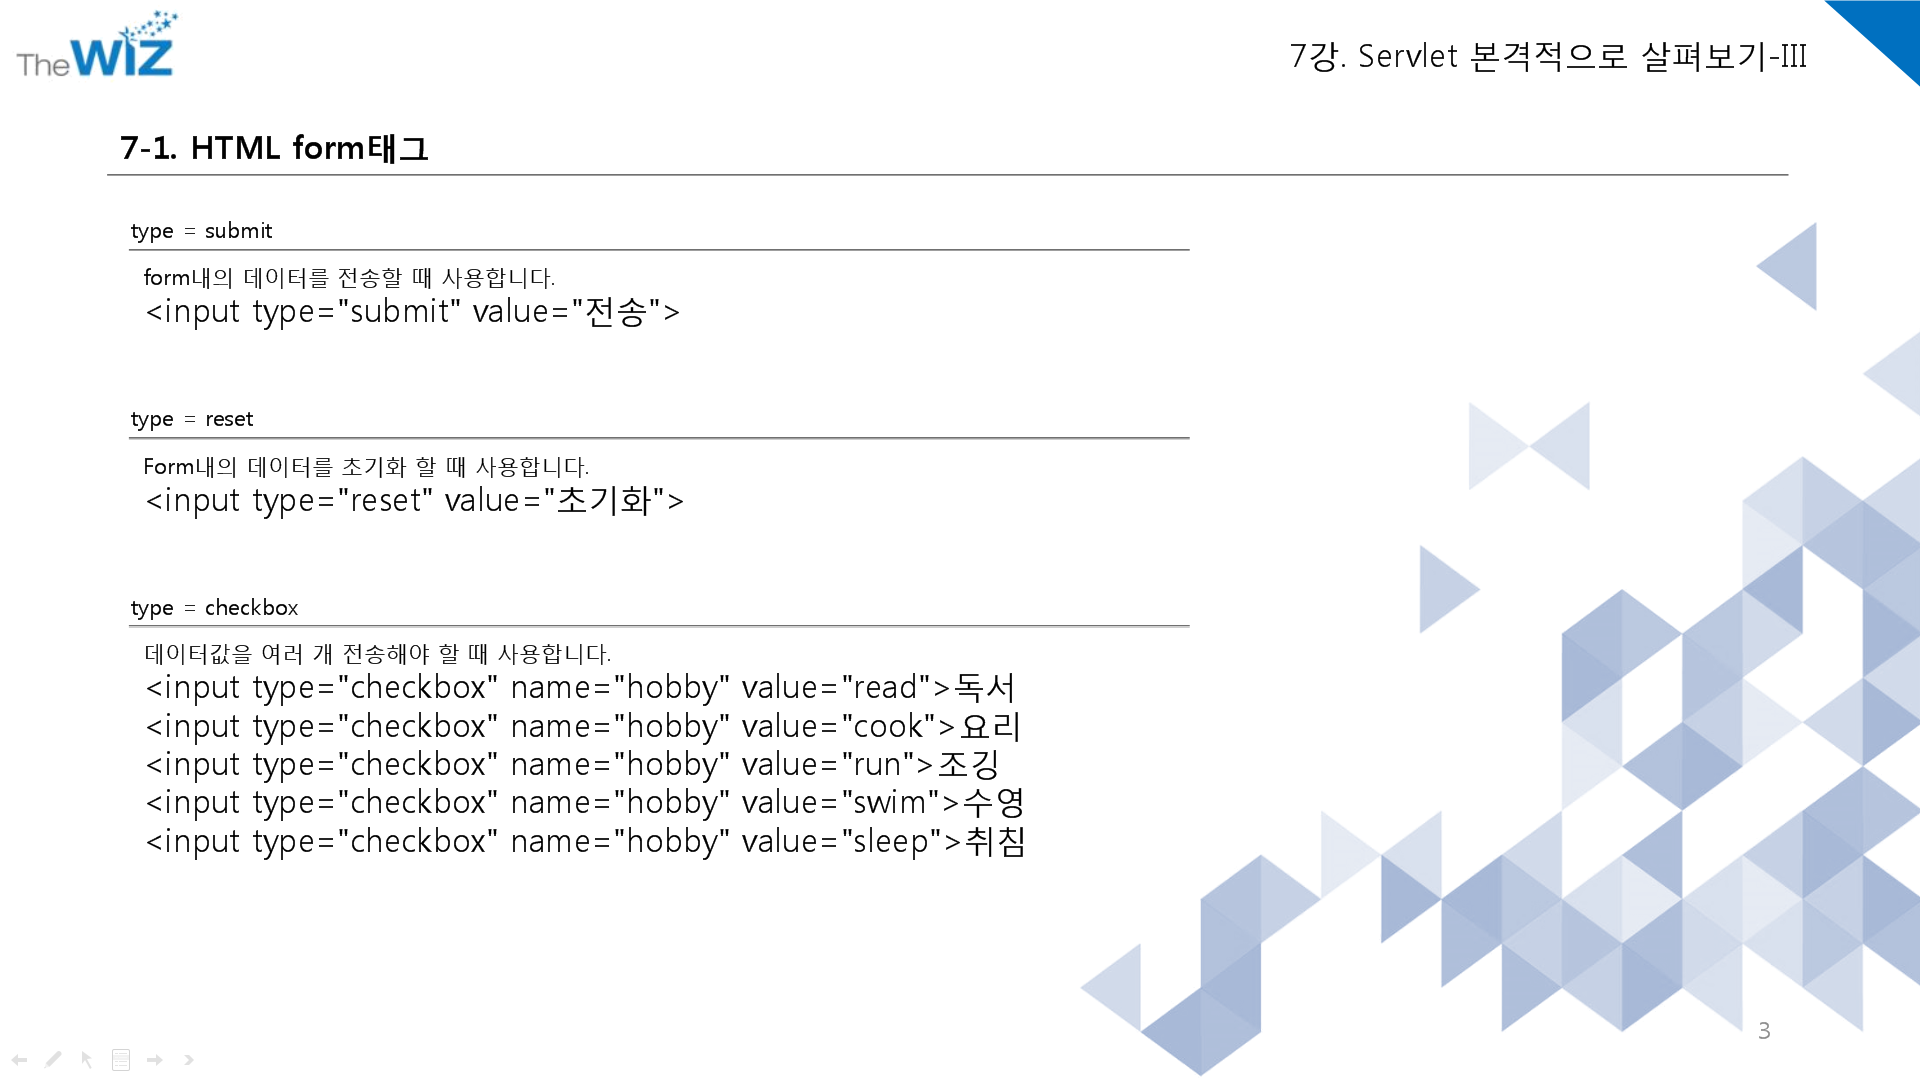
<input type="reset" value="초기화"> 버튼누르면 입력한게 모두 초기화됨.

package com.javalec.ex;

import java.io.IOException;
import java.io.PrintWriter;
import java.util.Arrays;

import javax.servlet.ServletException;
import javax.servlet.annotation.WebServlet;
import javax.servlet.http.HttpServlet;
import javax.servlet.http.HttpServletRequest;
import javax.servlet.http.HttpServletResponse;

/**
 * Servlet implementation class FormEx
 */
@WebServlet("/FormEx")
public class FormEx extends HttpServlet {
	private static final long serialVersionUID = 1L;

    /**
     * @see HttpServlet#HttpServlet()
     */
    public FormEx() {
        super();
        // TODO Auto-generated constructor stub
    }

	/**
	 * @see HttpServlet#doGet(HttpServletRequest request, HttpServletResponse response)
	 */
	protected void doGet(HttpServletRequest request, HttpServletResponse response) throws ServletException, IOException {
		// TODO Auto-generated method stub
		System.out.println("doGet");
	}

	/**
	 * @see HttpServlet#doPost(HttpServletRequest request, HttpServletResponse response)
	 */
	protected void doPost(HttpServletRequest request, HttpServletResponse response) throws ServletException, IOException {
		// TODO Auto-generated method stub
		System.out.println("doPost");

		String id = request.getParameter("id");
		String pw = request.getParameter("pw");

		String[] hobbys = request.getParameterValues("hobby");
		String major = request.getParameter("major");
		String protocol = request.getParameter("protocol");

		response.setContentType("text/html; charset=EUC-KR");
		PrintWriter writer = response.getWriter();

		writer.println("<html><head></head><body>");
		writer.println("아이디 : " + id + "<br />");
		writer.println("비밀번호 : " + pw + "<br />" );
		writer.println("취미 : " + Arrays.toString(hobbys) + "<br />");
		writer.println("전공 : " + major + "<br />");
		writer.println("프로토콜 : " + protocol);
		writer.println("</body></html>");

	}

}
아이디비번 입력받는것은 getDo는 사용하면안됨. 무조건 getPost로!
인터넷으로 타고 들어오는건 전부 String이다. (아이디 비번 등등... 아스키코드값으로 들어온다.)
hobby 체크박스는 배열로 받아옴!!! 그래서 getParameterValues를 씀
체크박스는 배열로 받아야한다!!!
response는 다시 writer.println을 가지고 뿌려줌.
오늘의 문제
1.선택자란?
선택자(selector)은 html안에서 특정 태그들에게 영향을 주는것.
div{ }는 <div>태그에 영향줌!
여기서 div가 선택자이다.
(style안에 있는 div{ } ---<태그>아닌 { }. 문법요소가 달라짐)
2.CSS 문법은?
html을 꾸며주는 문법
<head><style> </style></head>
<style>이용해서 스타일 지정
3.시멘틱(semnatic) 태그에 대하여 설명하고,그 종류는?
div보다 한단계 더 업그레이드된 버전.
시멘틱은 웹페이지가 어떻게 구성되어있는지, 태그구조를 쉽게 파악할 수 있다.
<nav> = navi = 메뉴
<section> = 여러 중심 내용을 감싸는 공간
<footer> = 꼬리말
<aside>=옆에 오는 글
4.bootstrap 에 대하여 설명하시오.
html을 구현할때 보다 쉽게 구현할수 있게 도와주는 사이트
5.overflow 에 대하여 설명하시오.
overflow=지정해준 값보다 넘칠때 어떻게 해줄지 정하는것.
(자식이 부모보다 클때 overflow속성을 쓴다. 부모가 더 크면 쓸필요x)
overflow: visible; - 지정해준 값보다 넘칠때 그냥 넘치게 보여지는것.
overflow: hidden; - 넘치면 잘림
overflow: scroll; -넘치는건 스크롤로.(가로세로 둘다)
overflow: auto; - 스크롤바 필요여부에 따라 자동으로 추가됨(가로 또는 세로 또는 둘다)
6.class 와 id 선택자의 차이와 어떨때 사용하는가?
<div id="div_01"> 주게되면 여기 id는 변수명 "div_01"이 html창에서 무조건 유일하게 있어야한다.
클래스는 변수명이 중복되도 상관X
따라서 중복되는 것에는 클래스 사용, 하나만 딱 지정하고 싶으면 id사용
7.servlet의 생명주기에 대하여 설명하시오.
init() (처음 한번만 호출된다.)
→service(),doPost(),doget() (호출될때마다 실행된다.)
→destroy() (호출된걸 소멸할때 쓴다.)
8. 위를 구성하시오

//메뉴12345 구상이안됨
<!DOCTYPE html>
<html>
<head>
<meta charset="utf-8">
<title></title>

<style>
#header {
	width: 500px;
	background-color: #ffff00;
	text-align: center;
	border: 1px solid  #ff0000 ;
}

#wrap {
	width: 500px;
	background-color: #87CEEB;
	text-align: center;
	overflow: hidden;
}

#content {
	width: 300px;
	background-color: #87CEEB;
	border: 2px solid  #ff0000;
	float: left;
}

#banner {
	border:1px;
	float: left;
	border: 2px solid  #ff0000;
}

.menu1{
color : blue;
}

.menu1, .menu3, .menu5 {
	font-size: 5px;
}

#footer {
	width: 500px;
	background-color: #ffff00;
	border: 1px solid  #ff0000;
	text-align: center;
}
</style>

</head>
<body>

	<div id="header">
		<h1>HEADER</h1>
	</div>

	<div id="wrap">
		<div id="content">
			<h1>CONTENT</h1>
			<ul>
				<li class="manu1">menu1</li>
				<li class="manu2">menu2</li>
				<li class="manu3">menu3</li>
				<li class="manu4">menu4</li>
				<li class="manu5">menu5</li>
			</ul>
		</div>

		<div id="banner">
			<h1>BANNER</h1>
			<a href="http://www.sba.seoul.kr" target="_blank"><img
				src="http://www.sba.seoul.kr/kr/images/footer/f_logo.png"></a>
		</div>
	</div>
	<div id="footer">
		<h1>FOOTER</h1>
	</div>
</body>
</html>
9.위를 구성하시오(필수)
(웹주소 또한 위의 그림대로 할것)
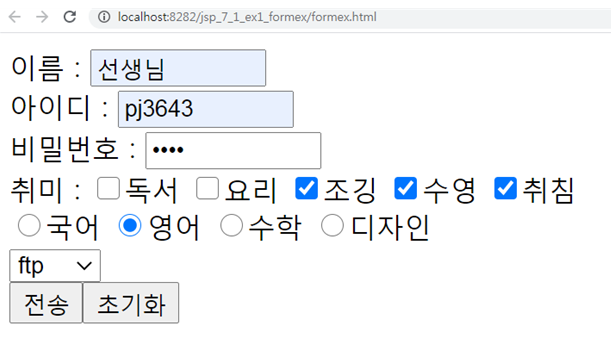
<!DOCTYPE html>

<html>
<head>
    <meta charset="utf-8" />
    <title></title>
</head>
<body>
           <form action="전송" method="post">
        이름 : <input type="text" name="uname" /><br />
        아이디 : <input type="text" name="id" /><br />
        비밀번호 : <input type="password" name="pw" /><br />
        취미 : <input type="checkbox" name="hobby" value="kor" checked="checked" />한글,
                   <input type="checkbox" name="hobby" value="read" />독서,
                   <input type="checkbox" name="hobby" value="cook" />요리,
                   <input type="checkbox" name="hobby" value="jog" />조깅,
                   <input type="checkbox" name="hobby" value="swim" />수영,
                   <input type="checkbox" name="hobby" value="sleep" />취침<br />

        성별구분 : <input type="radio" name="major" value="kor">국어,
                    <input type="radio" name="major" value="eng">영어
                    <input type="radio" name="major" value="math">수학
                    <input type="radio" name="major" value="deign">디자인<br />

                <select name="protocol">
                 <option>ftp</option>

               </select><br />

        <input type="submit" value="전송"><input type="submit" value="초기화">
	    </form>
</body>
</html>
package edu.bit.ex;
import java.io.IOException;
import java.io.PrintWriter;
import java.util.Arrays;
import javax.servlet.ServletException;
import javax.servlet.annotation.WebServlet;
import javax.servlet.http.HttpServlet;
import javax.servlet.http.HttpServletRequest;
import javax.servlet.http.HttpServletResponse;
/**
* Servlet implementation class helloworld
*/
@WebServlet("/전송")
public class output extends HttpServlet {
private static final long serialVersionUID = 1L;
/**
* @see HttpServlet#HttpServlet()
*/
public output() {
super();
// TODO Auto-generated constructor stub
}
/**
* @see HttpServlet#doGet(HttpServletRequest request, HttpServletResponse
* response)
*/
protected void doGet(HttpServletRequest request, HttpServletResponse response)
throws ServletException, IOException {
response.setContentType("text/html; charset=euc-kr");
}
/**
* @see HttpServlet#doPost(HttpServletRequest request, HttpServletResponse
* response)
*/
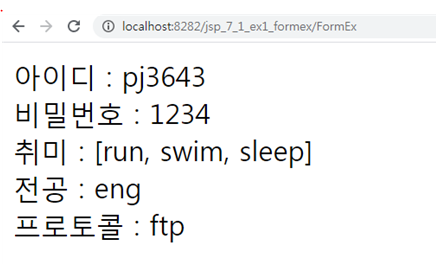
protected void doPost(HttpServletRequest request, HttpServletResponse response)
throws ServletException, IOException {
String id = request.getParameter("id");
String pw = request.getParameter("pw");
String[] hobby = request.getParameterValues("hobby");
String major = request.getParameter("major");
String protocol = request.getParameter("protocol");
response.setContentType("text/html; charset=euc-kr");
PrintWriter writer = response.getWriter();
writer.println("<html><head></head><body>");
writer.println("아이디 : " + id + "<br />");
writer.println("비밀번호 : " +pw + "<br />" );
writer.println("취미 : " + Arrays.toString(hobby) + "<br />");
writer.println("전공 : " + major + "<br />");
writer.println("프로토콜 : "+protocol);
writer.println("</body></html>");
writer.close();
}
}
dd추가설명
http://주소값/프로젝트명/webcontents밑에(formex.html)
정적리소스 갖고오는 방법임.


전송을 눌렀을때
클라이언트입장에서 바라는진짜주소는 webcontents밑으로오는 /주소
form action="상대경로"
	   ="/절대경로"
-절대경로하면 프로젝트명뛰어넘고 주소값뒤에 바로 때려붙는다.
따라서 앞에/이거 붙이고싶으면 프로젝트명/webcontents에 있는 명 까지 다 적는다.
여기서 ./ ../ 이건 쓰이지x
근데 톰캣은 /이거 하나만써도 알아서 다 알아듣는다.
dd이거 초기화부분 생성을 안함
'코딩 > 수업 정리' 카테고리의 다른 글
| 20.12.31 Thu [028] (0) | 2020.12.31 |
|---|---|
| 20.12.30 Wed [027] (0) | 2020.12.30 |
| 20.12.28 Mon [025] (0) | 2020.12.28 |
| 20.12.24 Thu [024] JSP (0) | 2020.12.24 |
| 20.12.22 Tue [022] (0) | 2020.12.22 |


댓글