HTML
실전 HTML5 & CSS동영상강좌_12강_CSS 속성-III
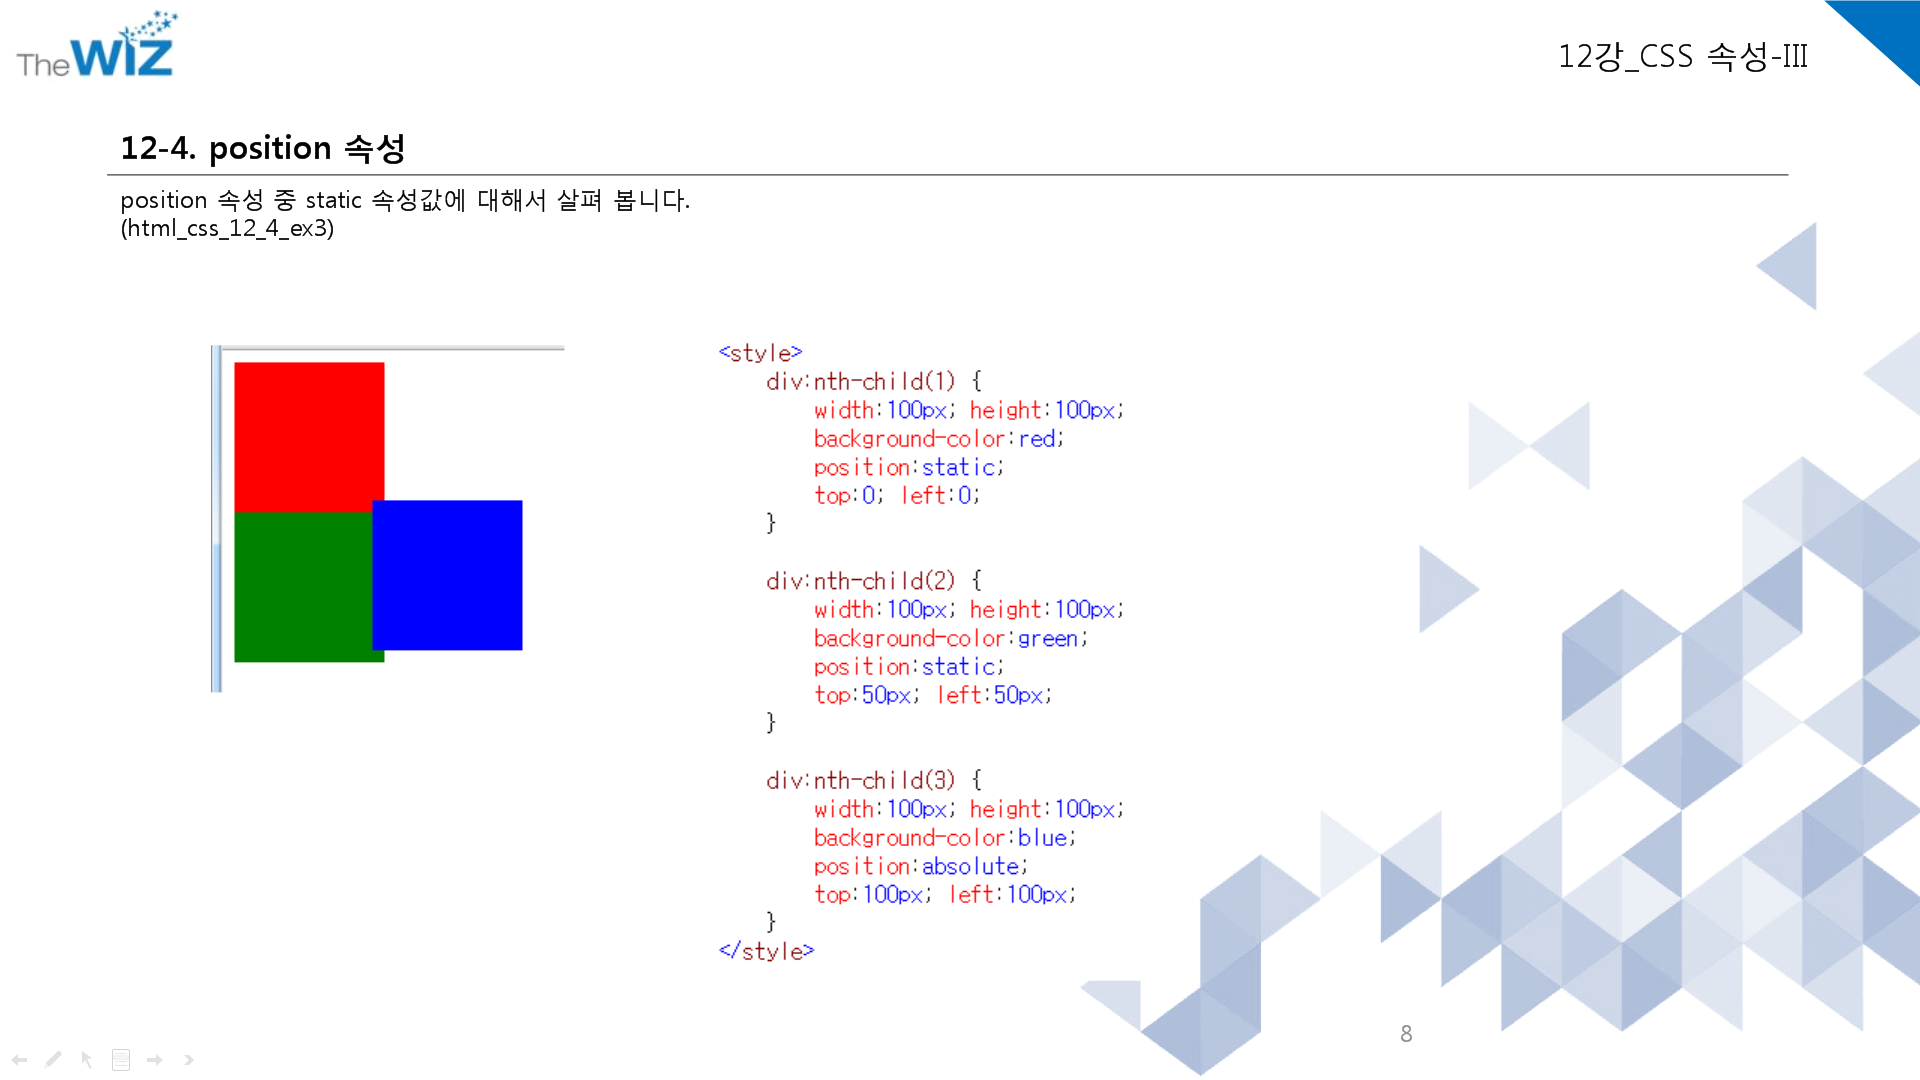
position 중요
position은 위치를 지정하는것.
static -디폴트가 static이어서 생략해도 됨. 기본적인건 static
relative - 상대위치.
absolute - static 속성을 가지고 있지 않은 부모를 기준으로 움직입니다
fixed -

absolute는 postion: static속성을 가지고 있지 않은 부모를 기준으로 움직인다. 만약 부모 중에 포지션이 relative, absolute, fixed인 태그가 없다면 가장 위의 태그(body)가 기준이 된다.
absolute는 처음에 top,left는 0
position - fixed

<!DOCTYPE html>
<html>
<head>
<meta charset="EUC-KR">
<title></title>
<style>
div {
	width: 100px;
	height: 100px;
	opacity: 0.7;
}

div:nth-child(1) {
	background-color: #ff0000;
	position: fixed;
	top: 0;
	left: 0;
}

div:nth-child(2) {
	background-color: #00ff00;
	position: absolute;
	top: 50px;
	left: 50px;
}

div:nth-child(3) {
	background-color: #0000ff;
	position: absolute;
	top: 100px;
	left: 100px;
}

#wrap {
	width: 300px;
	height: 300px;
	position: fixed;
	top: 300px;
	left: 300px;
	background-color: yellow;
	opacity: 1.0;
}

#wrap .content {
	width: 100px;
	height: 100px;
	position: absolute;
	top: 100px;
	left: 100px;
	background-color: red;
	opacity: 1.0;
}
</style>
</head>
<body>
	<div></div>
	<div></div>
	<div></div>

	<div id="wrap">
		<div class="content"></div>
	</div>
</body>
</html>
div:nth-child(2) {
background-color: #00ff00;
position: absolute;
top: 50px; →위로부터 50px떨어져있다.
left: 50px; →왼쪽으로부터 50px떨어져있다.
position - static
position - relative

<!DOCTYPE html>
<html>
<head>
<meta charset="EUC-KR">
<title></title>
<style>
#red {
	width: 100px;
	height: 100px;
	background-color: red;
}

#yellow {
	width: 400px;
	height: 400px;
	background-color: yellow;
	position: relative;
	top: 100px;
	left: 100px;
}

#green {
	width: 100px;
	height: 100px;
	background-color: green;
	position: relative;
	top: 0;
	left: 100px;
}

#blue {
	width: 100px;
	height: 100px;
	background-color: blue;
	position: relative;
	top: 100px;
	left: 100px;
}
</style>
</head>
<body>
	<div id="red"></div>
	<div id="yellow">
		<div id="green"></div>
		<div id="blue"></div>
	</div>


</body>
</html>
position - relative&absolute 혼합

실전 HTML5 & CSS동영상강좌_13강(gradient는 x)


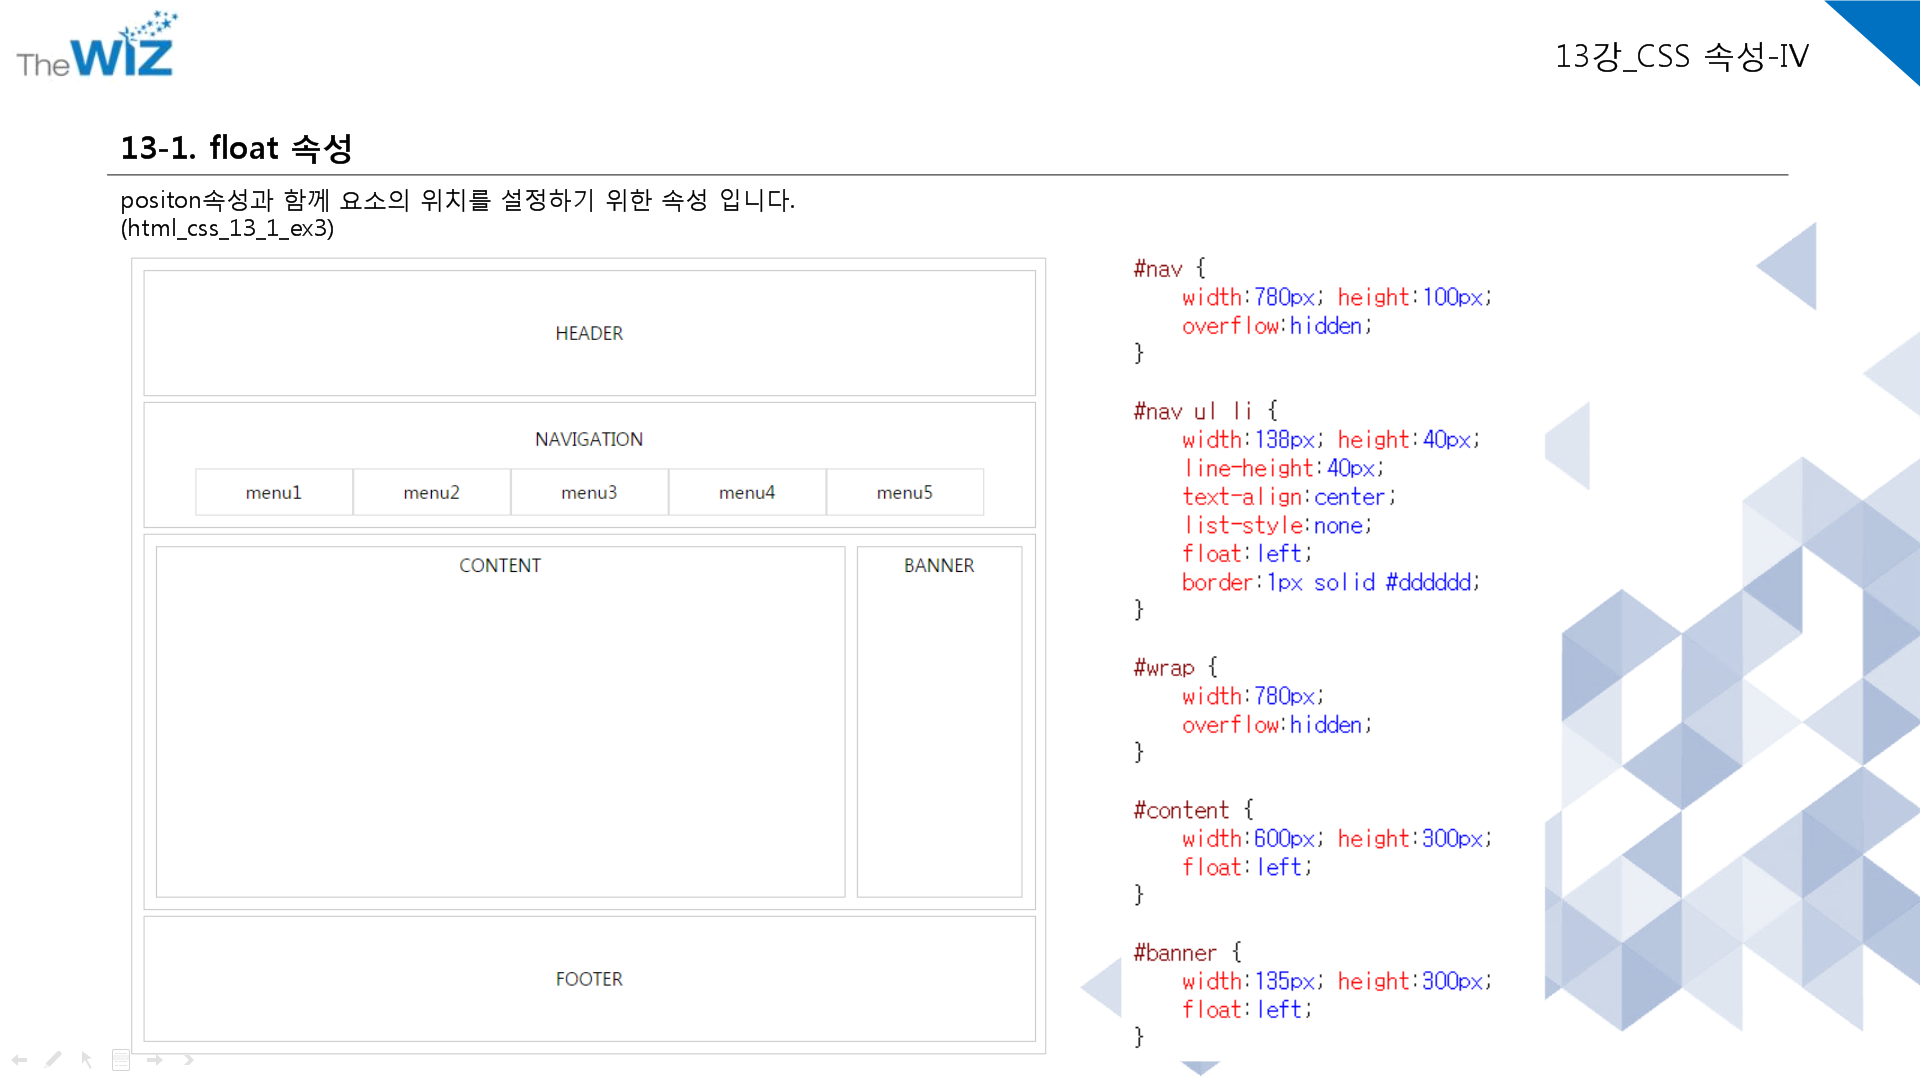
float:left; 시키면 = 왼쪽으로 띄운다는 뜻임.
첫번째거 float시키고 두번째거도 float시켜야 옆에 같이 띄어서 붙음
첫번째거 float시키고 두번째거 안시키면 공중에 띄어진 첫번째거 밑으로 들어감
근데 <p>태그나 그냥 text문자는 float안으로 들어가는게 아니라 그냥 옆에 같이 붙는다.
jsp
jsp_lecture_12

액션태그 : JSP페이지 내에서 어떤 동작을 하도록 지시하는 태그. ex. 페이지이동, 페이지 include..
forward, include, param에 대해서 배울것.

[main.jsp] WebContent에 생성
<%@ page language="java" contentType="text/html; charset=EUC-KR"
    pageEncoding="EUC-KR"%>
<!DOCTYPE html PUBLIC "-//W3C//DTD HTML 4.01 Transitional//EN" "http://www.w3.org/TR/html4/loose.dtd">
<html>
<head>
<meta http-equiv="Content-Type" content="text/html; charset=EUC-KR">
<title>Insert title here</title>
</head>
<body>

	<h1>main.jsp 페이지 입니다.</h1>

	<jsp:forward page="sub.jsp" />

</body>
</html>
[sub.jsp]WebContent에 생성
<%@ page language="java" contentType="text/html; charset=EUC-KR"
pageEncoding="EUC-KR"%>
<!DOCTYPE html PUBLIC "-//W3C//DTD HTML 4.01 Transitional//EN" "http://www.w3.org/TR/html4/loose.dtd">
<html>
<head>
<meta http-equiv="Content-Type" content="text/html; charset=EUC-KR">
<title>Insert title here</title>
</head>
<body>
<h5>sub.jsp 페이지 입니다.</h5>
</body>
</html>↓출력화면

redirect하면 주소가 바뀐다.
forward는 주소가 안바뀐다 - 바뀔리도없고 바뀔수도없다. 주소가 바뀐다는 의미는 request를 한번더 한다는 얘기. 클라이언트가 한번더 요청했다는 것.
main에서 주소를 쳤음에도 불구하고 forward시키면 서버에서 sub.jsp를 던져줬다.
jsp: 이런게 액션태그
쓰임새 - <jsp:forward ></jsp:forward> 해주거나 <jsp:forward />
sub.jsp → 상대경로

flush는 X 생략. 사용 거의 안함.
[include01.jsp]
<%@ page language="java" contentType="text/html; charset=EUC-KR"
    pageEncoding="EUC-KR"%>
<!DOCTYPE html PUBLIC "-//W3C//DTD HTML 4.01 Transitional//EN" "http://www.w3.org/TR/html4/loose.dtd">
<html>
<head>
<meta http-equiv="Content-Type" content="text/html; charset=EUC-KR">
<title>Insert title here</title>
</head>
<body>

	<h1> include01.jsp 페이지 입니다. </h1>
	<jsp:include page="include02.jsp" flush="true" />
	<h1> 다시 include01.jsp 페이지 입니다. </h1>

</body>
</html>
[include02.jsp]
<%@ page language="java" contentType="text/html; charset=EUC-KR"
pageEncoding="EUC-KR"%>
<!DOCTYPE html PUBLIC "-//W3C//DTD HTML 4.01 Transitional//EN" "http://www.w3.org/TR/html4/loose.dtd">
<html>
<head>
<meta http-equiv="Content-Type" content="text/html; charset=EUC-KR">
<title>Insert title here</title>
</head>
<body>
<h1> include02.jsp 페이지 입니다. </h1>
</body>
</html>include는 현재 페이지에 다 합쳐주는것.

forward는 서버에서 서버로 넘어가는 것이다.
↓ 이 소스코드는 외우기. 중요. 필수.
[forward.jsp]
<%@ page language="java" contentType="text/html; charset=EUC-KR"
    pageEncoding="EUC-KR"%>
<!DOCTYPE html PUBLIC "-//W3C//DTD HTML 4.01 Transitional//EN" "http://www.w3.org/TR/html4/loose.dtd">
<html>
<head>
<meta http-equiv="Content-Type" content="text/html; charset=EUC-KR">
<title>Insert title here</title>
</head>
<body>

	<jsp:forward page="forward_param.jsp">
		<jsp:param name="id" value="abcdef" />
		<jsp:param name="pw" value="1234" />
	</jsp:forward>

</body>
</html>
[forward_param.jsp]
<%@ page language="java" contentType="text/html; charset=EUC-KR"
pageEncoding="EUC-KR"%>
<!DOCTYPE html PUBLIC "-//W3C//DTD HTML 4.01 Transitional//EN" "http://www.w3.org/TR/html4/loose.dtd">
<html>
<head>
<meta http-equiv="Content-Type" content="text/html; charset=EUC-KR">
<title>Insert title here</title>
</head>
<body>
<%!
String id, pw;
%>
<%
id = request.getParameter("id");
pw = request.getParameter("pw");
%>
<h1>forward_param.jsp 입니다.</h1>
아이디 : <%= id %><br />
비밀번호 : <%= pw %>
</body>
</html>
param은 forward와 include태그에 데이터값을 넘겨주고 싶을대 쓰는것
넘겨줄때 request.getParameter("name"); 이라고 쓴다.
jsp_lecture_13

↓ 이 개념 매우 중요★★★★★

클라이언트 ㅡrequest→ 웹브라우저
서버는 웹브라우저와의 관계를 종료한다.
웹브라우저에 응답 후 관계를 끊는 것은 http프로토콜의 특징이다. 왜끊느냐? 수천만명의 서버를 계속 유지시킬 수 없으니까... 어쩔 수 없이 끊어야한다.
쿠키 역할:
채팅을 생각하면됨
채팅은 누가 한명 채팅을 끊지않는 이상 유지가 가능하다.
but, 쿠키는 채팅과 다르게 연결성 유지가 안된다.
데이터를 웹브라우저에 보내면 소켓에서 관계를 끊어버린다.
로그인 시켰는데 서버 끊김. 이때 연결성 유지 어떻게 시킴?
→ 쿠키, 세션 : 이 두가지는 연결성 유지를 위한 꼼수다.
저장공간 두개. 쿠키, 세션....(?)
================================================
(클라이언트가)
web ㅡcookie→ WAS(엡어플리케이션 서버)(WAS에 있는 servlet, 어플리케이션, session)
←cookieㅡ *servlet(servlet은 어플리케이션과 session에 줌..(?)
*어플리케이션(누구나 쓸수있는 저장공간)
*session(101 102 103 104...≒캐비넷. 자기만 쓸 수 있는 공간)
휘트니스에 샴푸를 캐비넷(session)에 두고올 수 있지만 가지고 다닐수도 있다.
↔getCookies();
↔addCookies();
================================================
↓이 코드들 그냥 전부 외우고, 코드 한줄한줄 어떤 의미인지 반드시 알것!
[login.html]
<!DOCTYPE html>
<html>
<head>
<meta charset="EUC-KR">
<title>Insert title here</title>
</head>
<body>

	<form action="loginOk.jsp" method="post">
		아이디 : <input type="text" name="id" size="10"><br />
		비밀번호 : <input type="password" name="pw" size="10"><br />
		<input type="submit" value="로그인">
	</form>

</body>
</html>
[loginOk.jsp]
<%@ page language="java" contentType="text/html; charset=EUC-KR"
pageEncoding="EUC-KR"%>
<!DOCTYPE html PUBLIC "-//W3C//DTD HTML 4.01 Transitional//EN" "http://www.w3.org/TR/html4/loose.dtd">
<html>
<head>
<meta http-equiv="Content-Type" content="text/html; charset=EUC-KR">
<title>Insert title here</title>
</head>
<body>
<%!
String id, pw;
%>
<%
id = request.getParameter("id");
pw = request.getParameter("pw");
if(id.equals("abcde") && pw.equals("12345")) {
Cookie cookie = new Cookie("id", id);
cookie.setMaxAge(60);
response.addCookie(cookie);
response.sendRedirect("welcome.jsp");
} else {
response.sendRedirect("login.html");
}
%>
</body>
</html>↑if조건에 맞는 순간 cookie생성.
cookie.setMaxAge(60) : 60분동안 유지시켜라
response.addCookie(cookie); 여기에 저장되어있는것은 id(keyValue형태)
cookie라는 객체를 생성시켰는데 abcde를 저장시킴 - 60분동안
response.sendRedirect("welcome.jsp"); 클라이언트한테 다시 가서 요청시켜라. welcome.jsp를 다시 줌.
[웹브라우저에는 쿠키를 담을 영역이있다.]
redirect의 뜻은?? 클라이언트는 id,pw를 통해 접속함. 서버는 id하고pw를 담아서 다시 response해서 해당 서버이름으로 쿠키라는 공간에 id에 abcde,pw에 12345를 담음. 그다음 넘어갈때 해당 쿠키를 무.조.건. 같이 넘긴다.(언제까지? 지정한 시간까지)
[loginOk.jsp]에서 response.addCookie(cookie)에서는 아직 쿠키가 심어지기 전이다.
여기서 호출할수 없음!
reponse.sendRedirect("welcome.jsp") 리다이렉트해야 클라이언트에 심어지는것!
[welcome.jsp]
<%@ page language="java" contentType="text/html; charset=EUC-KR"
    pageEncoding="EUC-KR"%>
<!DOCTYPE html PUBLIC "-//W3C//DTD HTML 4.01 Transitional//EN" "http://www.w3.org/TR/html4/loose.dtd">
<html>
<head>
<meta http-equiv="Content-Type" content="text/html; charset=EUC-KR">
<title>Insert title here</title>
</head>
<body>

	<%
		Cookie[] cookies = request.getCookies();

		for(int i=0; i<cookies.length; i++) {
			String id = cookies[i].getValue();
			if(id.equals("abcde")) out.println(id + "님 안녕하세요." + "<br />");
		}
	%>

	<a href="logout.jsp">로그아웃</a>

</body>
</html>
쿠키를 달고 왔으니까 Cookie[] cookies = request.getCookies();로 받아서
for문으로 갖고온 cookie가 맞는지 돌린다.
그러고 로그아웃을 누르면
[logout.jsp]
<%@ page language="java" contentType="text/html; charset=EUC-KR"
    pageEncoding="EUC-KR"%>
<!DOCTYPE html PUBLIC "-//W3C//DTD HTML 4.01 Transitional//EN" "http://www.w3.org/TR/html4/loose.dtd">
<html>
<head>
<meta http-equiv="Content-Type" content="text/html; charset=EUC-KR">
<title>Insert title here</title>
</head>
<body>

	<%
		Cookie[] cookies = request.getCookies();

		if(cookies != null) {
			for(int i=0; i<cookies.length; i++) {
				if(cookies[i].getValue().equals("abcde")){
					cookies[i].setMaxAge(0);
					response.addCookie(cookies[i]);
				}
			}
		}

		//response.sendRedirect("login.html");
		response.sendRedirect("cookietest.jsp");
	%>

</body>
</html>
로그아웃 = 해당 쿠키를 지워달라는 뜻
set.MaxAge(0); 유효기간을 0으로 주고 response.addCookie(cookies[i]);로 보내면
response.sendRedirect(이곳으로); 넘어간다.
용량은? 쿠키당4kb, 300개까지.
================================================
쿠키저장하기
Cookie cookie = new Cookie("c", String.valueOf(result));
response.addCookie(cookie);
쿠키읽기
Cookie[] cookies = request.getCookies();
if(cookies !=null)
for(Cookie cookie : cookies)
if("c".equals(cookie.getName());
_c=cookie.getValue();
→웹브라우저에 값 위임했다가 가져올 수 있다.
(cookie는 무조건 정수형(정수형url을 가짐) 따라서 String.valueOf(op) 이런식으로 형변환 해줘야함)
================================================
<%!에서 선언한 변수는 전역 변수의 의미를
<% 에서 선언하는 변수는 service method에서만 사용하는 local변수로 인식
servlet로 바뀐 java파일을 보기
1.절대경로와 상대경로에 대하여 설명하시오.
절대경로는 기준이 root이다.(C:\(근데 이거 쓰면 절대안됨.) , http://, / 등)
상대경로는 자기자신이 기준. 1)물리적인 경로(C:\User\bit\블라블라\WebContent) 2)웹사이트에서 치고 들어올때의 경로. (http://local.co.kr(아이피)/컨테스트명/) 여기서마지막 /이 바로 /WebContent이다. 그래서 WebContent안에 있는 파일이나 폴더 불러오고 있으면 컨테스트명/Webcontent/.jpg가 아니라 그냥 컨테스트명/.jpg로 해야한다
만약 WebContent 안에 생성된 폴더 안의 파일을 가져오고싶으면 ../생성된폴더/.jpg(상대경로) 로 해야함.
../는 상위폴더를 나타내기 때문
그냥 생성된폴더/.jpg로 쓰게되면(상대경로) 디폴트가 WebContent가 아닌 내가 갖고있는 주소 부터 그 앞의 모든주소가 다 기준이된다. 따라서 블라블라/생성된폴더/생성된폴더/.jpg 가된다.
그럼 /생성된폴더/.jpg 는?(절대경로) 절대경로는 아이피까지 붙여준다. (http://localhost:8282/)이게 알아서 붙음.
request.getURI();가 절대경로 - 결론:아이피/블라블라/생성된폴더/.jpg 라고하면 /블라블라/생성된폴더/.jpg를 써줘야 된다.
2.아래의 action 속성에 대하여 아래의 3가지 케이스에 대하여 테스트 하고 결론을 내려 보세요.
0105/request_send.jsp (상대경로)
../0105/request_send.jsp (상대경로)
/0105/request_send.jsp (절대경로)
<form action="0105/request_send.jsp">
당신의 나이는 : <input type="text" name="age" size="5">
<input type="submit" value="전송">
</form>
3. css에서의 position 의 4가지 설명하시오.
position은 위치를 지정하는것.
static -디폴트가 static이어서 생략해도 됨. 기본적인건 static
relative - 상대위치.
absolute - static 속성을 가지고 있지 않은 부모를 기준으로 위치 지정
fixed - 백그라운드를 기준으로 위치 지정
4. float 속성에 대하여 설명하시오.
float:left; 시키면 = 왼쪽으로 띄운다는 뜻임.
첫번째거 float시키고 두번째거도 float시켜야 옆에 같이 띄어서 붙음
첫번째거 float시키고 두번째거 안시키면 공중에 띄어진 첫번째거 밑으로 들어감
근데 <p>태그나 그냥 text문자는 float안으로 들어가는게 아니라 그냥 옆에 같이 붙는다.
5.쿠키에 대하여 설명하시오.
서버와 서버사이 연결성 유지 시킬때 필요한 요소이다.
쿠키의 용량은 쿠키당4kb, 300개까지.
6.액션 태그에 대하여 설명하시오.
JSP페이지 내에서 어떤 동작을 하도록 지시하는 태그. ex. 페이지이동, 페이지 include..
forward, include, param등이 있다.
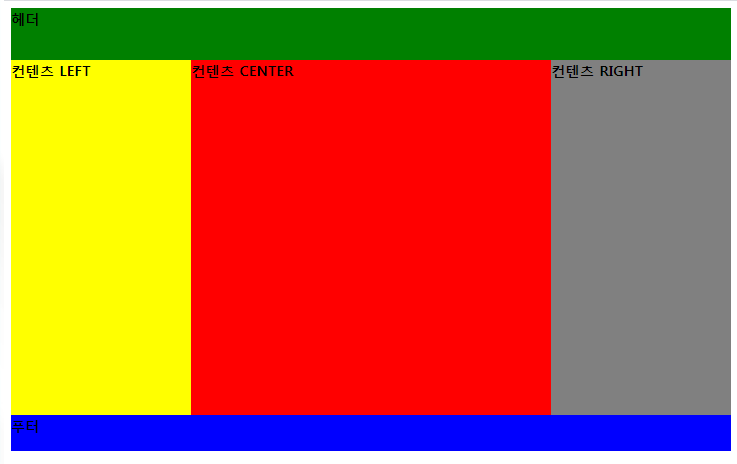
1.다음을 프로그래밍 하시오.

<!DOCTYPE html>
<html>
<head>
<meta charset="UTF-8">
<title>Insert title here</title>
<style>
body div:nth-child(1) {
	height: 60px;
	width:800px;
	position: fixed;
	background-color: green;
	display: inline-block;
	text-align:top;
	font-weight: bold;
}

body div:nth-child(2) {
	height: 400px;
	width: 800px;
	position:fixed;
	top:50px;
	font-weight: bold;
}

body div:nth-child(3) {
	height: 40px;
	width: 800px;
	background-color: blue;
	position:fixed;
	top:460px;
	font-weight: bold;
}

#content p:nth-child(1) {
	float: left;
	background-color: yellow;
	height: 400px;
	width: 200px;
}

#content p:nth-child(2) {
	float: left;
	background-color: red;
	height: 400px;
	width: 400px;
}

#content p:nth-child(3) {
	float: left;
	background-color: gray;
	height: 400px;
	width: 200px;
}
</style>


</head>
<body>

	<div>
		<il>헤더</il>

	</div>

	<div id="content">
		<p>컨텐츠 LEFT</p>
		<p>컨텐츠 CENTER</p>
		<p>컨텐츠 RIGHT</p>
	</div>

	<div>
		<il>푸터</il>
	</div>

</body>
</html>
↓출력화면
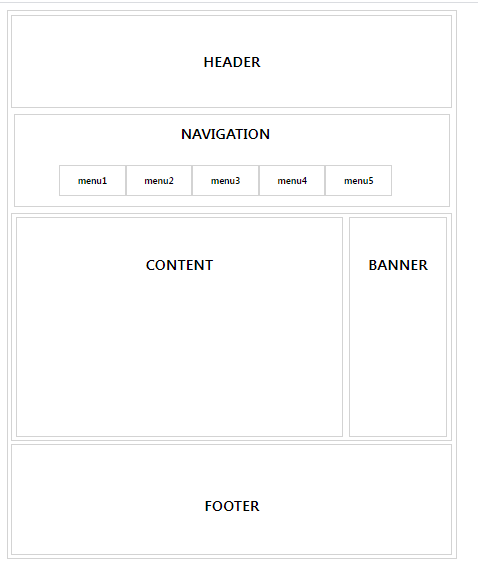
2. 다음을 프로그래밍 하시오

<!DOCTYPE html>
<html>
<head>
<meta charset="UTF-8">
<title>Insert title here</title>
<style>
#wrap {
	border: 2px solid lightgray;
	box-sizing: border-box;
	width: 500px;
	height: 610px;
}

body div:nth-child(1) {
	border: 2px solid lightgray;
	height: 100px;
	line-height: 100px;
	text-align: center;
	font-weight: bold;
	margin: 3px;
}

body div:nth-child(2) {
	height: 100px;
	width: 480px;
	display:inline-block;
	border: 2px solid lightgray;
	margin: 3px;
}

body div:nth-child(3) {
	height: 250px;
	border: 2px solid lightgray;
	margin: 3px;
}

body div:nth-child(4) {
	height: 120px;
	border: 2px solid lightgray;
	margin: 3px;
	line-height: 100px;
	text-align: center;
}

#nvi
 p:nth-child(n) {
	text-align: center;
	width: 70px;
	height: 30px;
	line-height: 30px;
	border: 2px solid lightgray;
	float: left;
	font-size: 5px;
	position : relative;
	left : 10%;
	top : 50%;
}
span{
position:relative;
top:-30%;
left:-40%;

}
#content {
	float: left;
	width: 360px;
	height: 240px;
}

#banner {
	float: left;
	width: 105px;
	height: 240px;
}
</style>

</head>
<body>
	<div id="wrap">
		<div>HEADER</div>

		<div id="nvi">
			<span>NAVIGATION</span>
			<p>menu1</p>
			<p>menu2</p>
			<p>menu3</p>
			<p>menu4</p>
			<p>menu5</p>

		</div>

		<div id="conban">
			<div id="content">CONTENT</div>
			<div id="banner">BANNER</div>
		</div>
		<div>
			<p>FOOTER</p>
		</div>
	</div>
</body>
</html>
↓화면 출력
↓저자 풀이 : overflow:hidden; 시켜서 따로 height값을 주지않음★
<!DOCTYPE html>

<html lang="en" xmlns="http://www.w3.org/1999/xhtml">
<head>
    <meta charset="utf-8" />
    <title></title>

    <style>
        div {
            border:1px solid #cccccc;
            padding:5px; margin:5px;
            text-align:center;
        }

        #con {
            width:800px;
            margin:0 auto;
            overflow:hidden;
        }

        #header {
            width:780px; height:100px;
            line-height:100px;
        }

        #nav {
            width:780px; height:100px;
        }

        #nav ul { overflow:hidden; }

        #nav ul li {
            width:138px; height:40px;
            line-height:40px;
            text-align:center;
            list-style:none;
            float:left;
            border:1px solid #dddddd;
        }

        #wrap {
            width:780px;
            overflow:hidden;
        }

        #content {
            width:600px; height:300px;
            float:left;
        }

        #banner {
            width:135px; height:300px;
            float:left;
        }

        #footer {
            width:780px; height:100px;
            line-height:100px;
        }
    </style>

</head>
<body>
    <div id="con">
        <div id="header">
            HEADER
        </div>

        <div id="nav">
            <p>NAVIGATION</p>
            <ul>
                <li>menu1</li>
                <li>menu2</li>
                <li>menu3</li>
                <li>menu4</li>
                <li>menu5</li>
            </ul>
        </div>

        <div id="wrap">
            <div id="content"> CONTENT </div>
            <div id="banner"> BANNER </div>
        </div>

        <div id="footer">
            FOOTER
        </div>
    </div>
</body>
</html>
쉽게 알아보는 서버 인증 1편(세션/쿠키 , JWT)
앱 개발을 처음 배우게 됐을 때, 각종 화면을 디자인해보면서 프론트엔드 개발에 큰 흥미가 생겼습니다. 한때 프론트엔드 개발자를 꿈꾸기도 했었죠(현실은 ...) 그러나 서버와 통신을 처음 배
tansfil.tistory.com
쉽게 알아보는 서버 인증 1편(세션/쿠키 , JWT)
앱 개발을 처음 배우게 됐을 때, 각종 화면을 디자인해보면서 프론트엔드 개발에 큰 흥미가 생겼습니다. 한때 프론트엔드 개발자를 꿈꾸기도 했었죠(현실은 ...) 그러나 서버와 통신을 처음 배
tansfil.tistory.com
쉽게 알아보는 서버 인증 1편(세션/쿠키 , JWT)
앱 개발을 처음 배우게 됐을 때, 각종 화면을 디자인해보면서 프론트엔드 개발에 큰 흥미가 생겼습니다. 한때 프론트엔드 개발자를 꿈꾸기도 했었죠(현실은 ...) 그러나 서버와 통신을 처음 배
tansfil.tistory.com
cjh5414.github.io/cookie-and-session/
쿠키(Cookie)와 세션(Session) & 로그인 동작 방법
Jihun's Development Blog
cjh5414.github.io
'코딩 > 수업 정리' 카테고리의 다른 글
| 21.01.07 Thu [032] (0) | 2021.01.07 |
|---|---|
| 21.01.06 Wed [031] (0) | 2021.01.06 |
| 21.01.04 Mon [029] (0) | 2021.01.04 |
| 20.12.31 Thu [028] (0) | 2020.12.31 |
| 20.12.30 Wed [027] (0) | 2020.12.30 |


댓글