2023.05.18 - [네트워크 수업/Docker] - Docker Image.pdf 23.05.18
10page부터
지금 만든 컨테이너를 이미지로 만들자.
docker container ls -a
docker stop 87ddb2c5e9ca
docker container rm 87ddb2c5e9ca
docker images
docker rmi -f 하나씩 지우기
[root@Docker1 ~]# docker run -i -t --name mynetwork_container --net mybridge ubuntu:14.04
다시 나가서
[root@Docker1 ~]# docker run -i -t --name commit_test commit_test:first //도커 이미지 생성
[root@Docker1 ~]# docker save -o test.tar commit_test:first //tar로 만드는것
ls 하면 보인다.
docker ps -a
docker rm -f 만든거 지우기
다시 ls
//tar를 이미지로 만들자
docker load -i test.tar
docker images //이미지 생성된거 확인 가능. 이미지 저장된 위치는?
docker container inspect commit_test:first
/var/lib/docker/에 들어가는데 16진수 난수로 쪼개져서 들어간다. 이렇게 쪼개져서 이미지 파일 복사를 못하는 것이다.
docker run -it --name commit_test commit_test:first //컨테이너 생성
이렇게 컨테이너를 이미지로 만들고 타르파일을 이미지로 만들고? 암튼 자유자재로 할 수 있다.
...? ? 쪼개져있기 때문에 (var/lib/docker/ 안에)
몰라 안돼...;;;
컨테이너 사용중인 이미지를 강제로 삭제되면 <nome>으로 변경되는데 이를 댕글링이미지 라고 한다.(불완전 삭제)
이제 도커이미지가 왜이렇게 가볍나 볼것임
[root@Docker1 ~]# docker images
REPOSITORY TAG IMAGE ID CREATED SIZE
ubuntu 14.04 13b66b487594 2 years ago 197MB
[root@Docker1 ~]# docker run -i -t --name commit_test ubuntu:14.04
root@98d1b1ec12b3:/# [root@Docker1 ~]# docker run -i -t --name commit_test ubuntrun -i -t --name c
[root@Docker1 ~]# docker run -i -t --name commit_test2 ubuntu:14.04
root@2ab1a8eb044a:/# [root@Docker1 ~]#
[root@Docker1 ~]# docker attach 2ab1a8eb044a
root@2ab1a8eb044a:/# echo test_secoond! >> second
root@2ab1a8eb044a:/# echo test_second test_second
test_second test_second
root@2ab1a8eb044a:/# ls
root@2ab1a8eb044a:/# cat second
test_secoond!
[root@Docker1 ~]# docker commit commit_test2 commit_test:second //commit_test2를 commit_test:second로 커밋하고 이미지 만들거다
sha256:8639b546ff220eaf91ffe830ac87e5a21201e14bbfc537064ac78d14ac32f604
[root@Docker1 ~]# docker commit commit_test commit_test:first
sha256:7e4ebac201e642a8940d9c59e008a05d40574a72a49bbf3d46df1d57cfd17181
[root@Docker1 ~]# docker images
REPOSITORY TAG IMAGE ID CREATED SIZE
commit_test first 7e4ebac201e6 2 seconds ago 197MB
commit_test second 8639b546ff22 2 minutes ago 197MB
ubuntu 14.04 13b66b487594 2 years ago 197MB
[root@Docker1 ~]#
[root@Docker1 ~]# docker image inspect commit_test:second
[root@Docker1 ~]# docker history commit_test:first
[root@Docker1 ~]# docker history commit_test:second //history보는 명령어
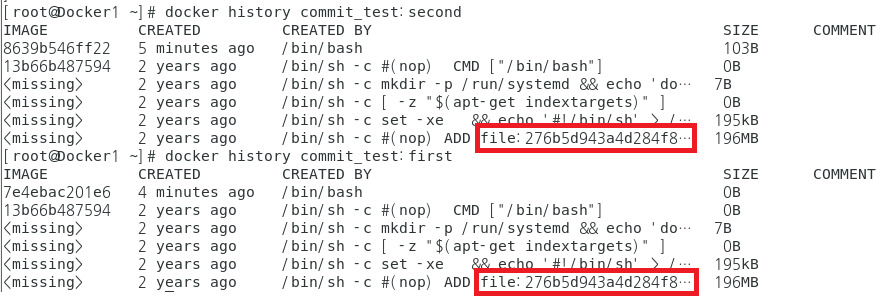
commit_test:first 와 commit_test:second는 같은 파일을 공유한다는 것을 알 수 있다.
도커 이미지 배포 / 도커 허브 저장소
도커 사설 레지스트리
Username : 유저네임
Email : 내이메일@gmail.com
[root@Docker1 ~]# docker run -i -t --name commit_container1 ubuntu:14.04
root@f79badef421a:/# exit
exit
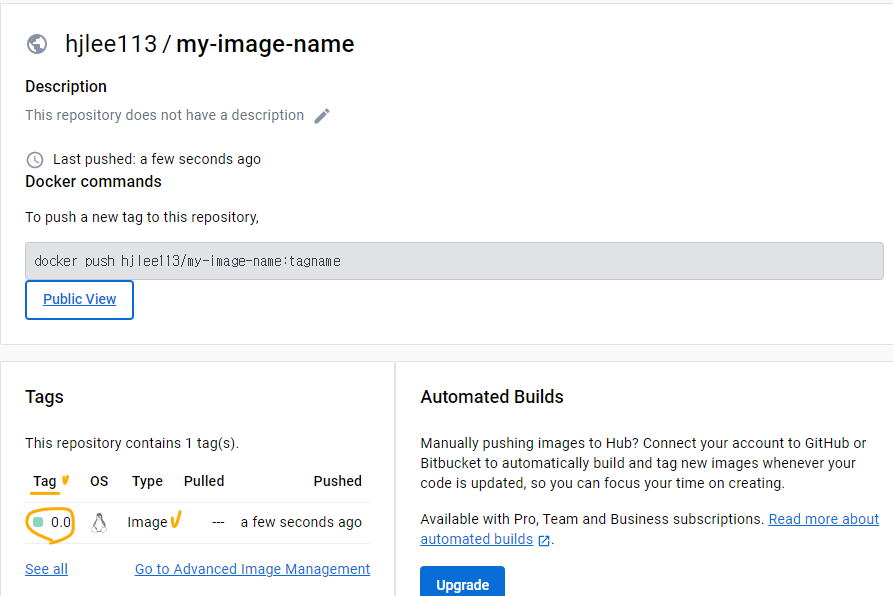
[root@Docker1 ~]# docker commit commit_container1 my-image-name:0.0 //아직 이상태로는 도커 허브에 올수 없다.
sha256:e9b877cbcfe4b701c22fc6967b7c2ebaa95eb6e0e1db980b83d87640cb6d05d6
[root@Docker1 ~]# docker images
REPOSITORY TAG IMAGE ID CREATED SIZE
my-image-name 0.0 e9b877cbcfe4 28 seconds ago 197MB
내아이디 앞에 붙여야 올릴수있다.
[root@Docker1 ~]# docker tag my-image-name:0.0 hjlee113/my-image-name:0.0

이제 올릴수있다.
[root@Docker1 ~]# docker login

[root@Docker1 ~]# docker push hjlee113/my-image-name:0.0

//다시 commit_container2 생성해서 이번엔 0518 레포지토리에 0.0 Tag달아서 올려보기
[root@Docker1 ~]# docker run -i -t --name commit_container2 ubuntu:14.04
root@80aa36444e76:/# exit
exit
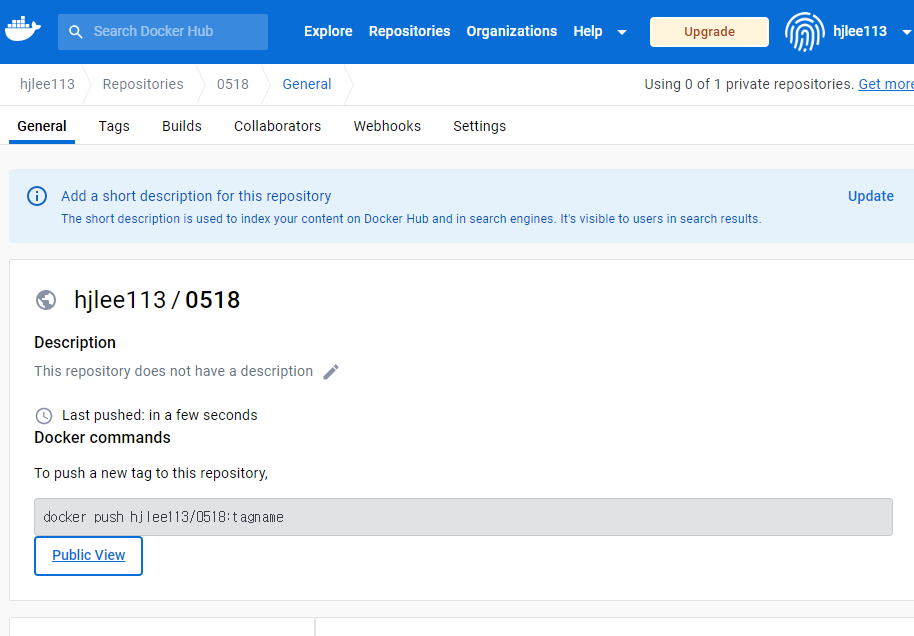
[root@Docker1 ~]# docker commit commit_container2 0518:0.0
sha256:3759329ad32bca67672cea82942473db8760a38c0f76c02b8683f68c91d3b19f
[root@Docker1 ~]# docker tag 0518:0.0 hjlee113/0518:0.0
[root@Docker1 ~]# docker push hjlee113/0518:0.0

2023.05.18 - [네트워크 수업/Docker] - Dockerfile.pdf 23.05.18
도커파일 - 이미지를 생성하는 방법

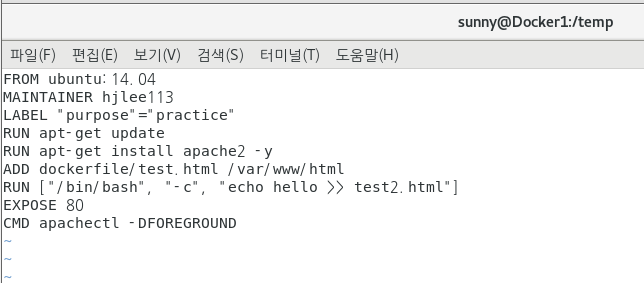
RUN : 컨테이너에서 실행할 명령어들 넣어준것
ADD : 파일을 이미지 안에 넣는것 // hello라는 단어를 test2에 저장
EXPOSE : 80번 포트 연다
//현재디렉터리에 mybuild를 만들어라. -t를 사용하지 않으면 16진수 난수 형태로 만들어진다.
[root@Docker1 temp]# docker build -t mybuild:0.0 ./
[root@Docker1 temp]# docker run -d -P --name myserver mybuild:0.0
[root@Docker1 temp]# docker port myserver
80/tcp -> 0.0.0.0:32768
80/tcp -> [::]:32768


[root@Docker1 temp]# vi Dockerfile
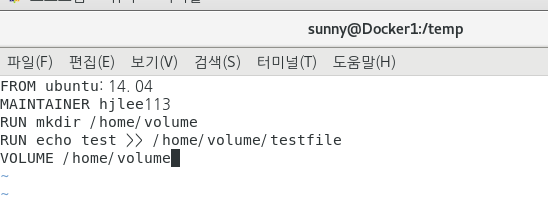
[root@Docker1 temp]# docker build -t myvolume:0.0 ./
[root@Docker1 temp]# docker run -i -t -d --name volume_test myvolume:0.0
f7dfbc37fbcc485ce4edc0358c711d69d561ce7b469686548d159d7f4d789eb6
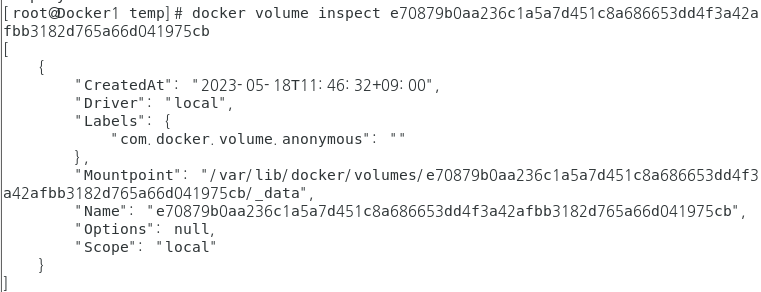
[root@Docker1 temp]# docker volume inspect myvolume
[
{
"CreatedAt": "2023-05-11T10:26:32+09:00",
"Driver": "local",
"Labels": null,
"Mountpoint": "/var/lib/docker/volumes/myvolume/_data",
"Name": "myvolume",
"Options": null,
"Scope": "local"
}
]

엥 원하는 결과가 아님...
다시 저 두번째거를 복사해서
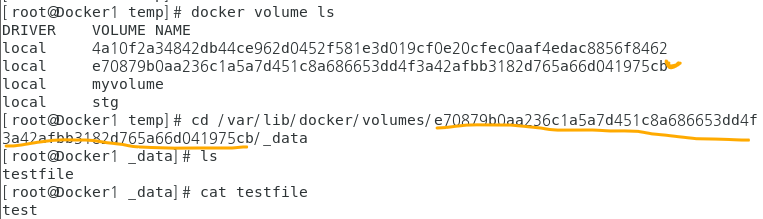
조회하면 내가 원하는 값이 나온다.
?뭐랑 호스트의 홈디렉터리랑 마운트가 됐다. 이걸 뭘? 구현할수있다.
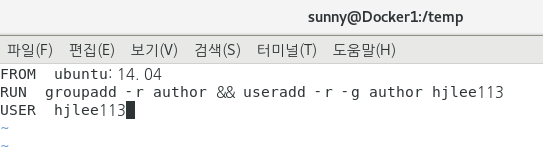
[root@Docker1 temp]# docker build -t myuser:0.0 ./
[root@Docker1 temp]# docker run -i -t --name my_user myuser:0.0
hjlee113@62f548169c5a:/$ su
Password:
//안된다.

[root@Docker1 temp]# docker start 62f548169c5a
62f548169c5a
[root@Docker1 temp]# docker attach 62f548169c5a
'네트워크 수업 > Docker' 카테고리의 다른 글
| ASA 23.05.23 (0) | 2023.05.25 |
|---|---|
| Cisco ASA Firewall 23.05.24 (0) | 2023.05.24 |
| 도커네트워크 23.05.16 (0) | 2023.05.16 |
| zfw 23.05.15 (0) | 2023.05.15 |
| Docker - NSF 서버구축 23.05.12 (0) | 2023.05.12 |


댓글