[dockerSTG] 는 전용서버가 되는것이다.
과제]
기존의 컨테이너와 이미지, 볼륨을 모두 지우고 .tar 파일을 로드하고 새볼륨(stg)을 만든 후, 새 컨테이너(nextcloud) 생성시 컨테이너 내의 '/var/www/html/nextcloud/_data'가 stg 볼륨을 사용하도록 설계하시오.
해설]
Docker1>
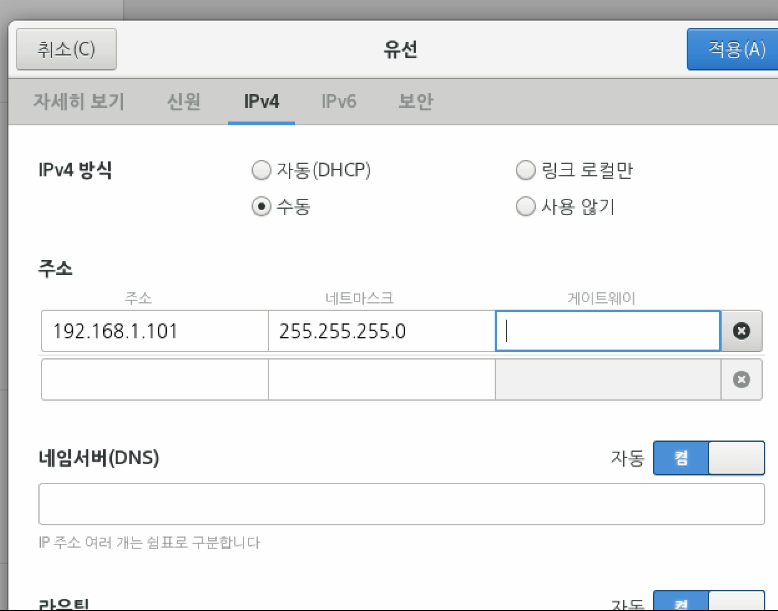
랜카드 추가 -> vmnet2(192.168.1.0/24) -> ifcfg-* 파일 수정
BOOTPROTO=static
IPADDR=192.168.1.101
NETMASK=255.255.255.0
# yum -y update
# yum -y install nfs-utils
# docker volume create --name stg
# vi /etc/hosts
192.168.1.101 docker1
192.168.1.104 stg
DockerSTG]
* SELINUX 해제
* 방화벽 해제
# vi /etc/hosts
192.168.1.101 docker1
192.168.1.104 stg
sun
# yum -y update
# yum -y install nfs-utils
# mkdir /stg
# chmod 777 -R /stg
# vi /etc/exports
/stg 192.168.1.0/24(rw,sync,no_root_squash)
# systemctl restart nfs-server
# systemctl enable nfs-server
Docker1]
# mount -t nfs stg:/stg /var/lib/docker/volumes/stg/_data =>stg는 192.168.1.104이다.
# docker run -it --name nextcloud -p 80:80 –v stg:/var/www/html/nextcloud/_data nextcloud:first
iptable error가 생길 경우 다음과 같이 한다.
# echo /proc/sys/net/ipv4/ip_forward=1
# vi /etc/fstab
192.168.1.104:/stg /var/lib/docker/volumes/stg/_data nfs defaults 0 0
VMnet1로 LAN카드 세팅


[root@samba network-scripts]# vi /etc/hostname

[root@samba network-scripts]# vi /etc/hosts

[root@samba network-scripts]# yum -y update
[DockerSTG]


새로 깔아서 셀리눅스가 살아있다. -- 꺼야함
su
setenforce 0
getenforce
disbled
아니면 이렇게해서 바꾼다.
vi /etc/sysconfig/selinux
SELINUX=disbled
systemctl stop firewalld
[root@samba network-scripts]# vi /etc/hosts

stg = storage
두대 다 재부팅! init 6
[root@docker1 sunny]# ping 10.10.51.15 ==> 선생님 아이피
성공했으면
[root@docker1 sunny]# yum install ftp ==> ftp는 client이다. (vftp는 server)
[root@docker1 sunny]# cd /
[root@docker1 /]# ftp 10.10.51.15 ==> 선생님 폴더로 가는것.
Connected to 10.10.51.15 (10.10.51.15).
220 (vsFTPd 3.0.2)
Name (10.10.51.15:root): anonymous
331 Please specify the password.
Password:
230 Login successful.
Remote system type is UNIX.
Using binary mode to transfer files.
ftp> pwd
257 "/"
ftp> cd pub
250 Directory successfully changed.
ftp> ls
227 Entering Passive Mode (10,10,51,15,118,85).
150 Here comes the directory listing.
-rw------- 1 14 50 21662 Apr 03 06:16 boa.jpg
-rw------- 1 14 50 14929930 Apr 03 06:16 boa_valenti.mp4
-rw------- 1 14 50 485 Apr 03 06:16 index.html
-rwxrwxrwx 1 14 50 4490847232 May 11 08:15 nextcloud.tar
226 Directory send OK.
ftp> get nextcloud.tar
[root@docker1 sunny]# docker ps -a
[root@docker1 sunny]# docker rm -f nextcloud
tar파일을 image로 바꾼다.
[root@docker1 sunny]# docker load -i nextcloud.tar
[root@docker1 sunny]# systemctl stop httpd
[root@docker1 sunny]# docker run -i -t --name nextcloud -p 80:80 nextcloud:first

[CentOS]
cd /var/www
ls
cd html
ls
cd nextcloud
pwd 하면 /var/www/html/nextcloud 라고 나온다.
docker attach nextcloud
cd /var/www
ls
cd html
ls
cd nextcloud
pwd
ls data
ls -l data
docker ps -a
docker rm -f nextcloud
[root@Docker1 sunny]# docker volume create --name stg ==> 볼륨이름을 stg로 만든다.
[root@Docker1 sunny]# cat /etc/hosts ==>볼륨만든거 확인
127.0.0.1 localhost localhost.localdomain localhost4 localhost4.localdomain4
::1 localhost localhost.localdomain localhost6 localhost6.localdomain6
192.168.1.101 docker1
192.168.1.104 stg
[dockerSTG]
[root@Docker1 /]# cat /etc/hosts
127.0.0.1 localhost localhost.localdomain localhost4 localhost4.localdomain4
::1 localhost localhost.localdomain localhost6 localhost6.localdomain6
192.168.1.101 docker1
192.168.1.104 stg
[root@Docker1 /]# yum -y update
[root@Docker1 /]# mkdir /stg
[root@Docker1 /]# chmod 777 -R /stg
[root@Docker1 /]# vi /etc/exports

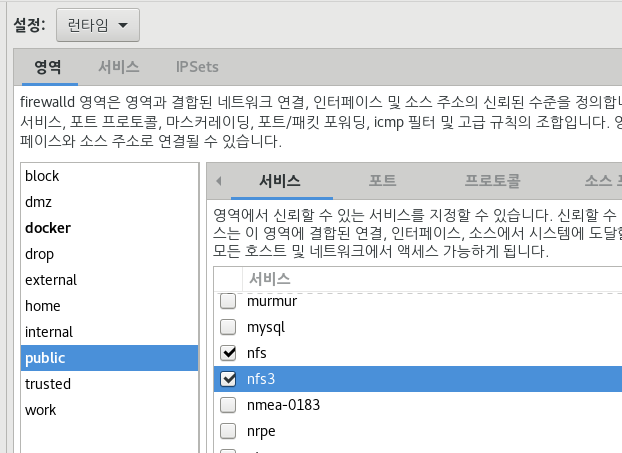
firewall-config
nfs 서버 체크

systemctl start nfs-server
systemctl enable nfs-server
systemctl status nfs-server ==> active된거 확인
[CentOS]
[root@Docker1 sunny]# cd /var/lib/docker/volumes
[root@Docker1 volumes]# ls ==>볼륨이 저장된곳 확인
4a10f2a34842db44ce962d0452f581e3d019cf0e20cfec0aaf4edac8856f8462 myvolume
backingFsBlockDev stg
metadata.db
[root@Docker1 volumes]# cd /
[root@Docker1 /]# mount -t nfs stg:/stg /var/lib/docker/volumes/stg/_data
마운트포인트는 오른쪽이다. 왼쪽에있는 /stg를 오른쪽에있는 /var/lib/docker/volumes/stg/_data 로 마운트하는것이다.
마운트 성공했으면 컨테이너 만들어준다
docker ps -a ==> 도커상태 확인해주고
systemctl stop httpd
docker run -it --name nextcloud -p 80:80 -v stg:/var/www/html/nextcloud/_data nextcloud:first ==>stg 볼륨이 storage에 마운트 됐다. 결국 이게 스토리지에 저장된다.
cd /var/www/html/nextcloud
ls _data
docker ps
docker attach nextcloud:first
find / -name config.php
vi /var/www/html/nextcloud/config/config.php
[root@Docker1 ~]# docker start nextcloud
[root@Docker1 ~]# docker attach nextcloud
root@831300ec8bdb:/# service apache2 start
ifconfig 하고 내 아이피로 내 찐컴퓨터로 접속한다.
[DockerSTG] 서버로가서
cd /stg
ls
[centOS]
docker attach nextcloud:first
touch a
ls
a
[STG]
ls
a
하면 a생긴거 확인가능
'네트워크 수업 > Docker' 카테고리의 다른 글
| 도커네트워크 23.05.16 (0) | 2023.05.16 |
|---|---|
| zfw 23.05.15 (0) | 2023.05.15 |
| 클라우드서버 구축 nextcoud 23.05.11 (0) | 2023.05.11 |
| CLI(Command-line Interface) 23.05.11 (0) | 2023.05.11 |
| [실습] IOS_FW GNS3 23.05.10 (0) | 2023.05.10 |


댓글