입력 리다이렉션
> : 입력 리다이렉션
< : 출력 리다이렉션
좌측꺽쇠는 없어도된다. 바로 출력된다.
파일 병합
cat a b > c 하면 c로 병합된다.
[root@centos7 /]# mkdir -p /test1/test2
[root@centos7 /]# touch /test1/test2/a
[root@centos7 /]# cat >> /test1/test2/a
this is test file
:qw!
^Z
[1]+ Stopped cat >> /test1/test2/a
[root@centos7 /]#
[root@centos7 /]# mkdir /test7
[root@centos7 /]# cp -r /test1/* /test7/ =>통째로 복사
[root@centos7 /]# ls -R /test7 ==> 파일 경로까지 보여주는 명령어/test7:
test2
/test7/test2:
a
[root@centos7 /]#
과제]
test1과 test7을 디렉터리 포함 모두 삭제하세요.
[root@centos7 /]# rm -rf /test1/* /test7/*
rm -rf test1 test7 ==>이렇게 해도 된다.
[root@centos7 /]# mkdir temp
[root@centos7 /]# mkdir /temp/test1
[root@centos7 /]# cat > /temp/test1/a
hi it's me~~
^C
[root@centos7 /]# mv /temp/test1/a /temp/b
[root@centos7 /]# ls /temp/test1 ==>아무것도 안보임
[root@centos7 /]# ls /temp ==>여기로 다 이동됨
b c d test1
[root@centos7 /]# cp /etc/passwd /temp/
[root@centos7 /]# cd /temp
[root@centos7 temp]# more passwd => 얘는 화살표가 안움직음
[root@centos7 temp]# less passwd =>%가 안나옴. 얘는 움직임
:
[root@centos7 temp]# vi text vb
2 files to edit
[root@centos7 temp]# vi text doc
2 files to edit
less testdoc
[root@centos7 temp]# ls -l
합계 12
-rw-r--r--. 1 root root 14 3월 27 15:24 b
drwxr-xr-x. 2 root root 6 3월 21 15:29 c
drwxr-xr-x. 2 root root 6 3월 21 15:30 d
-rw-r--r--. 1 root root 2265 3월 27 15:27 passwd
drwxr-xr-x. 2 root root 6 3월 27 15:25 test1
-rw-r--r--. 1 root root 93 3월 27 15:36 text
tourch testdoc => 날짜시간을 현재로 갱신(바꿔)한다.
??
[root@centos7 temp]# ls -l
합계 12
-rw-r--r--. 1 root root 14 3월 27 15:24 b
drwxr-xr-x. 2 root root 6 3월 21 15:29 c
drwxr-xr-x. 2 root root 6 3월 21 15:30 d
-rw-r--r--. 1 root root 2265 3월 27 15:27 passwd
drwxr-xr-x. 2 root root 6 3월 27 15:25 test1
-rw-r--r--. 1 root root 93 3월 27 15:36 text
[root@centos7 temp]# touch testdoc
[root@centos7 temp]# ls -l
합계 12
-rw-r--r--. 1 root root 14 3월 27 15:24 b
drwxr-xr-x. 2 root root 6 3월 21 15:29 c
drwxr-xr-x. 2 root root 6 3월 21 15:30 d
-rw-r--r--. 1 root root 2265 3월 27 15:27 passwd
drwxr-xr-x. 2 root root 6 3월 27 15:25 test1
-rw-r--r--. 1 root root 0 3월 27 15:39 testdoc
-rw-r--r--. 1 root root 93 3월 27 15:36 text
??
## runlevel
* 6.x 에서는 /etc/inittab 파일에서 설정가능
0 : halt - 종료, 기본값으로 사용 안함
1 : single user mode - 단일사용자, 윈도우 안전모드, 비밀번호 재설정, 파일시스템 체크, 복구작업
2 : multi usermode, without NFS, 다중 사용자모드, 네트워크 x
3 : Full multi usermode - 다중사용자모드, 네트워크0
4 : unused - 예약됨, 1~3까지는 CLI 환경
5 : X11 - 그래픽모드 지원, 네트워크0, 다중사용자, GUI 환경부팅
6 : reboot - 재부팅, 기본값으로는 사용안함.
* 7.x 이상
runlevel 0 == poweroff.target
runlevel 1 == rescue.target
runlevel 2 안씀
runlevel 3 == multi-user.target
runlevel 4 안씀
runlevel 5 == graphical.target
runlevel 6 == reboot.target
특히 재부팅 exec /etc/sbin/init 또는 init 6 하면 재부팅이 된다.
[root@centos7 temp]# cd ~
[root@centos7 ~]# vi /etc/inittab
[root@centos7 ~]# =>지금은 사용안함 더이상 inittab은 사용안함.
[root@centos7 ~]# vi /etc/inittab
[root@centos7 ~]# systemctl get-default ==>현재 runlevel이 보임(현재 level 5임)
graphical.target
[root@centos7 ~]# systemctl set-default multi-user.target ==> runlevel 바꿔보기
Removed symlink /etc/systemd/system/default.target.
Created symlink from /etc/systemd/system/default.target to /usr/lib/systemd/system/multi-user.target.
[root@centos7 ~]# init 6 ==>재부팅
그럼 runlevel 5로 다시 바꿔보자.

재부팅하면 GUI모드로 간다. ==>제대로 켜짐
root password 잃어버렸을때 쓰는 방법
1. 부팅시 최신 커널 버전을 선택 후 알파벳 e를 누른다.
2. linux16... 으로 시작하는 라인을 편집


//ro →rw 로 바꾼 뒤, 뒤에서부터 rhgd 까지 삭제 → init=/bin/bash 입력
3. ctril+x → passwd 입력 후 비밀번호 재설정
4. touch /.autorelabel
touch => 내용이 없는 빈 파일 생성
.autorelabel => 리눅스 접근통제 시스템인 selinux 정책을 우회하기 위한 임시파일
5. exec /sbin/init => 재부팅
*ifconfig 를 이용한 NIC확인
- ifconfig [interface] [up / down]
- ifconfig [interface] [IP Address]
- ifconfig [interface] [IP Address] netmask [mask] bradcast [addr]
## 네트워크 설정
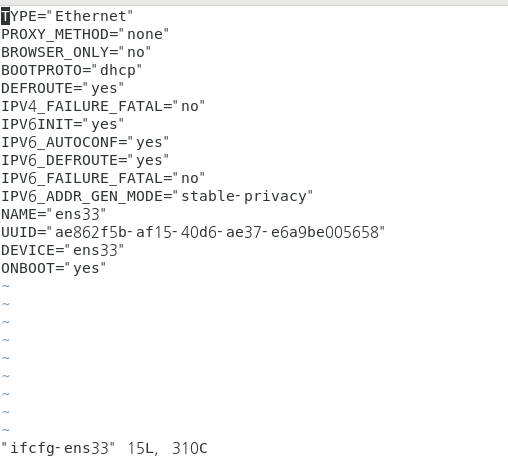
* /etc/sysconfig/network-scripts/ifcf-"랜카드명"
NIC 설정파일로써 'ifcfg-장치명' 과 같은 형식을 취하고 있다. Bootproto의 설정에 따라 항목의 개수가 조금씩 달라지며 다음과 같은 항목으로 구성되어 있다.
1. DEVICE : 인터페이스 장치명
2. BOOTPROTO : 프로토콜 지정
static(고정IP),dhcp(DHCP),none-사설IP를 사용한 NAT
3. BROADCAST : 브로드캐스트 IP 주소
4. HWADDR : MAC 주소
5. IPADDR : IP 주소(고정IP사용시)
6. NETMASK : 네트워크 마스크주소
7. NETWORK : 네트워크 주소
8. ONBOOT : 부팅시 자동으로 활성화 할지 지정
9. TYPE : 데이터링크 계층의 타입(주로 이더넷)
10. GATEWAY : 네트워크 게이트웨이 주소
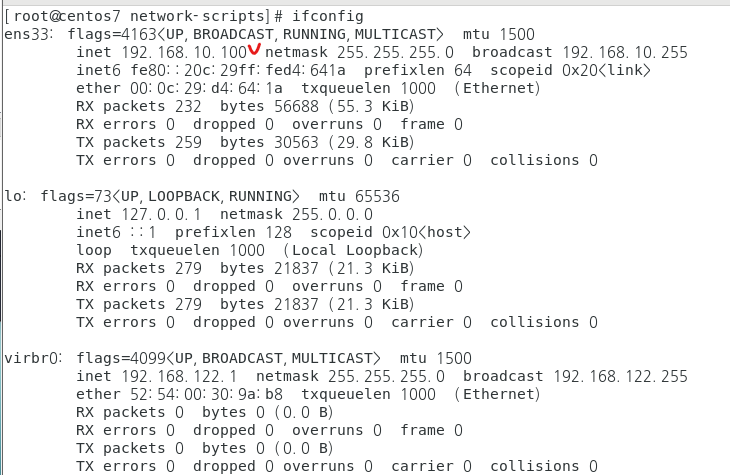
heejae@centos7 ~]$ ifconfig
[root@centos7 ~]# ifconfig ens33 down ==> lan 카드 죽음
[root@centos7 ~]# ifconfig ens33 up ==> lan카드 살아남.
[root@centos7 ~]# ifconfig ens33 192.168.10.100 netmask 255.255.255.0 broadcast 192.168.10.255 ==>ip넣기
[root@centos7 ~]# ifconfig
ens33: flags=4163<UP,BROADCAST,RUNNING,MULTICAST> mtu 1500
inet 192.168.10.100 netmask 255.255.255.0 broadcast 192.168.10.255
inet6 fe80::b475:b457:2039:8b4a prefixlen 64 scopeid 0x20<link>
ether 00:0c:29:d4:64:1a txqueuelen 1000 (Ethernet)
[root@centos7 ~]# cd ==> 다시시작
[root@centos7 ~]# cd /etc/sysconfig/network-scripts/
[root@centos7 network-scripts]# ls

[root@centos7 network-scripts]#vi ifcfg-ens33 ==>ifcfg-ens33문서로 들어가보자
리눅스 서버를 VMware와 연결해보자.

R1(config)#int f0/0
R1(config-if)#no shut
R1(config-if)#ip add 192.168.10.254 255.255.255.0
R1(config-if)#ip access-list standard INGRESS
R1(config-std-nacl)#permit 192.168.10.0 0.0.0.255
R1(config)#ip nat inside source list INGRESS interface f0/1 overload
R1(config)#int f0/1
R1(config-if)#ip nat outside
R1(config-if)#int f0/0
R1(config-if)#ip nat inside
R1(config-if)#ip route 0.0.0.0 0.0.0.0 f0/1 10.0.0.1
R1(config)#int f0/1
R1(config-if)#shut
R1(config-if)#mac-address 1234.1234.1212
R1(config-if)#no shut
R1(config-if)#ip add dhcp
===
다시 리눅스로 와서
BOOTPROTO는 고정이니까 static으로 바꾼다. ==> 안바꾸면 꽝임.
TYPE=Ethernet
BOOTPROTO=static
NAME=ens33
DEVICE=ens33
ONBOOT=yes
IPADDR=192.168.10.100
GATEWAY=192.168.10.254
NETMASK=255.255.255.0
NETWORK=192.168.10.0
BROADCAST=192.168.10.255
DNS1=168.126.63.1
DNS2=8.8.8.8
:wq
systemctl restart network
vmnet1번으로 바꾸고
ifconfig
리눅스 서버에서 인터넷켜보면 됨
[root@centos7 network-scripts]# cat /etc/resolv.conf =>dns정보가 여기에 들어가있다.
# Generated by NetworkManager
nameserver 168.126.63.1
nameserver 8.8.8.8
==>만약 저 명령어에서 dns가 안나타나면
[root@centos7 network-scripts]# vi /etc/resolv.conf ==>여기서 바꾸기
'네트워크 수업 > 리눅스' 카테고리의 다른 글
| [리눅스] 압축하기 tar, 압축풀기 gz 23.03.28 (0) | 2023.03.28 |
|---|---|
| [리눅스] 사용자계정, 홈디렉터리 변경, 유저 패스워드 23.03.28 (0) | 2023.03.28 |
| [리눅스] fstab, 복사, 시간 23.03.23 (0) | 2023.03.23 |
| [리눅스] 쉘 23.03.22 (0) | 2023.03.22 |
| [리눅스] 실습 (0) | 2023.03.21 |


댓글