어제 과제>>
sdb의 나머지 500MB를 2번 파티션으로 잡고 /drive3에 마운트시켜 보세요.
fdisk -l /dev/sdb
n p 2 enter enter w
reboot //이거 하라고 해서;;
[]?? 또는 [root@centos7 /]# mkfs.ext4 /dev/sdb3 ??
[root@centos7 /]# mkdir /drive3
[root@centos7 /]# mount /dev/sdb2 /drive3
질문
//모르고 sdb2에 drive2를 넣었을때 삭제방법
===
m p 2
w
w
t???
파티션 sdb1 sdb2만들기
[root@centos7 heejae]# fdisk /dev/sdb
Welcome to fdisk (util-linux 2.23.2).
Changes will remain in memory only, until you decide to write them.
Be careful before using the write command.
Command (m for help): n = n add a new partition
Partition type:
p primary (0 primary, 0 extended, 4 free)
e extended
Select (default p): p
Partition number (1-4, default 1):
First sector (2048-2097151, default 2048):
Using default value 2048
Last sector, +sectors or +size{K,M,G} (2048-2097151, default 2097151): +500M
Partition 1 of type Linux and of size 500 MiB is set
하나 더만들기
Command (m for help): n
Partition type:
p primary (1 primary, 0 extended, 3 free)
e extended
Select (default p): p
Partition number (2-4, default 2): 2
First sector (1026048-2097151, default 1026048):
Using default value 1026048
Last sector, +sectors or +size{K,M,G} (1026048-2097151, default 2097151):
Using default value 2097151
Partition 2 of type Linux and of size 523 MiB is set
Command (m for help): w =저장
The partition table has been altered!
Calling ioctl() to re-read partition table.
Syncing disks.
[root@centos7 heejae]# fdisk /dev/sdb
Welcome to fdisk (util-linux 2.23.2).
Changes will remain in memory only, until you decide to write them.
Be careful before using the write command.
[root@centos7 drive3]# cd /
[root@centos7 /]# echo $SHELL
/bin/bash =bash = 환경보호 쉘의 값을 보여달라
[root@centos7 /]# csh =c shell로 들어가
[heejae@centos7 /]# echo $SHELL
/bin/bash
[heejae@centos7 /]# chsh -l
/bin/sh
/bin/bash
/usr/bin/sh
/usr/bin/bash
/bin/tcsh
/bin/csh
현재쓰고있는 쉘을 알고싶으면?
[heejae@centos7 /]# tcsh = 일시적으로 쉘 바꾸고싶을때
[heejae@centos7 /]# chsh -s /bin/tcsh =계속 로그인때부터 쉘로 바꾸고 싶을때
Changing shell for root.
Shell changed.
[heejae@centos7 /]#
exit exit하거나 다시 reboot하거 다시 켜고
[heejae@centos7 heejae]# echo $SHELL ==> shell로 바뀌었는지 확인
/bin/tcsh
[heejae@centos7 heejae]# cat /etc/passwd
root:x:0:0:root:/root:/bin/tcsh
bin:x:1:1:bin:/bin:/sbin/nologin
...
ntp:x:38:38::/etc/ntp:/sbin/nologin
tcpdump:x:72:72::/:/sbin/nologin
heejae:x:1000:1000:HEEJAE:/home/heejae:/bin/bash
bash = Bourne-agin shell
[heejae@centos7 heejae]# chsh -s /bin/bash = shell바꾸기...??
Changing shell for root.
Shell changed.
[heejae@centos7 heejae]#
[heejae@centos7 heejae]# cat /etc/passwd
root:x:0:0:root:/root:/bin/tcsh
bin:x:1:1:bin:/bin:/sbin/nologin
daemon:x:2:2:daemon:/sbin:/sbin/nologin
....
heejae:x:1000:1000:HEEJAE:/home/heejae:/bin/bash
[heejae@centos7 heejae]# chsh -s /bin/bash
Changing shell for root.
Shell changed.
[heejae@centos7 heejae]# head /etc/passwd
root:x:0:0:root:/root:/bin/bash
bin:x:1:1:bin:/bin:/sbin/nologin
daemon:x:2:2:daemon:/sbin:/sbin/nologin
adm:x:3:4:adm:/var/adm:/sbin/nologin
lp:x:4:7:lp:/var/spool/lpd:/sbin/nologin
sync:x:5:0:sync:/sbin:/bin/sync
shutdown:x:6:0:shutdown:/sbin:/sbin/shutdown
halt:x:7:0:halt:/sbin:/sbin/halt
mail:x:8:12:mail:/var/spool/mail:/sbin/nologin
operator:x:11:0:operator:/root:/sbin/nologin
[heejae@centos7 heejae]#
[heejae@centos7 heejae]# echo $SHELL =cshell로 바뀌었는데 환경변수는 tc shell이다.
/bin/tcsh
다시 exit exit 다시 열고
[heejae@centos7 ~]$ su
암호:
[heejae@centos7 heejae]# echo $SHELL =현재 사용중인 쉘 보
/bin/csh
[heejae@centos7 heejae]#
[heejae@centos7 heejae]# chsh -s /bin/bash ==다시 바꿔보자
Changing shell for root.
Shell changed.
[heejae@centos7 heejae]# echo $SHELL
/bin/csh ==c shell로 다시 바뀜
[heejae@centos7 heejae]#
결론 ==> 쉘 바꾸면 당장 안바뀌고 다시 재로그인해야 바뀐다.
그냥 바로 바뀌고싶으면 그냥 sh 이라고 치면 그냥 shell로 들어간다.
쉘은 뭐 할거 없다...

sh-4.2# bash =다시 쉘 바꿔
[root@centos7 heejae]# cd /
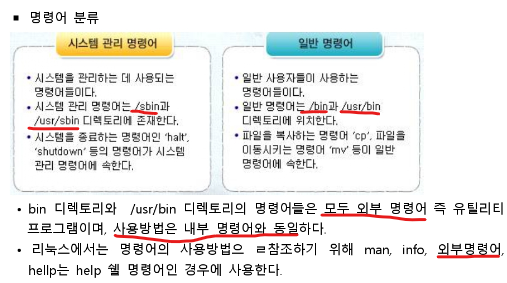
[root@centos7 /]# man ls = ls의 자세한 사용법이 나온다.
[root@centos7 /]# mkdir /temp
[root@centos7 /]# man ls > /temp/ls_help =ls의 사용법을 이 파일로 출력하겠다.
[root@centos7 temp]# ls
c d ls_help
[root@centos7 temp]# cd /temp =temp로 이동하고
[root@centos7 temp]# cat ls_help =ls_help를 자세히 보여줘
[root@centos7 temp]# man cat > cat_help = manual을 cat으로 보여줘 cat_help로 저장해줘
[root@centos7 temp]# ls
c cat_help d ls_help
[root@centos7 /temp]# cat cat_help ls_help >> help =두개를 합쳐서 help로 만들겠다.
[root@centos7 /temp]# ls
c cat_help d help ls_help
[root@centos7 /temp]# cat help | more =help를 나눠서 보여줘
[ root@centos7 /temp]# which man = man은 어느위치에 있니?
/usr/bin/man
[root@centos7 /temp]# pwd = 지금 내 위치가 어디니?
/temp
[root@centos7 /temp]# free =현재 메모리의 상태를 알려줘
total used free shared buff/cache available
Mem: 995704 737664 65168 20152 192872 84284
Swap: 2097148 55552 2041596
[root@centos7 /temp]# df --help =여기에서 mount정보를 볼수있다.
[root@centos7 /temp]# df -h = size 까지 볼수있다.
[root@centos7 /temp]# mount =정보 다나오니까 df --help쳐서 보는 게 낫다
켜졌을때 자동으로 마운트하는


LABEL=/boot =>여기에다 마운트할 장치(/dev/sdb2,3를 여기다 넣어주면 된다.)
/boot => drive2
ext3 =>ext4
defaults =>자동마운트
dump =>하드디스크 이미지
fsck =>파일시스템 체크
기본값은 2?
걍 0 0하는게 빠르다 = 덤프 생성안하는게 빠르다.
[root@centos7 /temp]# cd /
[root@centos7 /]# vi /etc/fstab = vi는 리눅스 워드프로세서
하고 i 나 a누르면 이제부터 편집하겠다.
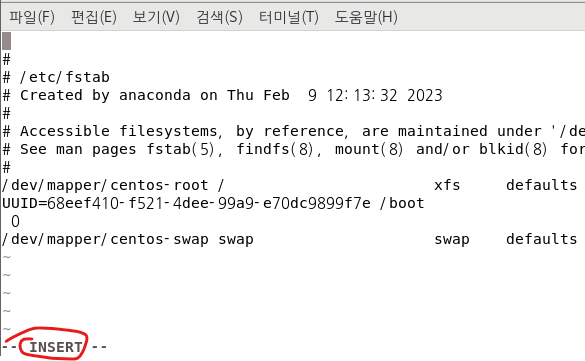

(맨~~ 끝에서 엔터를 치고)
/dev/sdb1 /drive2 ext4 defaults 0 0
/dev/sdb2 /drive2 ext4 defaults 0 0
=이렇게 하면 부팅할때 마운트 해제 안되고 저대로 남는다.
저장하고 나가려면
esc :wq
키 이동키
일단 명령문으로 들어가
su
cd /
cp /etc/passwd /temp = cp는 copy 복사
cd /temp
vi passwd =이러고 나오는 화면은 명령모드
좌하상우
h는 오른쪽
j는 아래
k는 위쪽
l은 왼쪽
w는 단어이동
b는 단어 처음
e는 단어 마지막
) 는 맨끝
(는 맨
G는 문서의 끝
gg는 문서의 처음
$는 행의 끝
0은 행의 처음
M은 화면의 중간
L은 화면의 끝
i누르고 커서움직이면 움직여지고 엔터치면 편집된다.(insert모드여서)
esc키누르면 원위치로 간다(읽기 모드)
a누르면 현재위치에서 오른쪽으로 이동하고 편집모드
s는 지우면서 편집모드
o는 엔터되고 편집모드
dd는 줄지우기
5dd는 5줄 지우기
x는 한글자 지우기
u는 되돌리기
3yy 하고 p 누르면 3줄 복사 붙여넣기
:q! =저장하지 않고 강제로 나가기
====
명령모드들어가기
:! 하고 명령어 누르면 잠깐 내가 명령어 친 화면 보여주고 다시 돌아갈수있다.
:.!
예시) :! man ls
예시) :.! man ls
찾기 기능
/하고 찾고싶은 문자
n은 뒤로찾기, N은 앞으로 찾기
:set nu 는 앞에 넘버링해주는것
:set nonu 넘버링 지워주기
'네트워크 수업 > 리눅스' 카테고리의 다른 글
| [리눅스] 사용자계정, 홈디렉터리 변경, 유저 패스워드 23.03.28 (0) | 2023.03.28 |
|---|---|
| [리눅스] vmware와 연결 23.03.27 (0) | 2023.03.27 |
| [리눅스] fstab, 복사, 시간 23.03.23 (0) | 2023.03.23 |
| [리눅스] 실습 (0) | 2023.03.21 |
| [리눅스 실습] 23.03.16 (0) | 2023.03.16 |


댓글