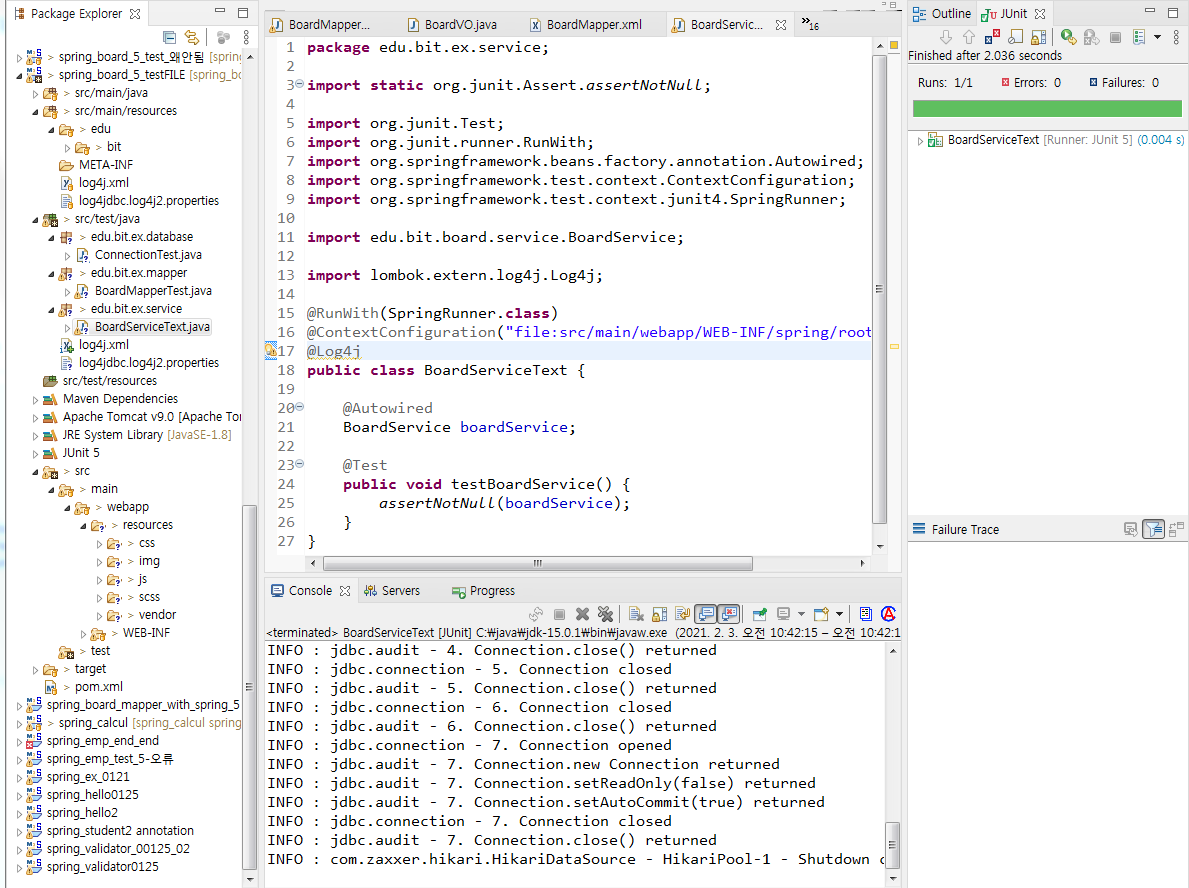
junit이어서
service단 검사하기
[BoardServiceTest.java]
package edu.bit.ex.service;

import static org.junit.Assert.assertNotNull;

import org.junit.Test;
import org.junit.runner.RunWith;
import org.springframework.beans.factory.annotation.Autowired;
import org.springframework.test.context.ContextConfiguration;
import org.springframework.test.context.junit4.SpringRunner;

import edu.bit.board.service.BoardService;

import lombok.extern.log4j.Log4j;

@RunWith(SpringRunner.class)
@ContextConfiguration("file:src/main/webapp/WEB-INF/spring/root-context.xml")
@Log4j
public class BoardServiceText {

	@Autowired
	BoardService boardService;

	@Test
	public void testBoardService() {
		assertNotNull(boardService);
	}
}
controll단 검사하기 - 중요하고 까다롭다. url(value = "/")을 처리하고 페이지를 뿌리는 view부분(junit이 제공하는 톰캣부분이 아님)이 있기 때문에 까다롭다. 자세하게 검사는 어렵지만 그냥 흉내는 낼수있다.
ioc컨테이너를 root-context.xml과 servleet-context.xml 두개를 만든다. - 까먹지말것.
[BoardControllerTest.java]
package edu.bit.board.controller;

import static org.junit.Assert.assertNotNull;
import static org.springframework.test.web.servlet.request.MockMvcRequestBuilders.get;
import static org.springframework.test.web.servlet.result.MockMvcResultHandlers.print;
import static org.springframework.test.web.servlet.result.MockMvcResultMatchers.forwardedUrl;
import static org.springframework.test.web.servlet.result.MockMvcResultMatchers.status;

import org.junit.Before;
import org.junit.Test;
import org.junit.runner.RunWith;
import org.springframework.beans.factory.annotation.Autowired;
import org.springframework.test.context.ContextConfiguration;
import org.springframework.test.context.junit4.SpringJUnit4ClassRunner;
import org.springframework.test.context.junit4.SpringRunner;
import org.springframework.test.context.web.WebAppConfiguration;
import org.springframework.test.web.servlet.MockMvc;
import org.springframework.test.web.servlet.setup.MockMvcBuilders;
import org.springframework.web.context.WebApplicationContext;

import lombok.Setter;
import lombok.extern.log4j.Log4j;

//@RunWith(SpringRunner.class)
@RunWith(SpringJUnit4ClassRunner.class)
@WebAppConfiguration // 이부분추가 - @RunWith와 함게 webApplicationContext를 읽음
@ContextConfiguration({ "file:src/main/webapp/WEB-INF/spring/root-context.xml",
		"file:src/main/webapp/WEB-INF/spring/appServlet/servlet-context.xml" })
//servlet-context가 jsp파일관련. controller이 당연히 관여하는 곳이므로 추가!
@Log4j
public class BoardControllerTest {

	@Setter(onMethod_ = { @Autowired })
	private WebApplicationContext ctx;//이렇게 적게되면 알아서 setter함수 만들어서 autowired하게 됨.
	/*
	MockMvc란?
	실제 객체와 비슷하지만 테스트에 필요한 기능만 가지는 가짜 객체를 만들어서
	애플리케이션 서버에 배포하지 않고도 스프링 MVC 동작을 재현할 수 있는 클래스를 의미.
	*/
	private MockMvc mockMvc;

	@Before//테스트 초기화
	public void setup() {
		this.mockMvc = MockMvcBuilders.webAppContextSetup(ctx).build();
	}

	@Test
	public void testList() throws Exception {
		mockMvc.perform(get("/list"))
		.andExpect(status().isOk())
		.andDo(print())
		.andExpect(forwardedUrl("/WEB-INF/views/list2.jsp"));//응답 검증
	}
}

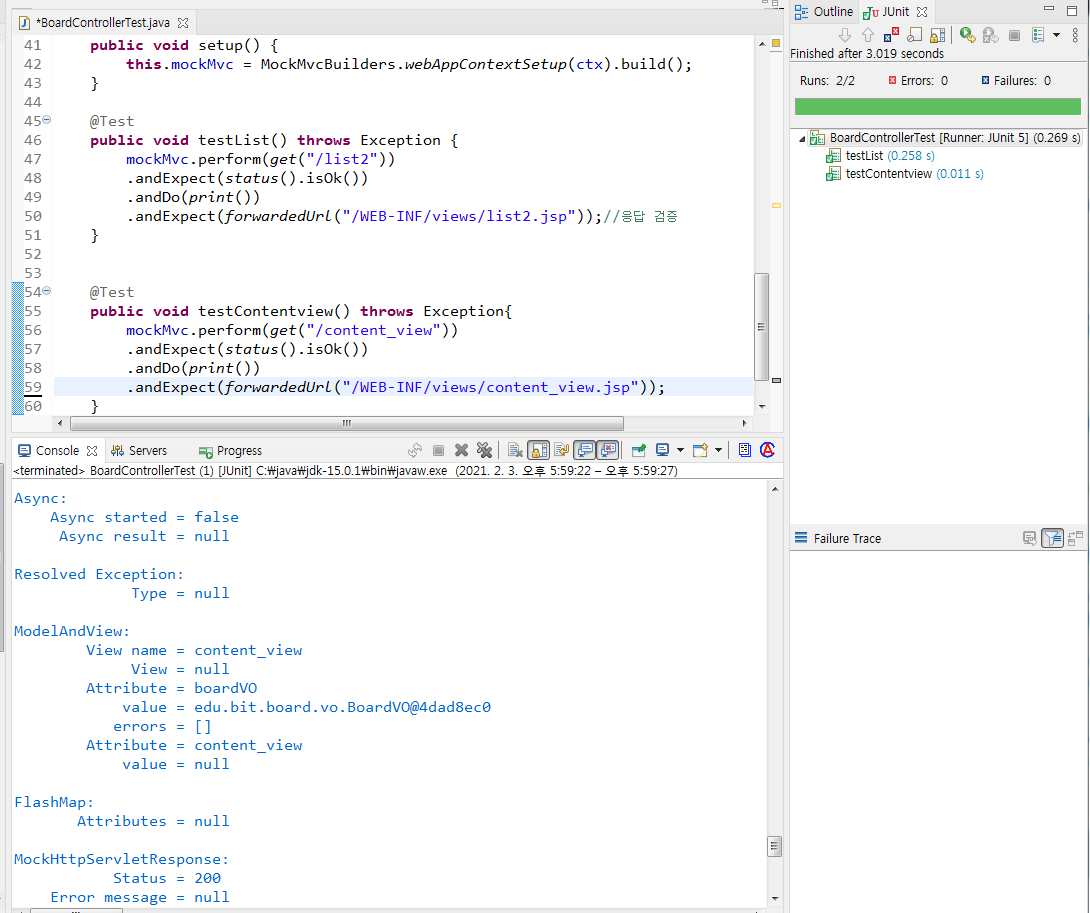
console창에 보이는게 mock이 구현해 내는것.
DB modeling
[3장]데이터베이스 설계
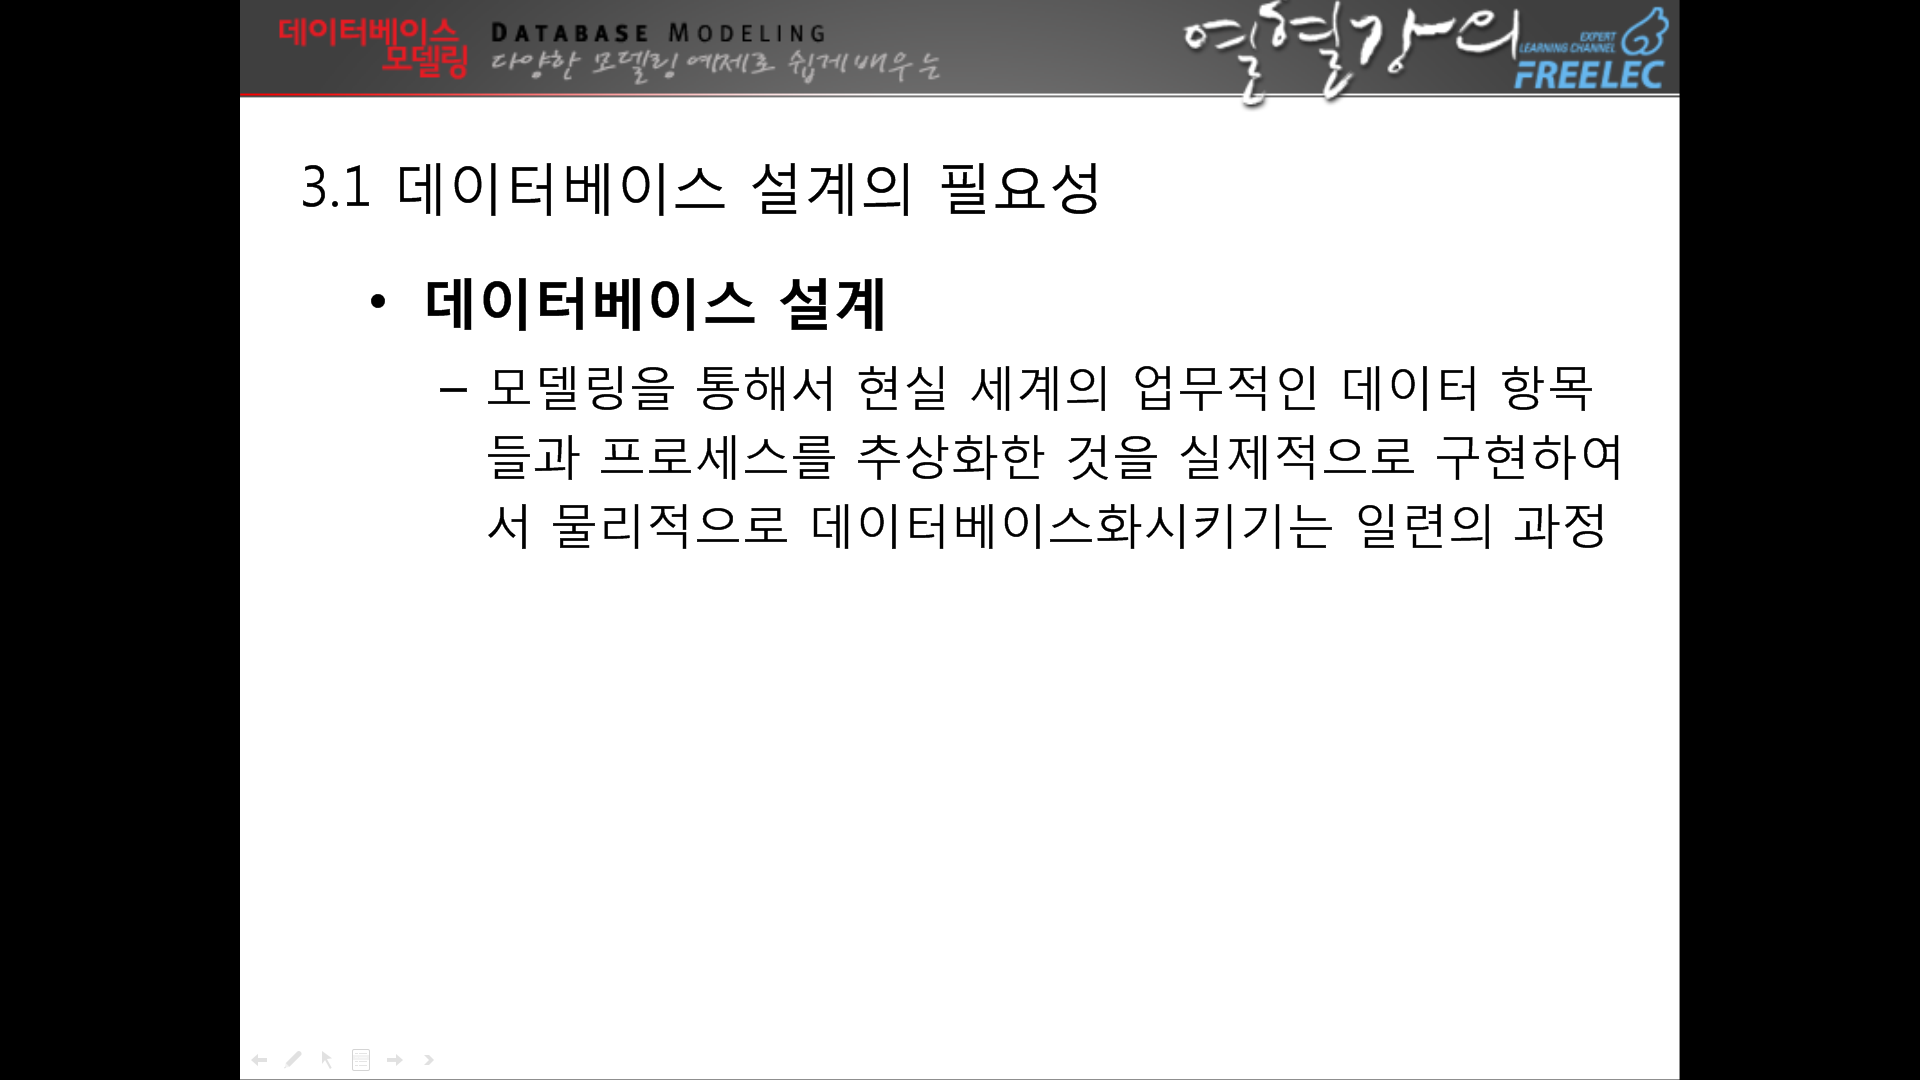

↑포커스. 하향식 모델
주먹구구x. 문서화 시켜야한다.
간단한 가위바위보를 짜더라도 저렇게 문서화 시켜야한다.
이렇게 문서화시키는 프로세서가있는 회사를 가자..!! 주먹구구는 ㄸㄹㅇ상사다
★프로젝트에 이거 무조건 달아놓기
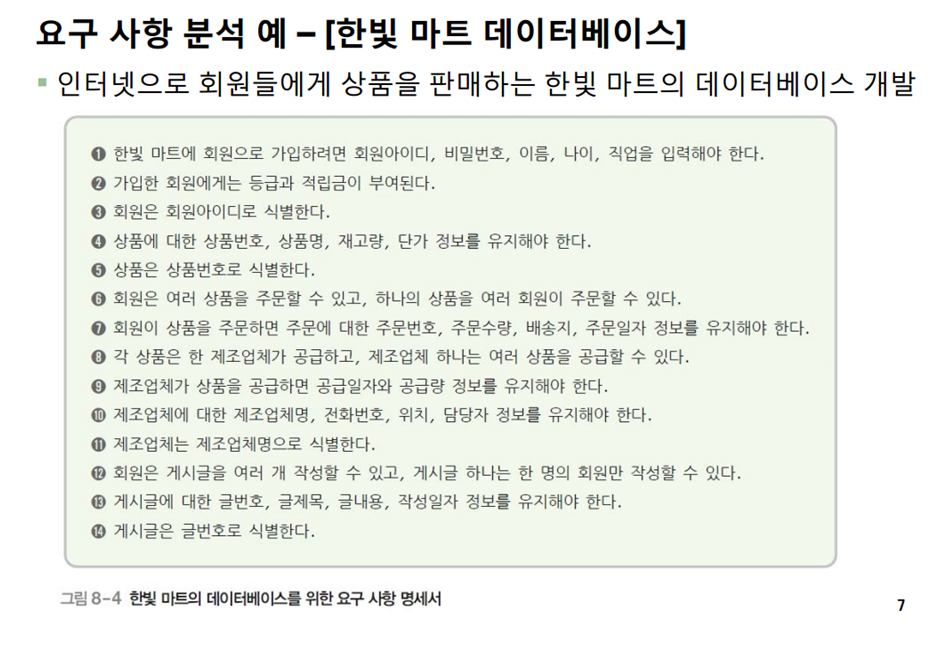
[4장]요구 사항 수집 및 분석
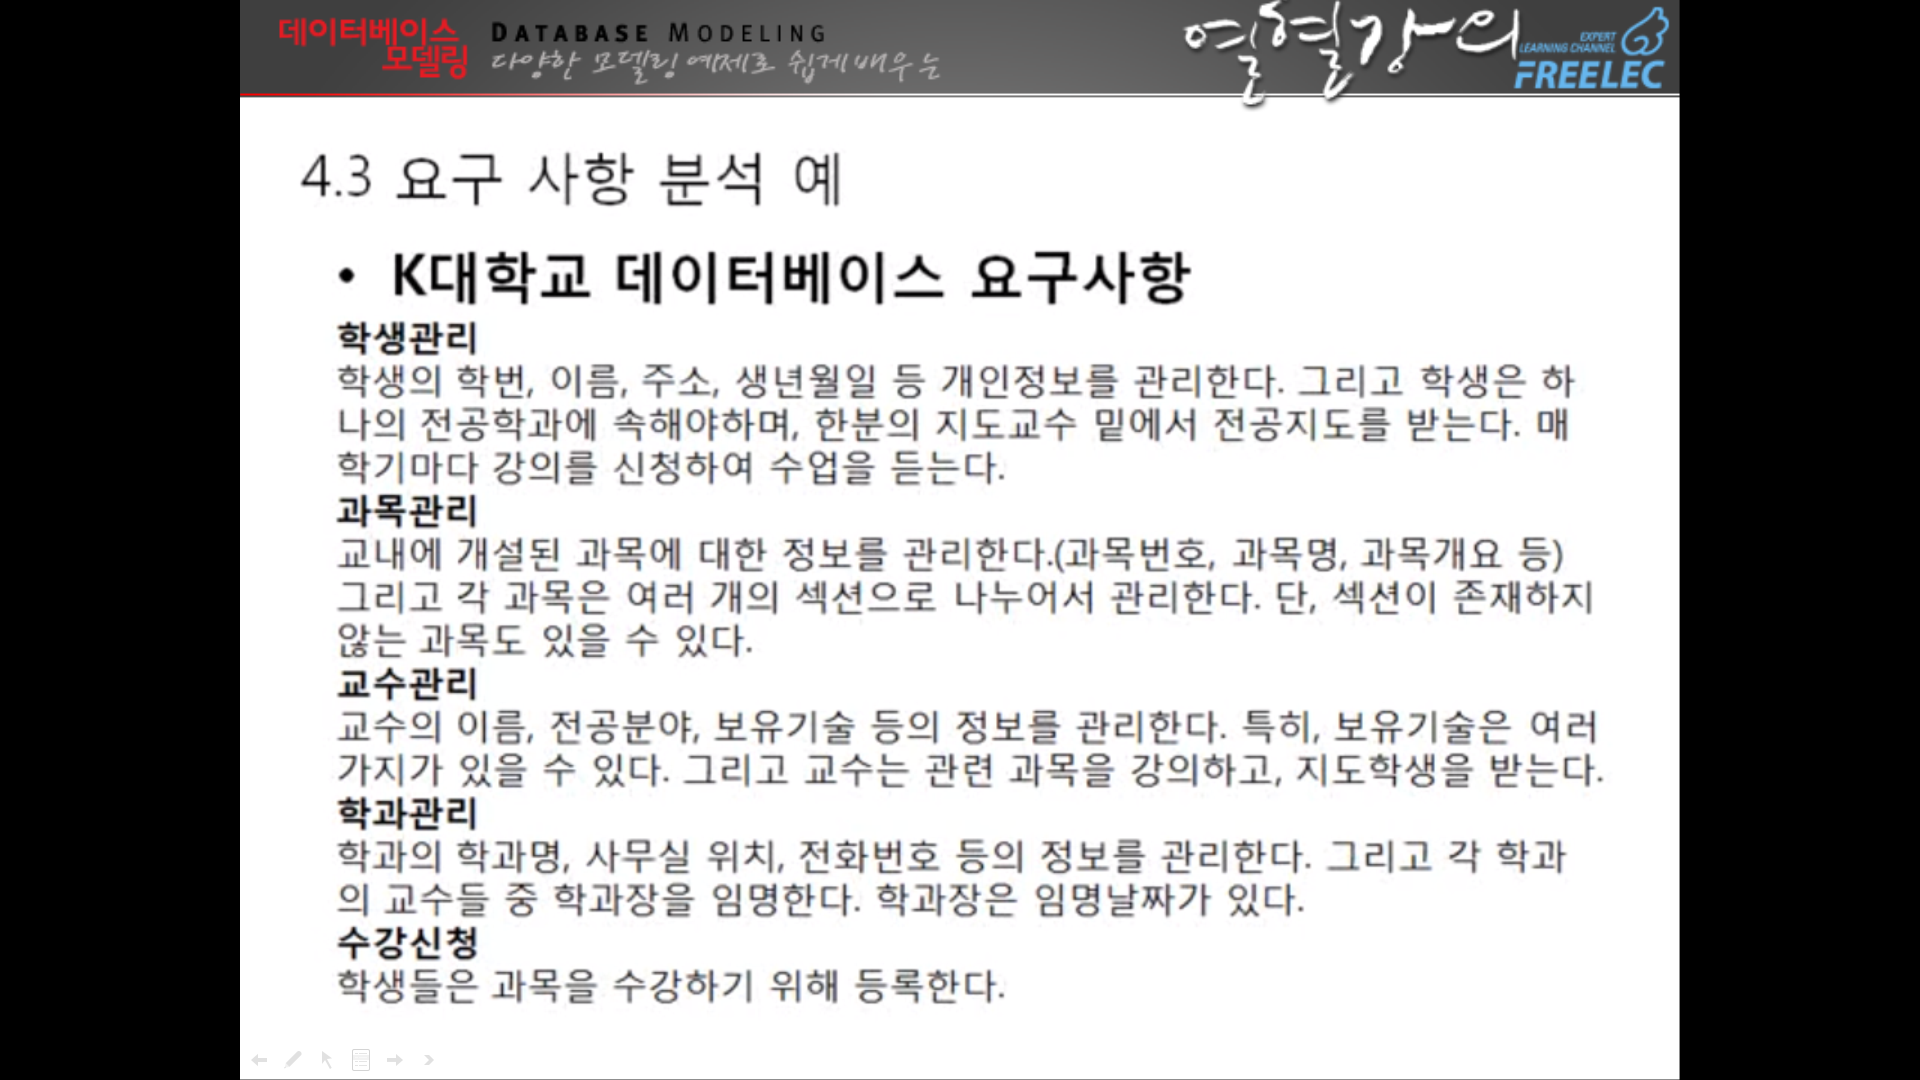
↑프로젝트할때 이렇게 분석한 걸 써야한다. 딱 db스러운 문장이니 인지할것
↓선생님이 주신 자료중 하나
DFD(자료흐름도)는 은행권에서 쓴다. --일단 패스
저거 다하고나면 이제 개념적설계
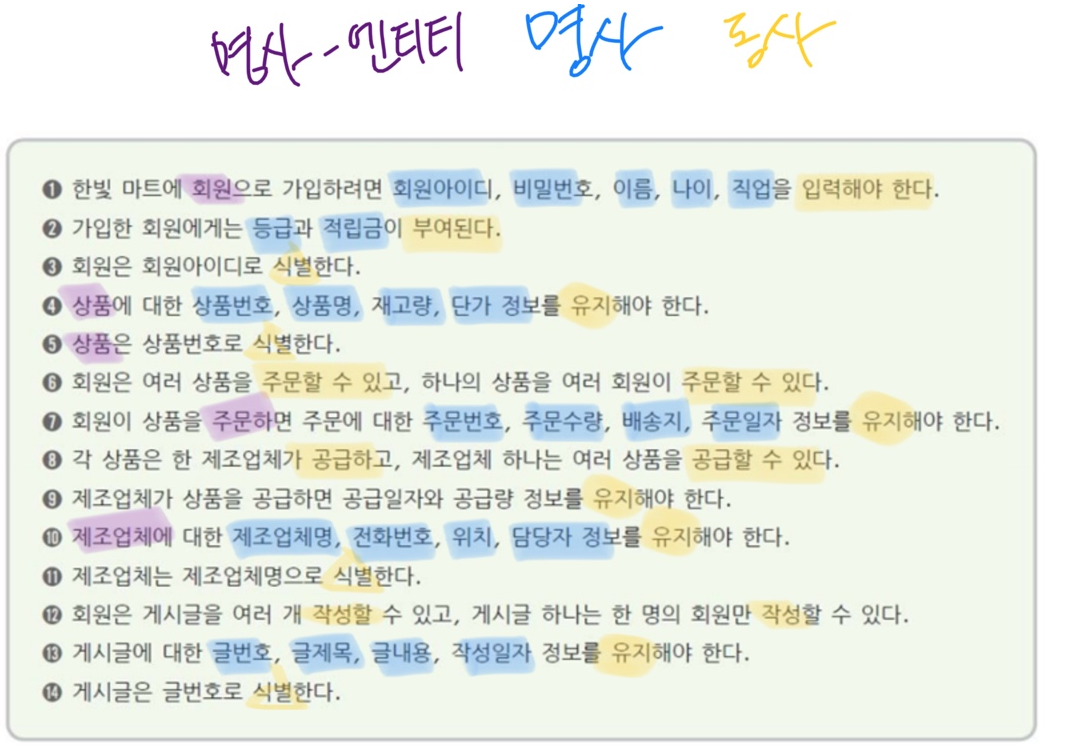
[5장]개념적 설계(하향식)
↑프로젝트에 이렇게 넣기
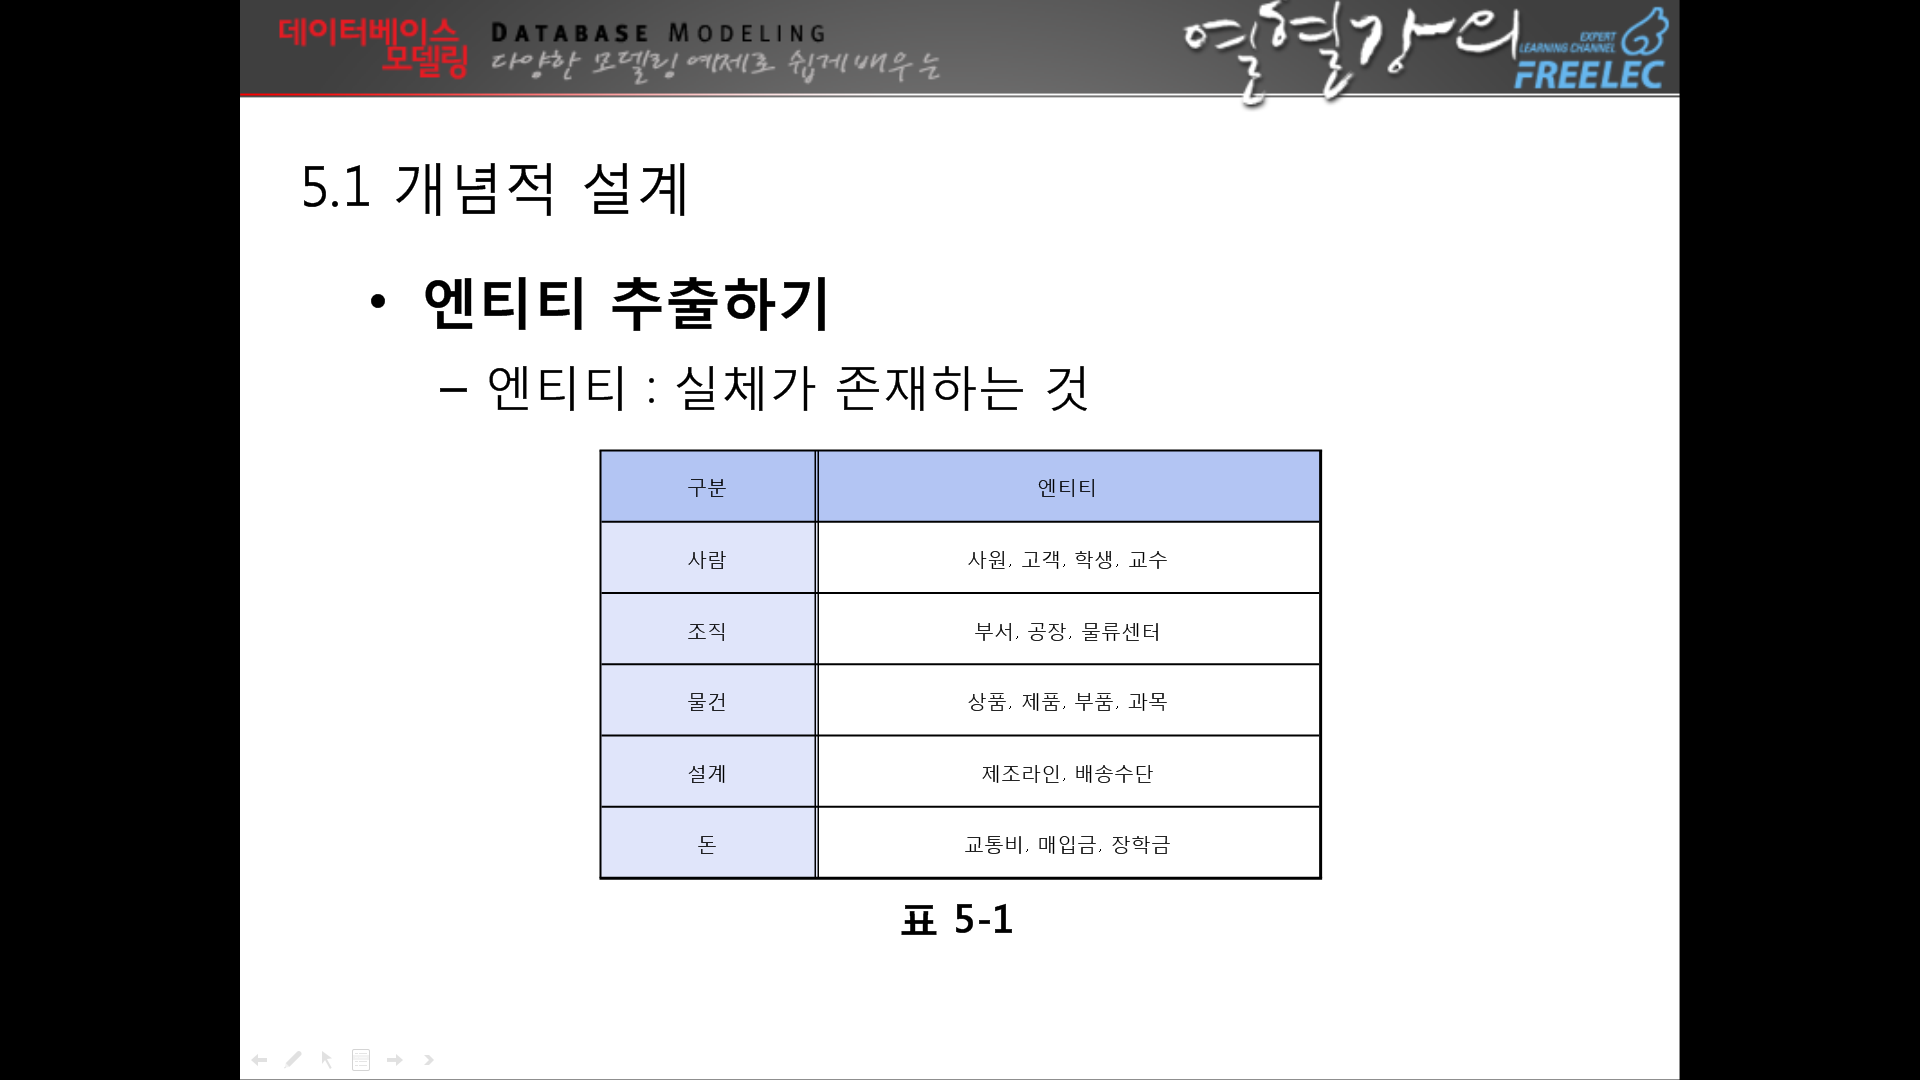
↑요구사항분석에서 명사가 될만한 것들은 다 엔티티에 넣기
↑왜 이렇게 하느냐? 테이블이 될만한 요소를 뽑기위해서다
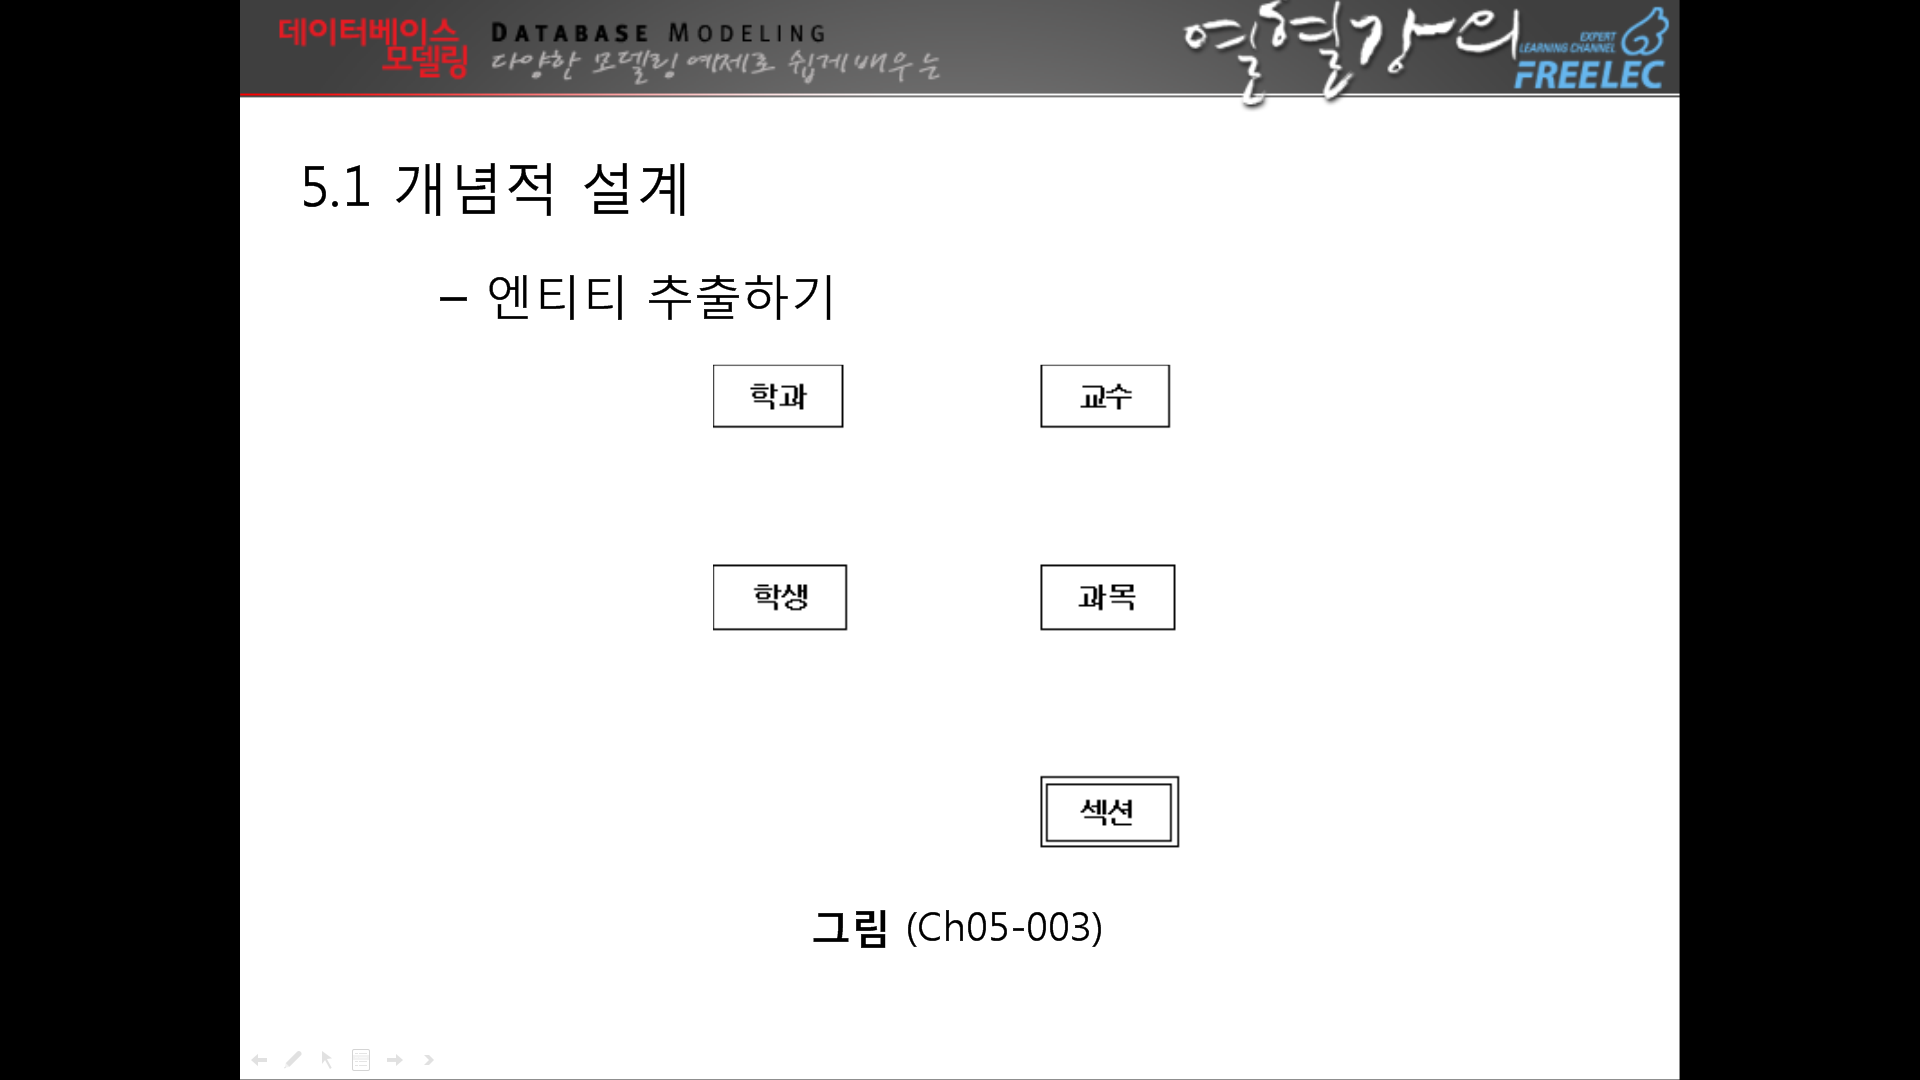
섹션은 과목이 없으면 날라감. 약한엔티티-- 테두리 두개
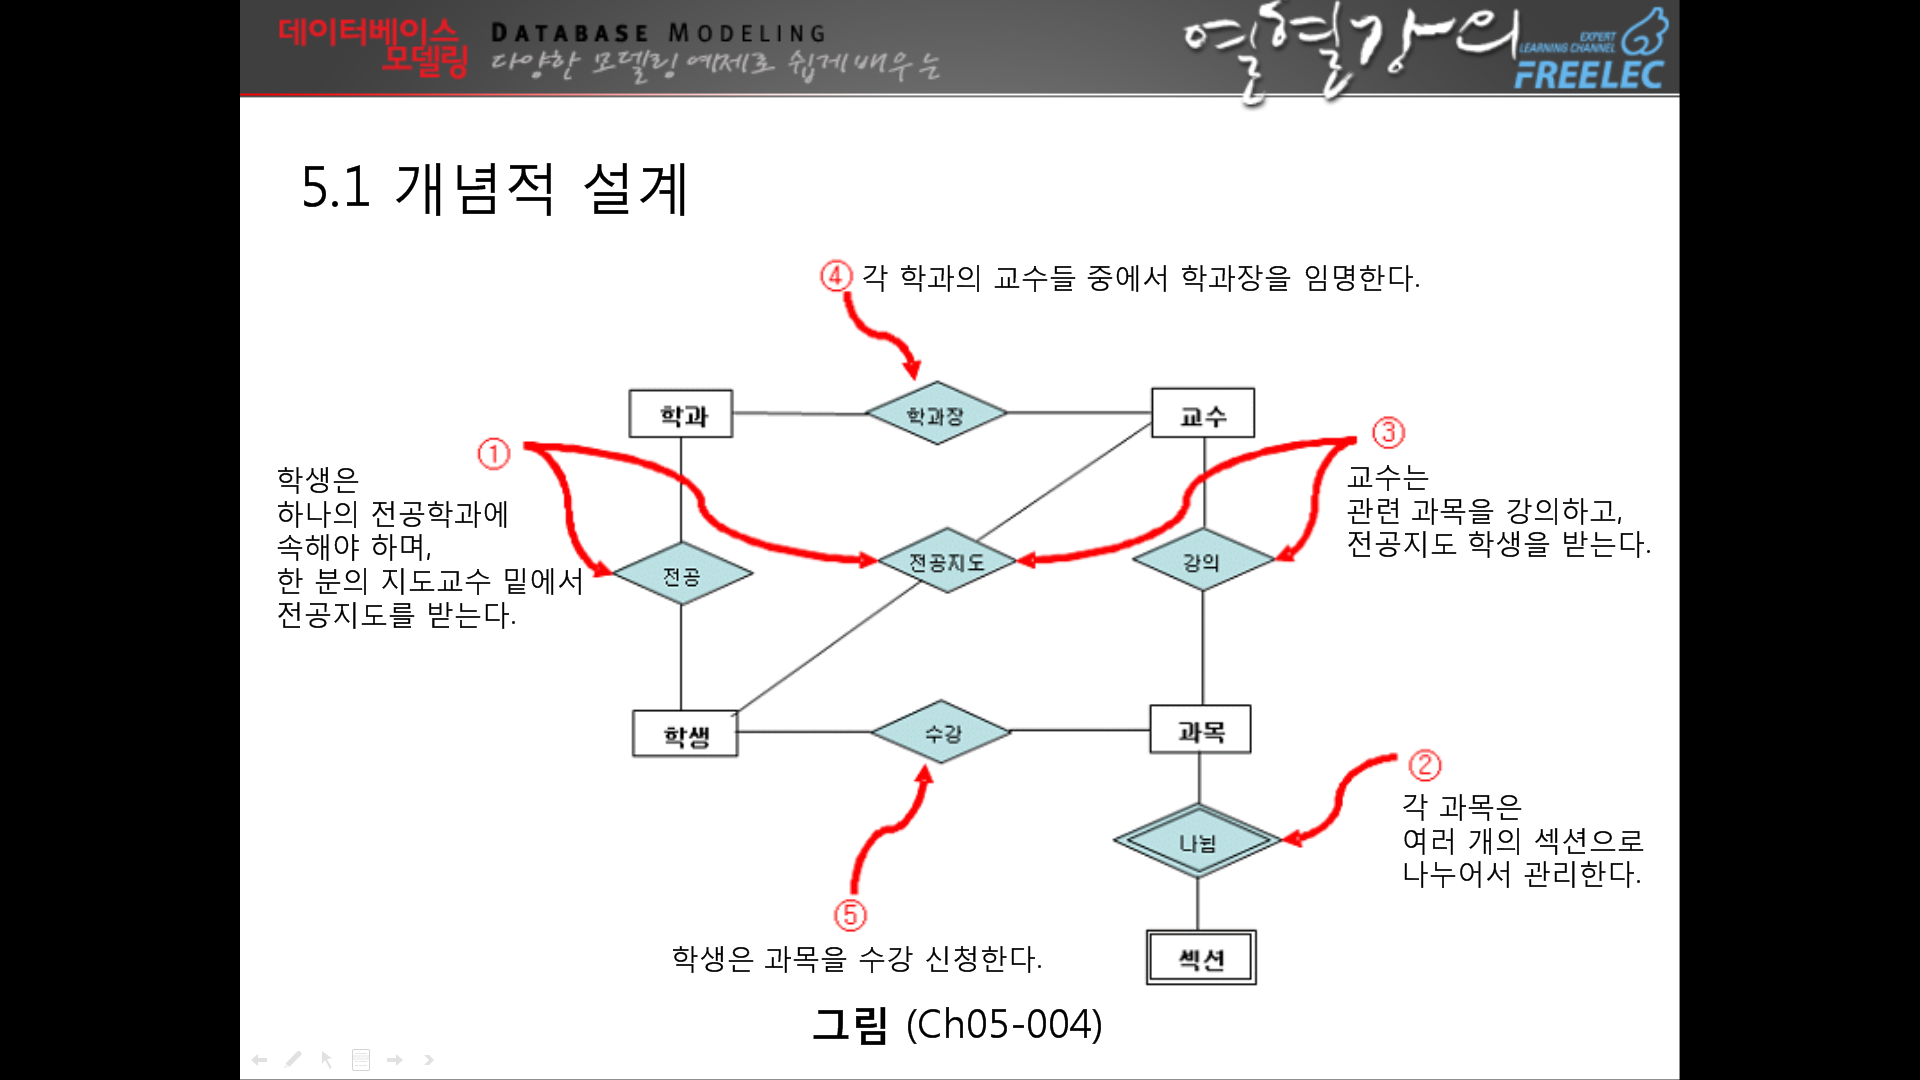
↑관계를 맺는방법 = 문장의 동사로 찾는다.
ㅁ★↓이부분 무조건 해줘야함
--> 여기까지하면 설계는 다 끝난것
오늘의 문제
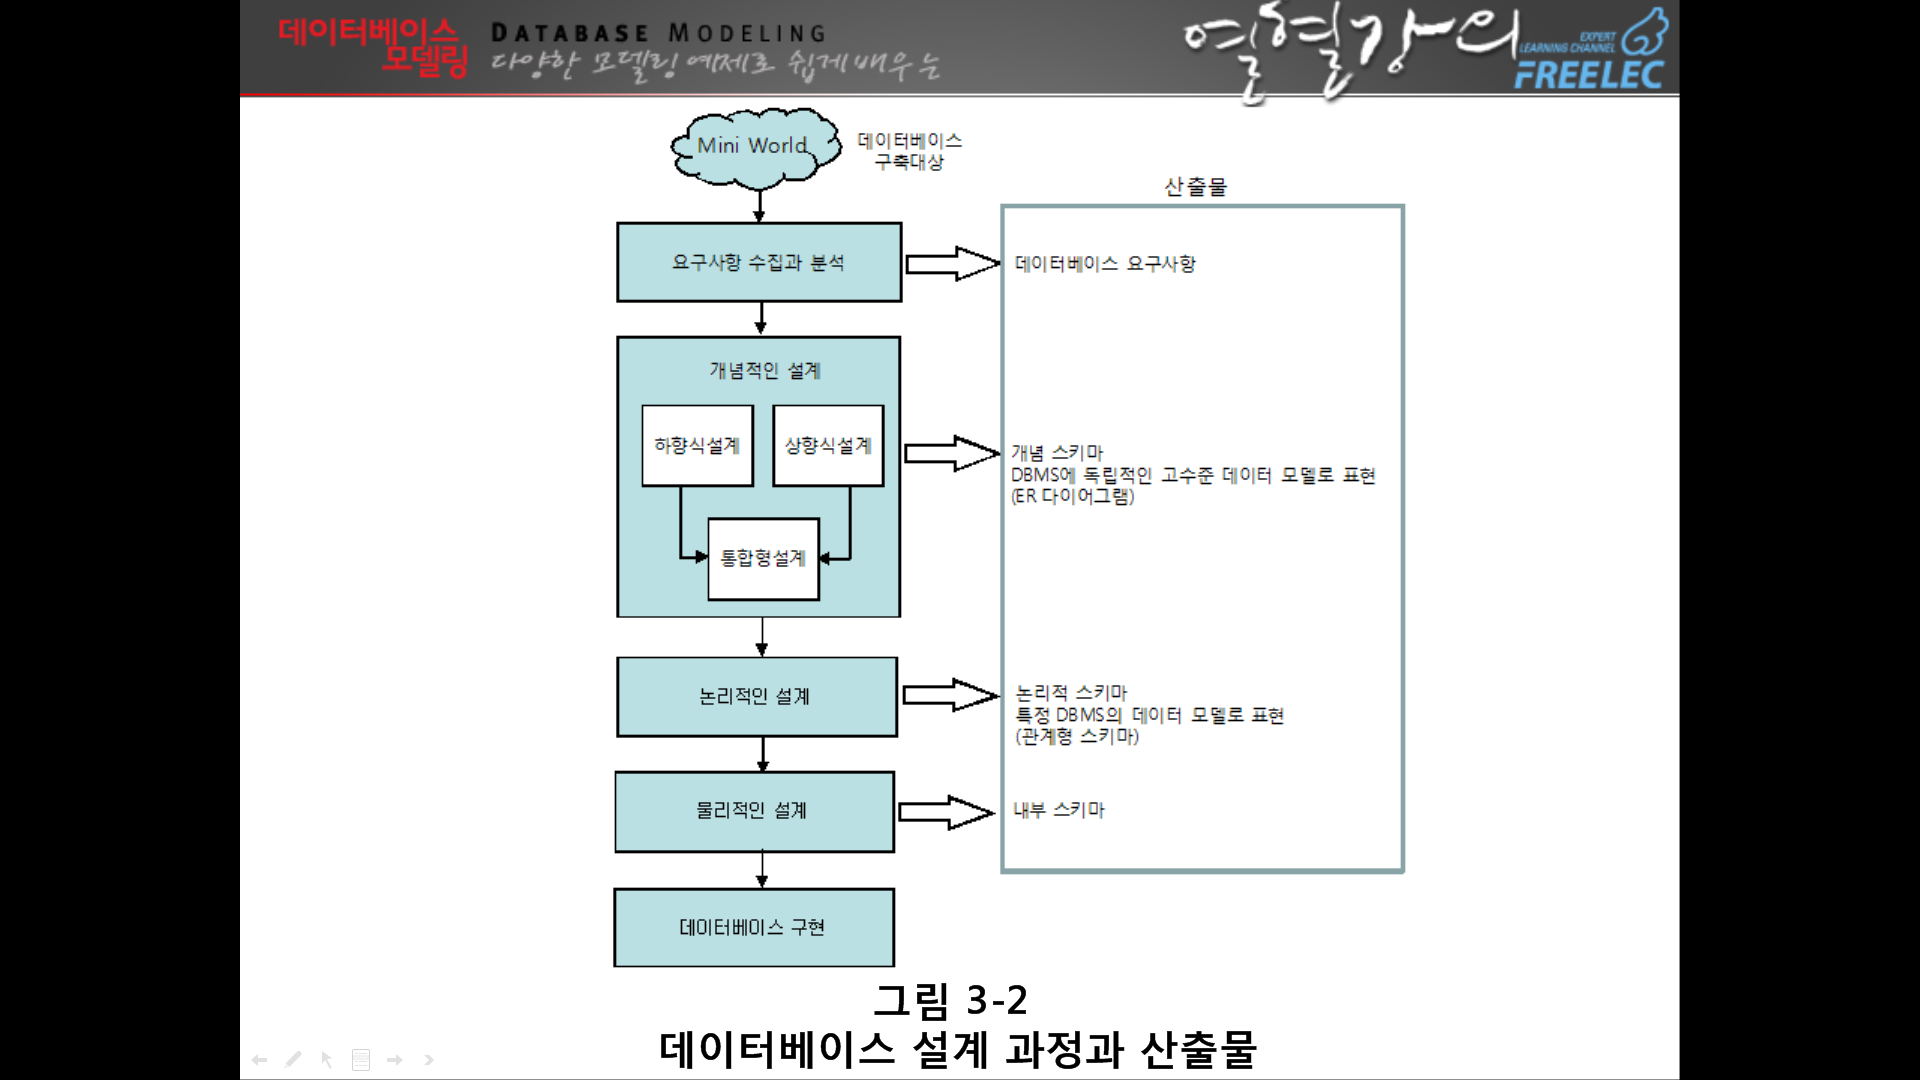
1.DB 설계의 순서는?
요구분석 (사용자의 요구사항 분석, 요구 조건 작성)
↓
개념적 설계 (DBMS 독립적 개념 스키마 설계 (E-R모델))
↓ㅡDBMS선정
논리적 설계 (DBMS에 맞는 스키마 설계, 트랜잭션 인터페이스 설계)
↓ㅡ정규화
물리적 설계 (목표 DBMS에 맞는 물리적 구조 설계, 트랜잭션 세부 설계)
↓
구현
*DBMS=데이터베이스 관리 시스템
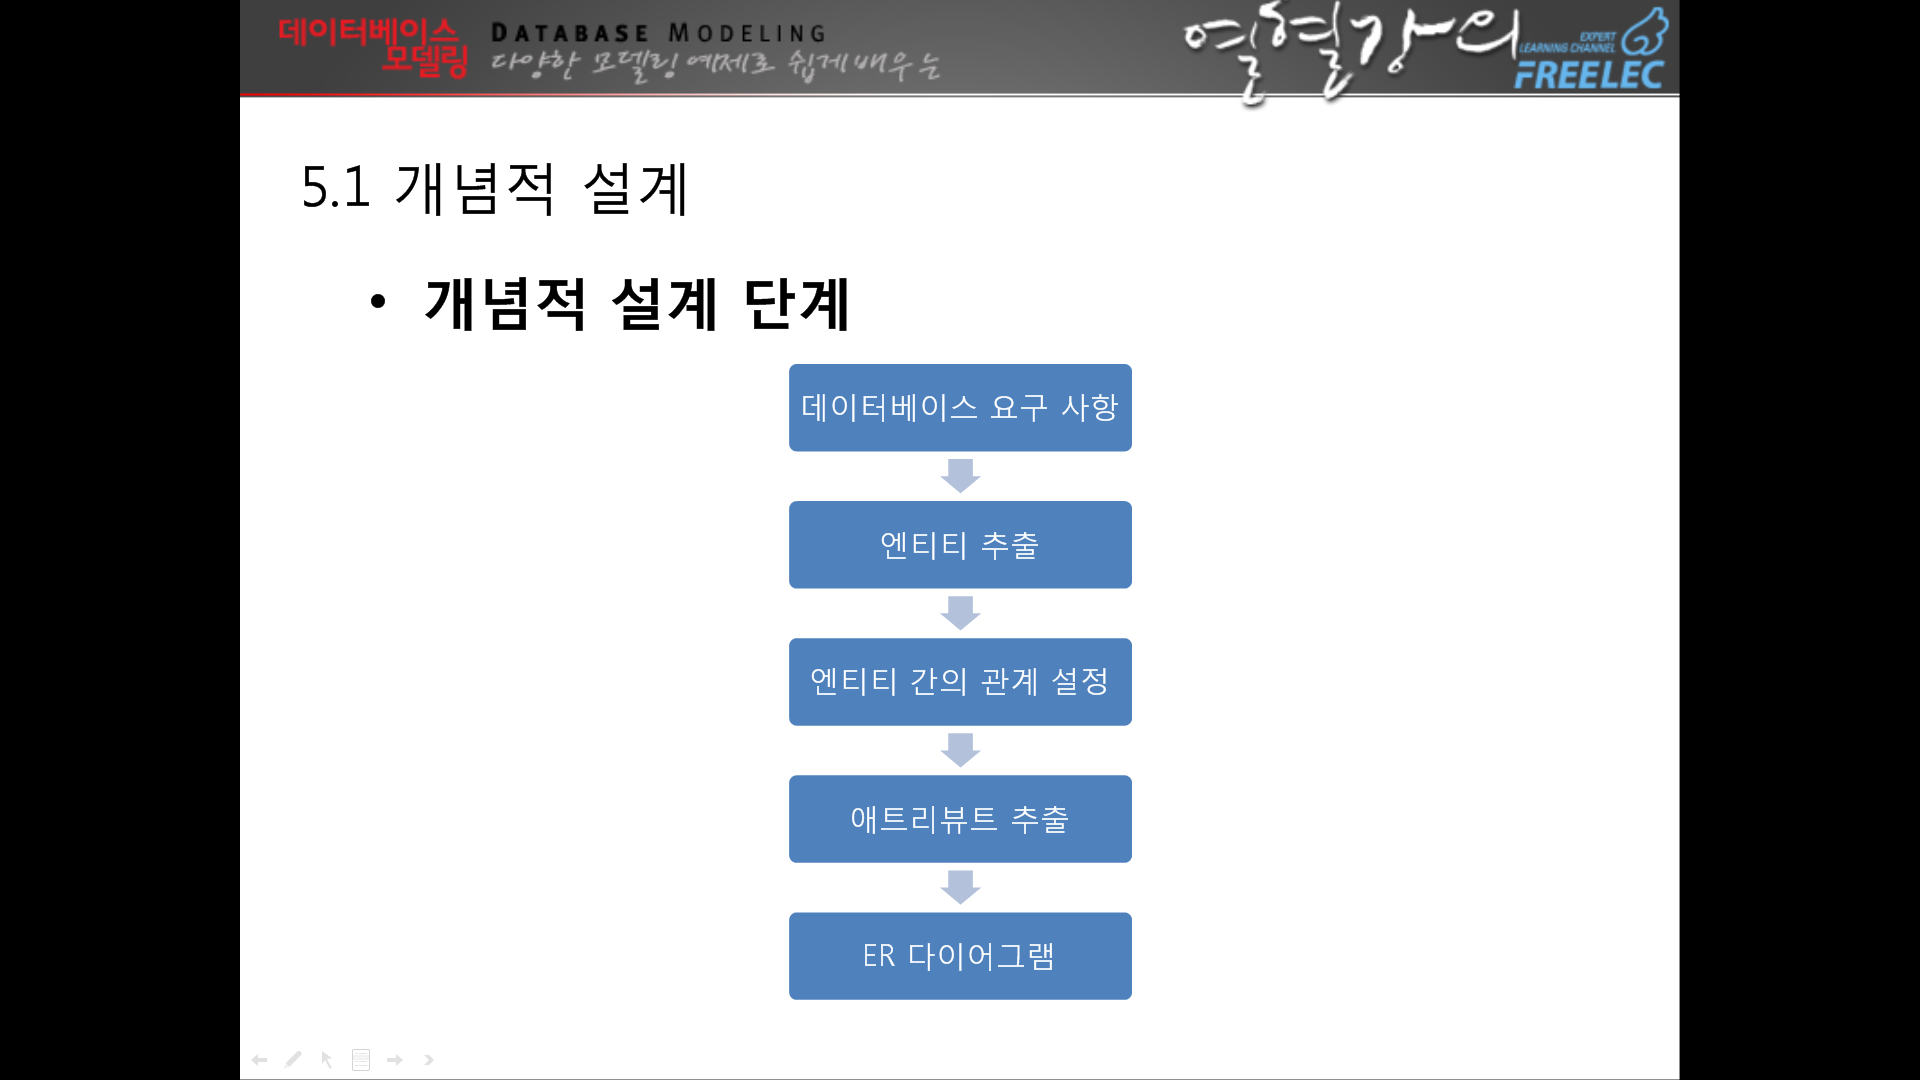
2.개념적 설계의 순서에 대하여 설명하시오.
고객의 요구사항 분석단계를 파악해 고객의 니즈를 개념적 데이터 모델을 이용하여 표현한다.
데이터베이스 요구사항
↓
엔티티 추출
↓
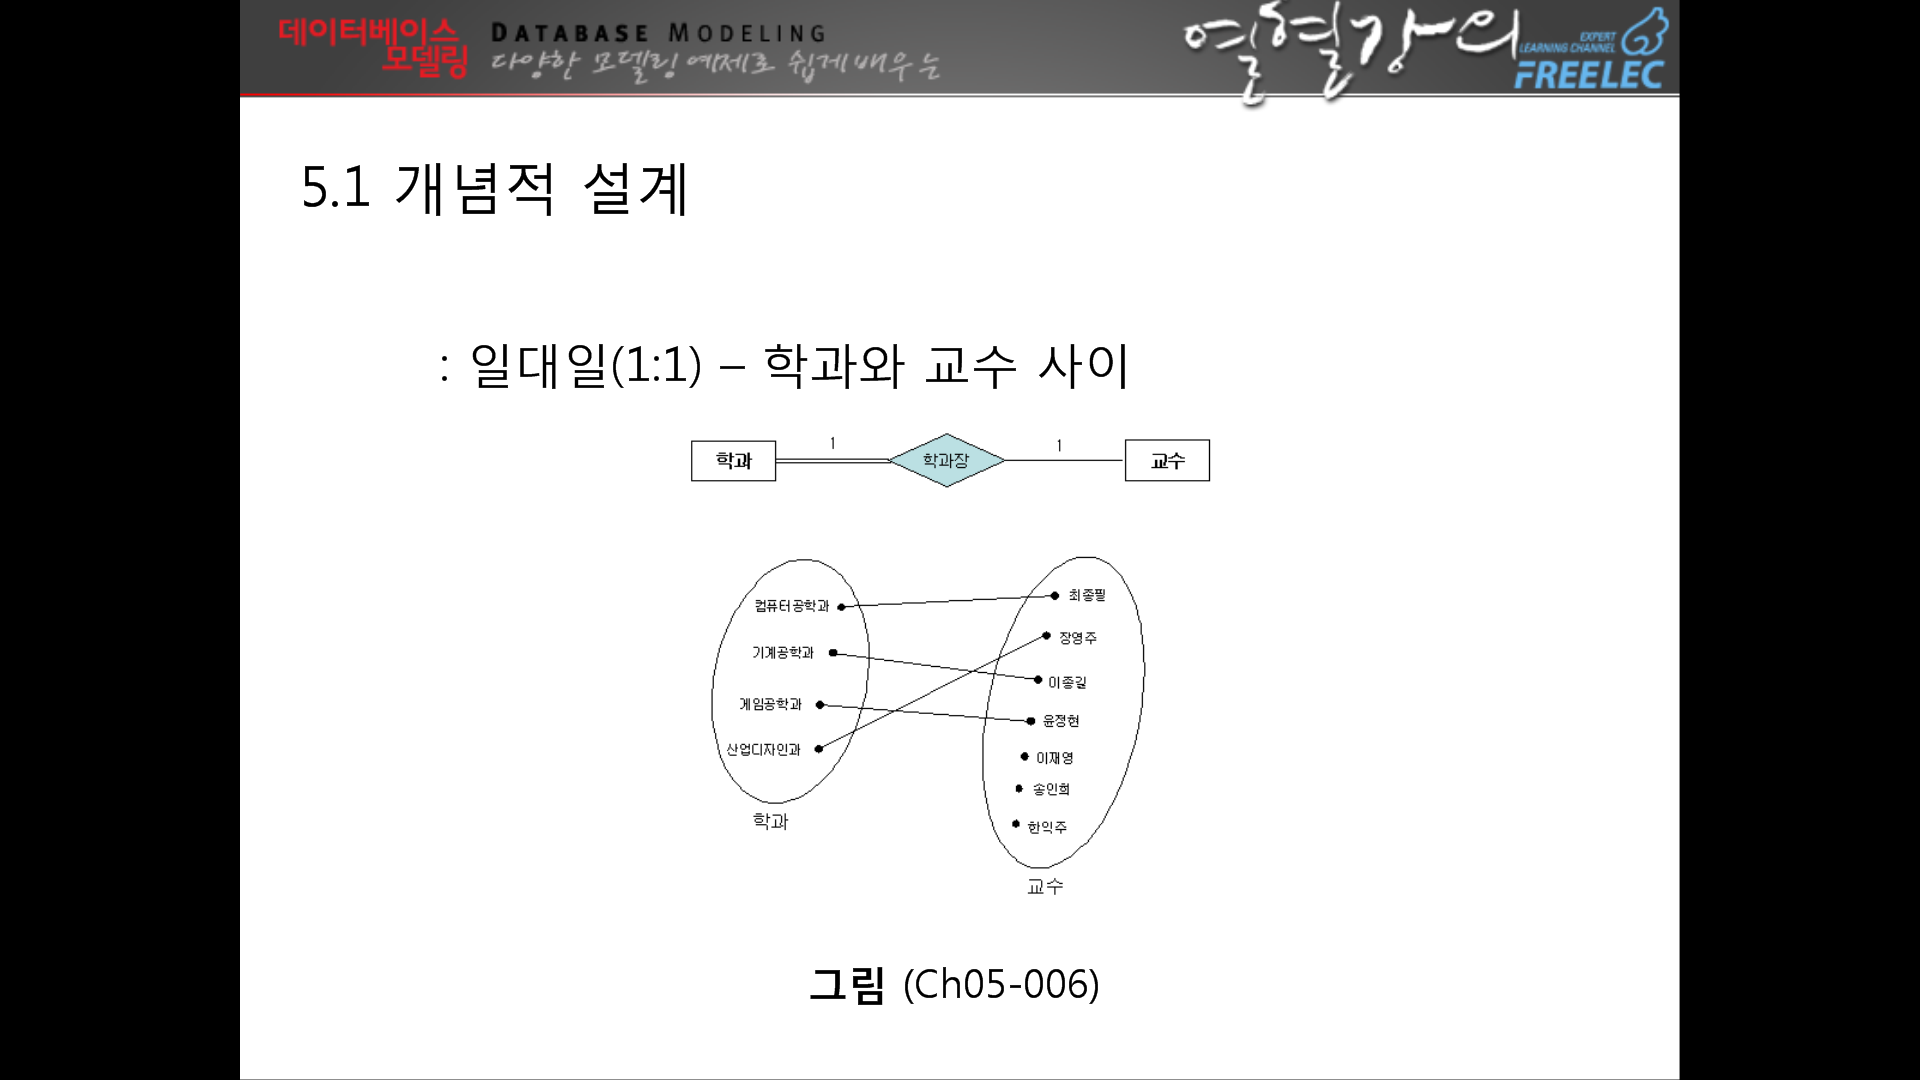
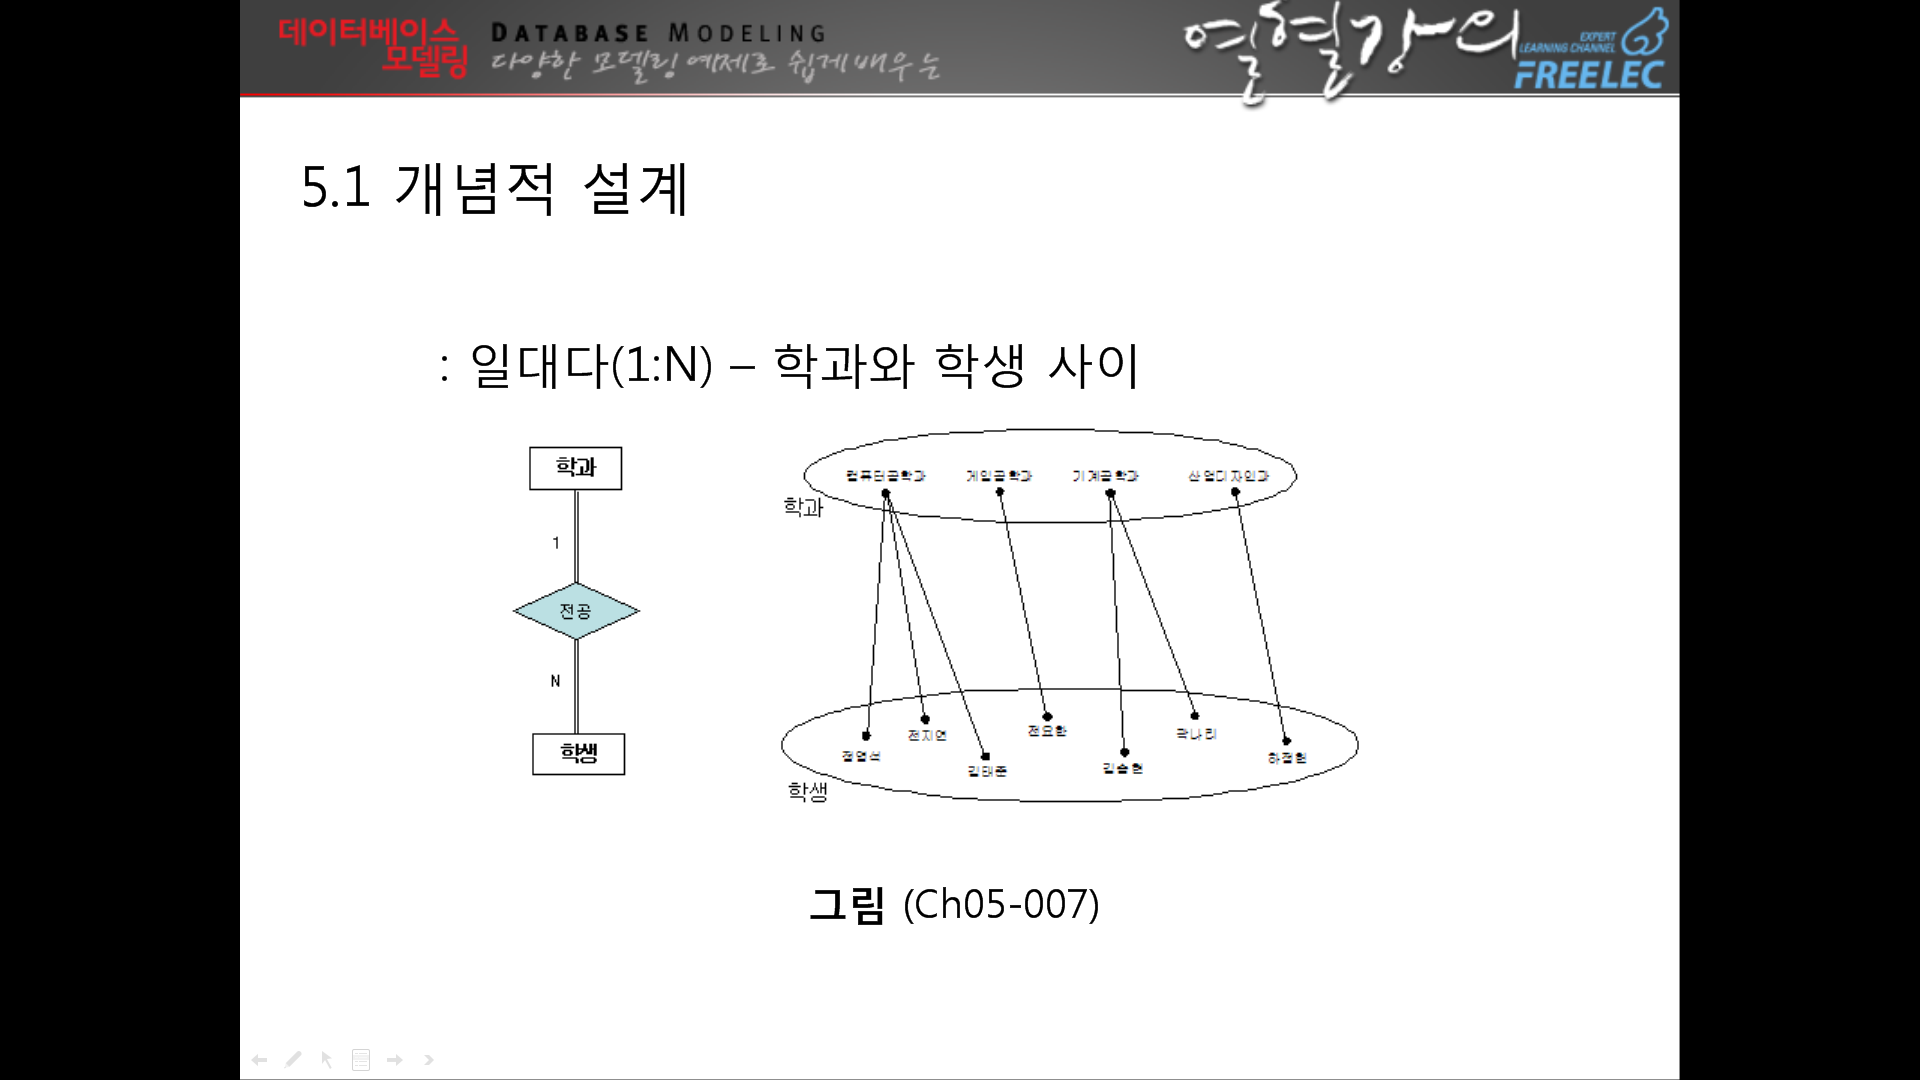
엔티티 간의 관계 설정
↓
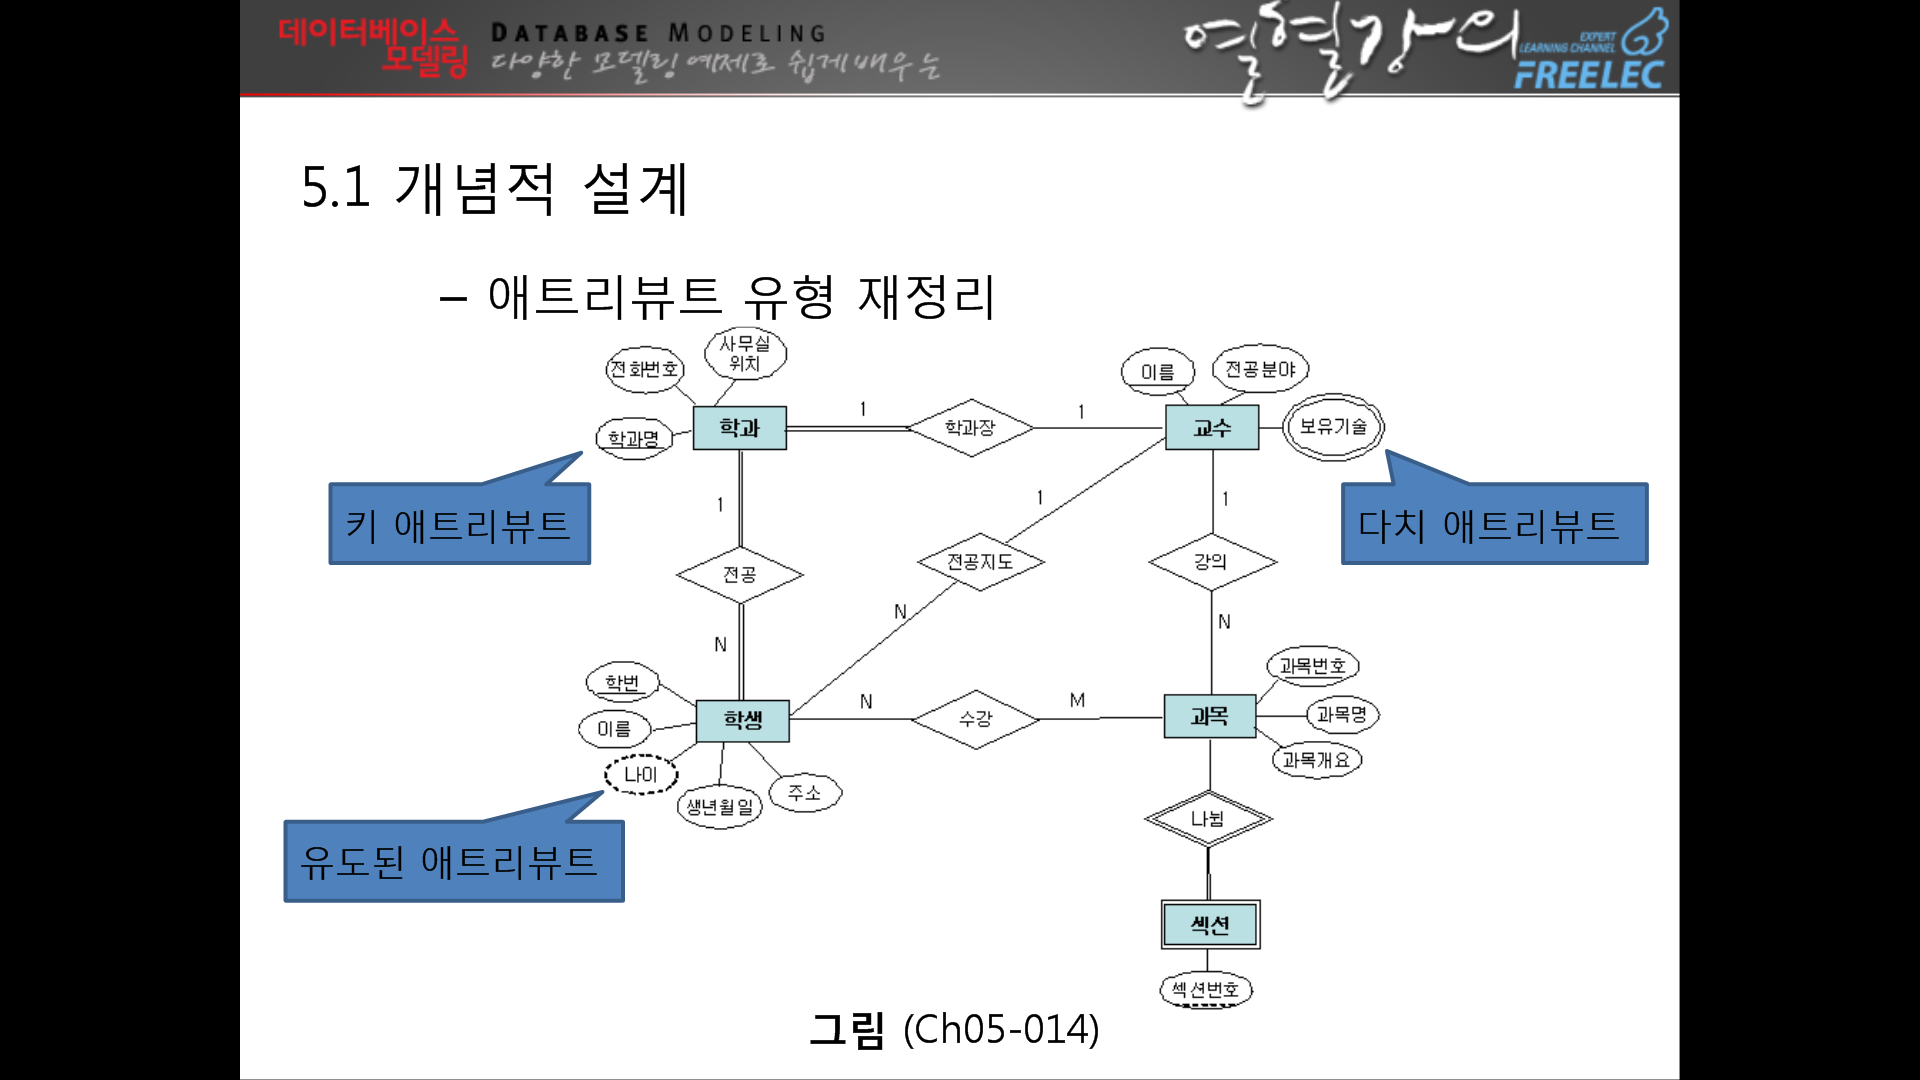
애트리뷰트 추출
↓
ER다이어그램
3.list 및 content_view함수의 mock 테스트를 하시오.
[BoardControllerTest.java]
package edu.bit.board.controller;

import static org.springframework.test.web.servlet.request.MockMvcRequestBuilders.get;
import static org.springframework.test.web.servlet.result.MockMvcResultHandlers.print;
import static org.springframework.test.web.servlet.result.MockMvcResultMatchers.forwardedUrl;
import static org.springframework.test.web.servlet.result.MockMvcResultMatchers.status;

import org.junit.Before;
import org.junit.Test;
import org.junit.runner.RunWith;
import org.springframework.beans.factory.annotation.Autowired;
import org.springframework.test.context.ContextConfiguration;
import org.springframework.test.context.junit4.SpringJUnit4ClassRunner;
import org.springframework.test.context.web.WebAppConfiguration;
import org.springframework.test.web.servlet.MockMvc;
import org.springframework.test.web.servlet.setup.MockMvcBuilders;
import org.springframework.web.context.WebApplicationContext;

import lombok.Setter;
import lombok.extern.log4j.Log4j;

@RunWith(SpringJUnit4ClassRunner.class)
@WebAppConfiguration
@ContextConfiguration({ "file:src/main/webapp/WEB-INF/spring/root-context.xml",
		"file:src/main/webapp/WEB-INF/spring/appServlet/servlet-context.xml" })
@Log4j
public class BoardControllerTest {

	@Setter(onMethod_ = { @Autowired })
	private WebApplicationContext ctx;
	private MockMvc mockMvc;

	@Before//테스트 초기화
	public void setup() {
		this.mockMvc = MockMvcBuilders.webAppContextSetup(ctx).build();
	}

	@Test
	public void testList() throws Exception {
		mockMvc.perform(get("/list2"))
		.andExpect(status().isOk())
		.andDo(print())
		.andExpect(forwardedUrl("/WEB-INF/views/list2.jsp"));//응답 검증
	}


	@Test
	public void testContentview() throws Exception{
		mockMvc.perform(get("/content_view"))
		.andExpect(status().isOk())
		.andDo(print())
		.andExpect(forwardedUrl("/WEB-INF/views/content_view.jsp"));//응답 검증
	}

}
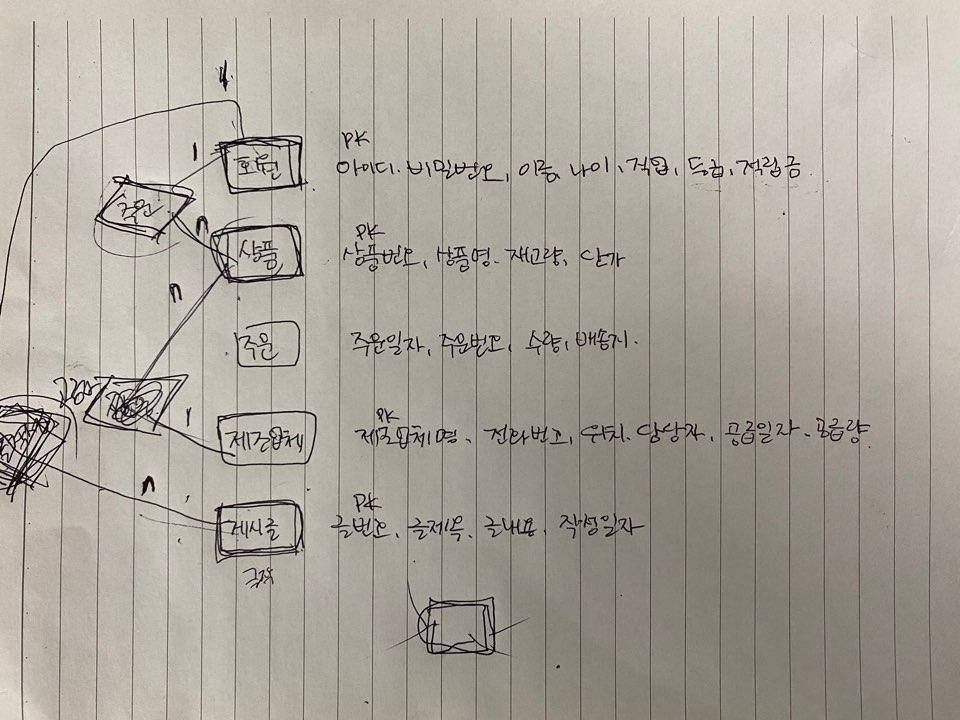
4. DB설계를 하시오
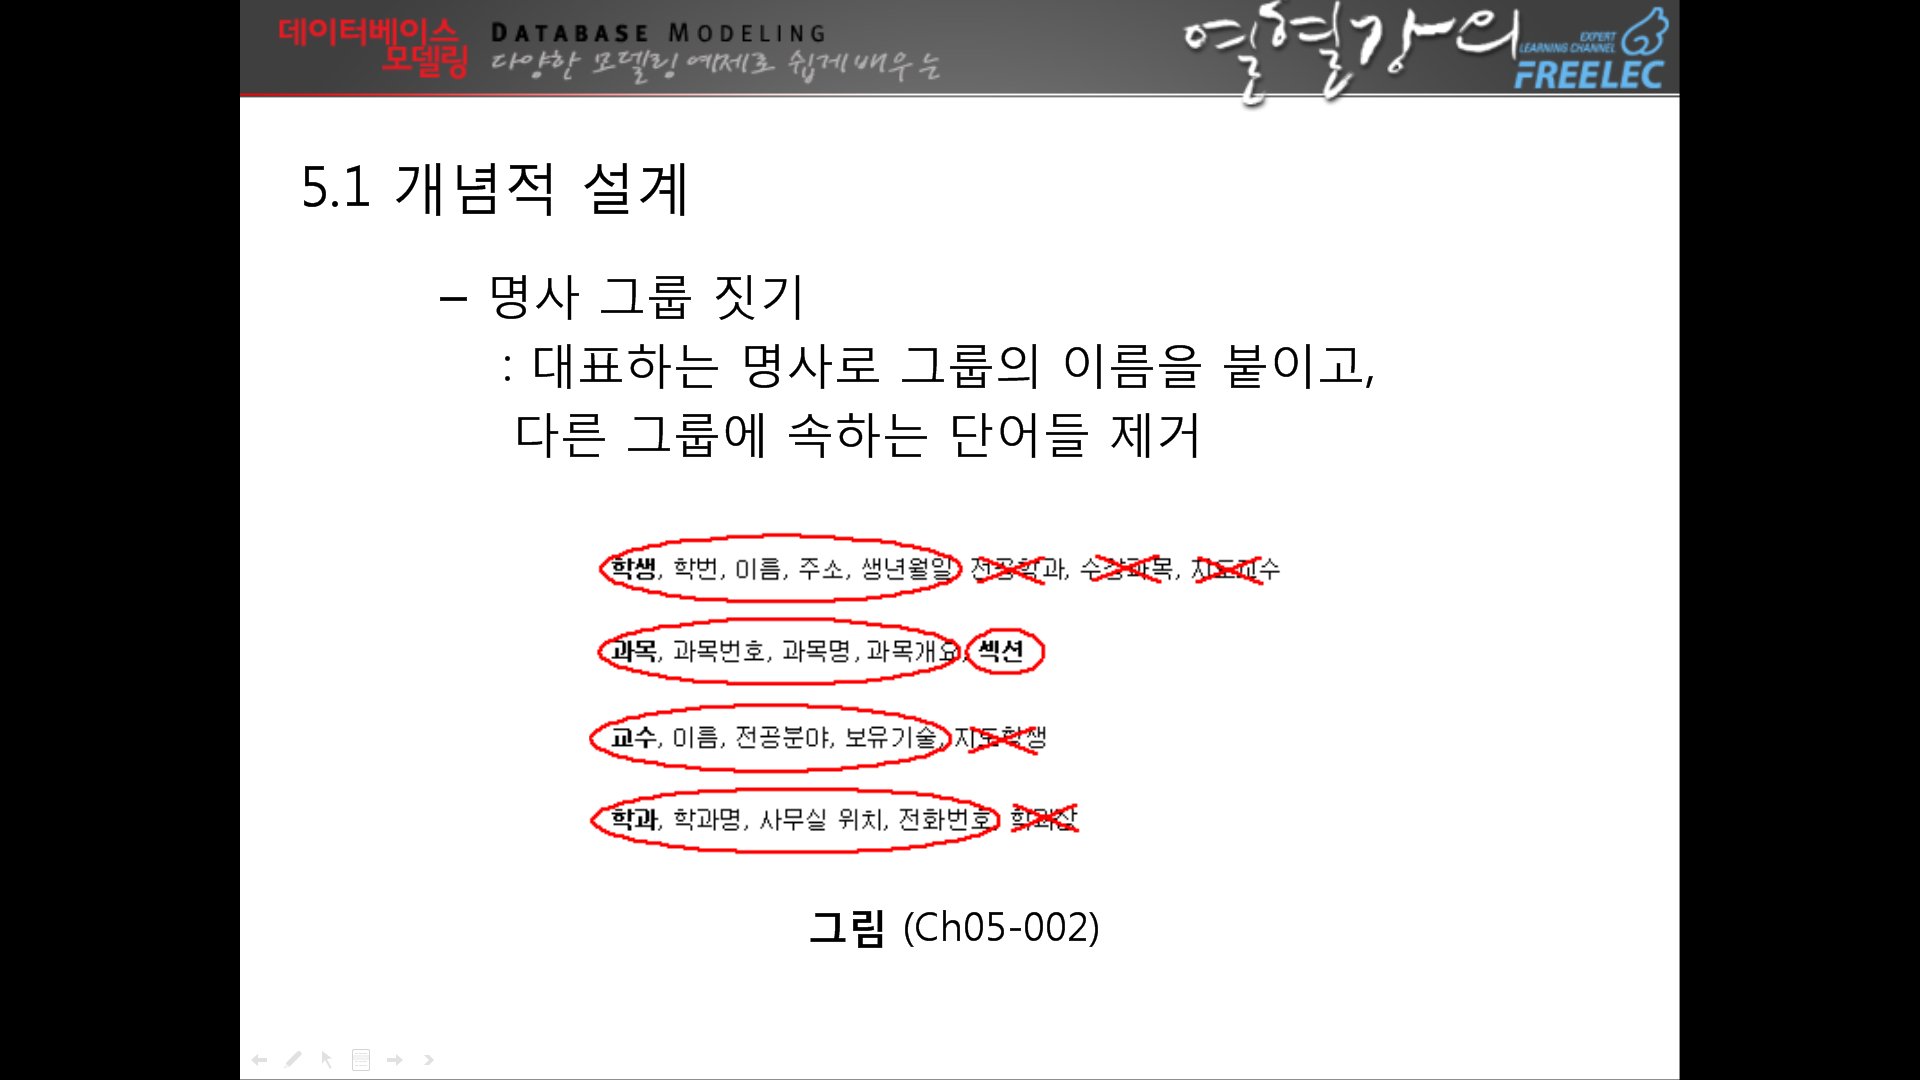
↓요구사항 분석. 엔티티 추출하고 명사그룹, 동사그룹 짓기
↓e-r 다이어그램 초기 설계

↓db 개념적설계 E-R다이어그램 구현
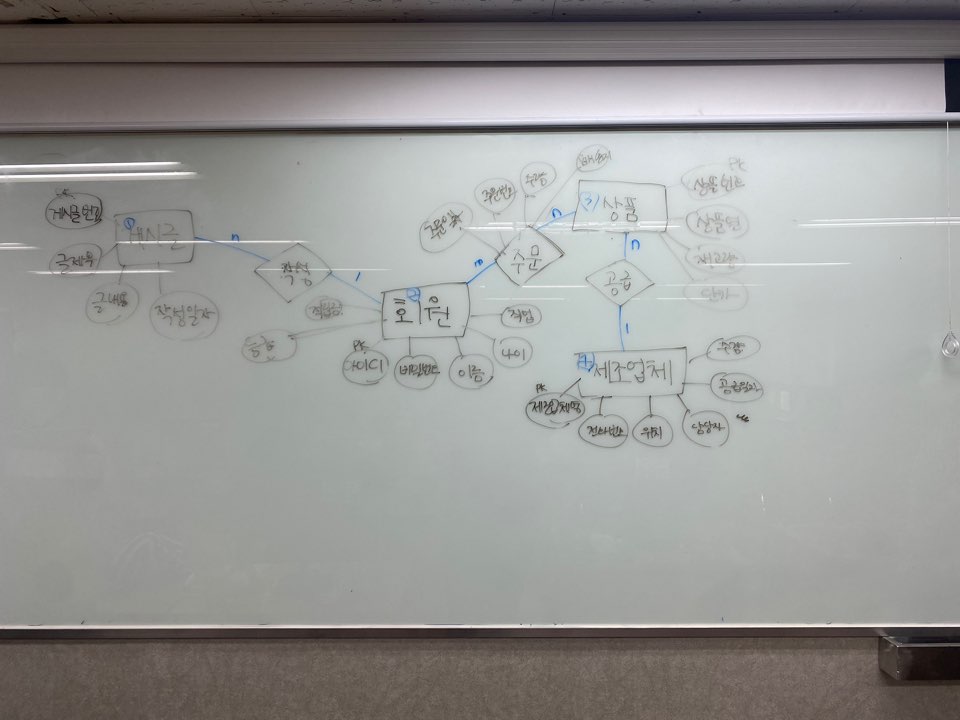
사진 더보기↓


주소주소주소
'코딩 > 수업 정리' 카테고리의 다른 글
| 21.02.05 [053] Fri (0) | 2021.02.05 |
|---|---|
| 21.02.04 [052] Thu (0) | 2021.02.04 |
| 21.02.02 [050] Tue (0) | 2021.02.02 |
| 21.02.01 [049] Mon (0) | 2021.02.01 |
| 21.01.29 [048] Fri (0) | 2021.01.29 |


댓글